<?xml version="1.0" encoding="utf-8"?>
<feed xmlns="http://www.w3.org/2005/Atom">
  <title>jiyiren</title>
  
  <subtitle>AI有趣工具，梯子购买，翻墙服务器合集，GPU 服务器选择，ChatGPT 如何注册，ChatGPT 如何访问，Midjourney 如何注册访问，分享各种网络云盘资源、视频课程、BT种子、磁力链接、高清电影电视剧和羊毛福利，收集各种有趣实用的软件和APP的下载、安装、使用方法，发现一些稀奇古怪的的网站，折腾一些有趣实用的教程，关注谷歌苹果等互联网最新的资讯动态，探索新领域，发现新美好，分享小快乐</subtitle>
  <link href="https://jiyiren.github.io/atom.xml" rel="self"/>
  
  <link href="https://jiyiren.github.io/"/>
  <updated>2026-05-20T07:40:23.938Z</updated>
  <id>https://jiyiren.github.io/</id>
  
  <author>
    <name>jiyiren</name>
    
  </author>
  
  <generator uri="https://hexo.io/">Hexo</generator>
  
  <entry>
    <title>分享一个集成全球 550+ 大模型统一聚合平台</title>
    <link href="https://jiyiren.github.io/2026/05/20/aigc1024/"/>
    <id>https://jiyiren.github.io/2026/05/20/aigc1024/</id>
    <published>2026-05-20T01:07:25.000Z</published>
    <updated>2026-05-20T07:40:23.938Z</updated>
    
    <content type="html"><![CDATA[<p>今天给大家介绍一个集成全球 500+ 最新模型的平台：AIGC1024 平台，网址: <strong><a href="https://aigc1024.com" target="_blank" rel="noopener">aigc1024.com</a></strong> ，优势如下:</p><ul><li>✅ <strong>无需翻墙，不用梯子，国内丝滑访问；</strong></li><li>✅ <strong>无需信用卡，不用担心自动扣费问题；</strong></li><li>✅ <strong>支持支付宝、微信，即买即用，最低 1 元，用完再买；</strong></li><li>✅ 支持全球 500+ 主流大模型，<strong>ChatGPT、Gemini、Claude、Grok、Midjourney、HappyHorse、Seedance2.0、可灵、Veo</strong> 等等大模型！</li><li>✅ 支持 <strong>AI 对话、AI 图片、AI 视频、AI 音频</strong>等一切模型场景都支持！</li><li>✅ 支持 <strong>智能体，支持 OpenClaw，支持 Skills，支持 API</strong>！</li></ul><p><strong>AIGC1024 平台是实现大模型聚合一体化平台！</strong></p><p>AIGC1024 平台地址: <strong><a href="https://aigc1024.com" target="_blank" rel="noopener">https://aigc1024.com</a></strong></p><p><img src="https://img.hackersee.com/file/1779157875330_202605191031159.webp" alt></p><p>最近热门的 ChatGPT Image 2 图片生成模型 AIGC1024 平台最低 0.06 元/张图片，比官方便宜好几倍：</p><p><img src="https://img.hackersee.com/file/1779262036867_202605201527960.webp" alt></p><a id="more"></a><p>下面我按 ChatGPT Image 2 使用方法来示例一下：</p><h2 id="账号注册"><a href="#账号注册" class="headerlink" title="账号注册"></a>账号注册</h2><p>打开 AIGC1024 平台: <strong><a href="https://aigc1024.com" target="_blank" rel="noopener">https://aigc1024.com</a></strong> ，点击右上角开始使用：</p><p><img src="https://img.hackersee.com/file/1779155652768_202605190954199.webp" alt></p><p>支持手机登录、邮箱登录、密码登录，大家可以根据自己的需求进行注册登录。建议登录后设置登录密码！</p><p>注册登录后打开如下界面:</p><p><img src="https://img.hackersee.com/file/1779155805365_202605190956254.webp" alt></p><p>新用户注册登录后有 0.3 元现金奖励，可以生成 5 张 GPT Image 2 图片了，可以在右上角设置中心查看自己剩余的算力！</p><p>然后就可以来生成 GPT Image 2 模型图片了。</p><h2 id="图片生成"><a href="#图片生成" class="headerlink" title="图片生成"></a>图片生成</h2><p>点击左侧菜单栏的「图片」菜单，会列出很多图片生成模型，我们使用 GPT Image 2模型，这里有两个可供使用:</p><ul><li>模型<strong>【GPT Image 2】</strong>👍: 这个是 AIGC1024 平台渠道模型，按张付费，一张最低 0.06 元，大约 $0.01 刀/张，非常便宜！推荐用这个。</li><li>模型<strong>【GPT Image 2 官转】</strong>: 这个是官方模型，按 Token 消费量付费，按官方统一计价，稍微贵点。</li></ul><p><img src="https://img.hackersee.com/file/1779156079467_202605191001469.webp" alt></p><p>这里我先用模型【GPT Image 2】来生成:</p><ul><li>选择模型</li><li>输入提示词</li><li>选择宽高比和图片质量</li><li>可以看到右侧一张图片生成费用只要 0.06 元一张<br><img src="https://img.hackersee.com/file/1779156786107_202605191013684.webp" alt></li></ul><p>回车提交任务后会进入生成队列，一会儿就生成完了:</p><p><img src="https://img.hackersee.com/file/1779156921512_202605191015307.webp" alt></p><p>可以看下高清大图(下图已被我压缩了画质):<br><img src="https://img.hackersee.com/file/1779156953549_202605191015724.webp" alt></p><p>我再使用模型<strong>【GPT Image 2 官转】</strong>来生成:</p><p><img src="https://img.hackersee.com/file/1779157011916_202605191016932.webp" alt></p><p>效果图如下:<br><img src="https://img.hackersee.com/file/1779157027692_202605191016246.webp" alt></p><p>这个官转模型看不到消耗了多少算力值，可以到右上角设置中心查看最近生成的图片，点击详细信息就行了：<br><img src="https://img.hackersee.com/file/1779157079980_202605191017060.webp" alt></p><p>所以模型<strong>【GPT Image 2 官转】</strong>一张图片大约 0.1 元，比<strong>【GPT Image 2】</strong>这个模型贵一点。</p><p>综上所述，我建议大家使用模型<strong>【GPT Image 2】</strong>来生成图片，一张只要 0.06 元!</p><h2 id="AIGC1024-更多使用说明"><a href="#AIGC1024-更多使用说明" class="headerlink" title="AIGC1024 更多使用说明"></a>AIGC1024 更多使用说明</h2><p>登录进入平台后，左侧菜单区：</p><ul><li>第一栏为：<strong>大模型、智能体、灵感广场</strong>菜单</li><li>第二栏为：第一栏的子菜单<ul><li>大模型包括：<strong>全部、聊天、图片、视频、音频</strong>菜单，这些都是和 AI 大模交互的。<br>左下角为用户名信息，右侧充值区可以按需使用充值，非包年包月，用多少充多少，最低1元起。</li></ul></li></ul><h3 id="AI-聊天"><a href="#AI-聊天" class="headerlink" title="AI 聊天"></a>AI 聊天</h3><p>下面为 AI 聊天大模型截图，左侧向下滑动还有很多模型，选择一个模型，右侧直接对话即可:</p><p><img src="https://img.hackersee.com/file/1779157307083_202605191021973.webp" alt></p><h3 id="AI-图片"><a href="#AI-图片" class="headerlink" title="AI 图片"></a>AI 图片</h3><p>面为 AI 图片大模型界面截图，左侧下滑还有很多模型，选择一个模型，右侧直接交互对话即可：</p><p><img src="https://img.hackersee.com/file/1779157340482_202605191022660.webp" alt></p><h3 id="AI-视频"><a href="#AI-视频" class="headerlink" title="AI 视频"></a>AI 视频</h3><p>下面为 AI 视频大模型界面截图，左侧下滑还有很多模型，选择一个模型，右侧直接交互对话即可：</p><p><img src="https://img.hackersee.com/file/1779157366407_202605191022611.webp" alt></p><h3 id="AI-音频"><a href="#AI-音频" class="headerlink" title="AI 音频"></a>AI 音频</h3><p>下面为 AI 音频大模型界面截图，选择一个模型，右侧直接对话交互即可：</p><p><img src="https://img.hackersee.com/file/1779157392369_202605191023236.webp" alt></p><h3 id="AI-智能体"><a href="#AI-智能体" class="headerlink" title="AI 智能体"></a>AI 智能体</h3><p>点击左侧一级菜单的「智能体」就进入智能体交互页面，如下所示：</p><p><img src="https://img.hackersee.com/file/1779157423632_202605191023883.webp" alt></p><p>包含了：</p><ul><li>API 开放接口</li><li>无限画布</li><li>电商一键生图</li><li>通用一键生图</li><li>OpenClaw</li><li>AI漫剧-S2.0</li><li>AI漫剧-剧情版</li><li>AI 漫剧-解说版</li><li>智能多帧<br>多种智能体均可无限制使用，模型，市场，分辨率等等参数均可自定义。</li></ul><h3 id="开放-API"><a href="#开放-API" class="headerlink" title="开放 API"></a>开放 API</h3><p>在整个平台支持 API token 接入，也支持 SKILL.md，你本地的智能体也能完全使用 AIGC1024 平台的所有大模型:</p><p><img src="https://img.hackersee.com/file/1779157560315_202605191025841.webp" alt></p><p>文档如下:</p><p><img src="https://img.hackersee.com/file/1779157662057_202605191027958.webp" alt></p><h3 id="灵感广场"><a href="#灵感广场" class="headerlink" title="灵感广场"></a>灵感广场</h3><p>点击左侧一级菜单的「灵感广场」，就可以查看别人分享的 Prompt 提示词和图片、视频结果示例了，参考别人的自己再做出自己的创意图片或视频。</p><p><img src="https://img.hackersee.com/file/1779157456783_202605191024241.webp" alt></p><p>视频参考 Prompt，非常多：</p><p><img src="https://img.hackersee.com/file/1779157470190_202605191024832.webp" alt></p><h2 id="总结"><a href="#总结" class="headerlink" title="总结"></a>总结</h2><p><strong><a href="https://aigc1024.com" target="_blank" rel="noopener">AIGC1024</a></strong> 是一个集成了全球 500+ 最新模型的统一 AI 平台:</p><ul><li>✅ 无需翻qiang，不用梯子，国内丝滑访问；</li><li>✅ 无需信用卡，不用担心自动扣费问题；</li><li>✅ 支持支付宝、微信，即买即用，最低可冲 1 元，用完再买；</li><li>✅ 支持全球 500+ 主流大模型，ChatGPT、Gemini、Claude、Grok、Midjourney、HappyHorse、Seedance2.0、可灵、Veo 等等大模型全都支持！</li><li>✅ 支持 AI 对话、AI 图片、AI 视频、AI 音频一切模型场景都支持！</li><li>✅ 支持智能体，支持 OpenClaw，支持 Skills，支持 API，实现大模型聚合一体化平台！</li></ul><p>官网网址: <strong><a href="https://aigc1024.com" target="_blank" rel="noopener">https://aigc1024.com</a></strong> , 是国内 AIGC 用户的不二之选！！</p>]]></content>
    
    
    <summary type="html">&lt;p&gt;今天给大家介绍一个集成全球 500+ 最新模型的平台：AIGC1024 平台，网址: &lt;strong&gt;&lt;a href=&quot;https://aigc1024.com&quot; target=&quot;_blank&quot; rel=&quot;noopener&quot;&gt;aigc1024.com&lt;/a&gt;&lt;/strong&gt; ，优势如下:&lt;/p&gt;
&lt;ul&gt;
&lt;li&gt;✅ &lt;strong&gt;无需翻墙，不用梯子，国内丝滑访问；&lt;/strong&gt;&lt;/li&gt;
&lt;li&gt;✅ &lt;strong&gt;无需信用卡，不用担心自动扣费问题；&lt;/strong&gt;&lt;/li&gt;
&lt;li&gt;✅ &lt;strong&gt;支持支付宝、微信，即买即用，最低 1 元，用完再买；&lt;/strong&gt;&lt;/li&gt;
&lt;li&gt;✅ 支持全球 500+ 主流大模型，&lt;strong&gt;ChatGPT、Gemini、Claude、Grok、Midjourney、HappyHorse、Seedance2.0、可灵、Veo&lt;/strong&gt; 等等大模型！&lt;/li&gt;
&lt;li&gt;✅ 支持 &lt;strong&gt;AI 对话、AI 图片、AI 视频、AI 音频&lt;/strong&gt;等一切模型场景都支持！&lt;/li&gt;
&lt;li&gt;✅ 支持 &lt;strong&gt;智能体，支持 OpenClaw，支持 Skills，支持 API&lt;/strong&gt;！&lt;/li&gt;
&lt;/ul&gt;
&lt;p&gt;&lt;strong&gt;AIGC1024 平台是实现大模型聚合一体化平台！&lt;/strong&gt;&lt;/p&gt;
&lt;p&gt;AIGC1024 平台地址: &lt;strong&gt;&lt;a href=&quot;https://aigc1024.com&quot; target=&quot;_blank&quot; rel=&quot;noopener&quot;&gt;https://aigc1024.com&lt;/a&gt;&lt;/strong&gt;&lt;/p&gt;
&lt;p&gt;&lt;img src=&quot;https://img.hackersee.com/file/1779157875330_202605191031159.webp&quot; alt&gt;&lt;/p&gt;
&lt;p&gt;最近热门的 ChatGPT Image 2 图片生成模型 AIGC1024 平台最低 0.06 元/张图片，比官方便宜好几倍：&lt;/p&gt;
&lt;p&gt;&lt;img src=&quot;https://img.hackersee.com/file/1779262036867_202605201527960.webp&quot; alt&gt;&lt;/p&gt;</summary>


    <category term="AI" scheme="https://jiyiren.github.io/categories/AI/"/>
    
    
    <category term="账号" scheme="https://jiyiren.github.io/tags/账号/"/>
    
    <category term="ChatGPT" scheme="https://jiyiren.github.io/tags/ChatGPT/"/>
    
    <category term="Midjourney" scheme="https://jiyiren.github.io/tags/Midjourney/"/>
    
    <category term="AIGC1024" scheme="https://jiyiren.github.io/tags/AIGC1024/"/>
    
  </entry>
  
  <entry>
    <title>红杏云代理官方客户端使用方法</title>
    <link href="https://jiyiren.github.io/2026/03/31/fqhongxing/"/>
    <id>https://jiyiren.github.io/2026/03/31/fqhongxing/</id>
    <published>2026-03-31T03:16:40.000Z</published>
    <updated>2026-07-21T02:44:29.771Z</updated>
    
    <content type="html"><![CDATA[<p align="center" style="margin: 30px 0 35px;">本文不提供翻墙服务，只作为技术交流教程！</p><p>很多人看了这篇文章 <a href="/2025/01/09/fanqianghx/">最新稳定翻墙服务：高速代理翻墙，支持全球28多个国家，4K流媒体秒播，支持奈飞GPT等流媒体</a> 选择使用红杏云科学上网。(不要干违法的事情，专注于学习)。</p><p>但是最近，无论是使用 V2RayNG、Clash 还是 FiClash 等等各种开源工具都显示连接超时情况。今天教大家使用官方代理 APP 来使用代理，速度和效率更快更好。</p><p><img src="https://githubblog.s3.bitiful.net/blog/202603311304128.webp" alt></p><p><img src="https://githubblog.s3.bitiful.net/blog/202603311243990.webp" alt></p><a id="more"></a><h2 id="前言说明"><a href="#前言说明" class="headerlink" title="前言说明"></a>前言说明</h2><p>最近使用 FiClash 代理情况如下，直接不能使用了：</p><p><img src="https://githubblog.s3.bitiful.net/blog/202603311156612.webp" alt></p><p>这极大地影响外网使用效率，这是因为最近国家的防火墙又升级了，各种开源工具代码应该都学习了代理模式，导致防火墙应对策略更多，而有了 AI 的加持，国家封杀将会更加严格。</p><p>所以，未来各家的代理平台会逐渐推出自己家的不公开私有协议工具，红杏云也推出了自己的代理工具，这个是目前还能使用的唯一方式了。</p><p>我们登录到红杏后台，可以看到有通知消息:</p><p><img src="https://githubblog.s3.bitiful.net/blog/202603311157376.webp" alt></p><p>点开看看，如下所示，消息说 4月1日之后就不再支持 <strong>普通APP链路</strong> 了，这个普通 APP 链路就是开源的代理工具链路，从而大家必须要切换为 <strong>红杏 APP 端</strong> 使用。</p><p><img src="https://githubblog.s3.bitiful.net/blog/202603311158770.webp" alt></p><p>那红杏 APP 端在哪里下载呢？红杏后台的客户端那里都是开源客户端：</p><p><img src="https://githubblog.s3.bitiful.net/blog/202603311201561.webp" alt></p><h2 id="客户端下载入口"><a href="#客户端下载入口" class="headerlink" title="客户端下载入口"></a>客户端下载入口</h2><p>目前红杏的客户端 APP 下载还没在客户端类目里展示，而是在网站公告那里，点击下一条就有<strong>红杏云客户端通知（必读）</strong>如下：</p><p><img src="https://githubblog.s3.bitiful.net/blog/202603311157011.webp" alt></p><p>点开消息，就有红杏官方客户端所有平台的下载地址：</p><p><img src="https://githubblog.s3.bitiful.net/blog/202603311158707.webp" alt></p><p><del>我将各个平台的地址复制下来了，可能未来官方会更新替换，建议大家可以先去官网查看最新链接</del>:</p><ul><li><del>苹果IOS版：<a href="https://testflight.apple.com/join/McVthqwk" target="_blank" rel="noopener">点击下载</a> ，注意：苹果IOS版为TF版，需要先下载TestFlight，国区美区账号均可下载，然后再次点击安装，打开软件后输入：红杏云 ，即可进入正常输入账号使用！</del></li><li><del>Windows 10/11 版：<a href="https://down.hx.luckydownload.vip/hongxingyun_3.0.5_x64-setup.exe" target="_blank" rel="noopener">点击下载</a></del></li><li><del>macOS Intel 芯片：<a href="https://down.hx.luckydownload.vip/hongxingyun_3.0.5-Intel-x64.dmg" target="_blank" rel="noopener">点击下载</a></del></li><li><del>macOS Apple M 系列芯片：<a href="https://down.hx.luckydownload.vip/hongxingyun_3.0.5-M-arm64.dmg" target="_blank" rel="noopener">点击下载</a></del></li><li><del>Android 安卓版：<a href="https://down.hx.luckydownload.vip/hongxingyun_v2.0.0-release.apk" target="_blank" rel="noopener">点击下载</a></del></li></ul><p>我看到官网已经更新了各个平台软件下载地址了：</p><ul><li><p>官方说明地址: <a href="https://hongxingdl.one/web/#/docsDetail?id=25" target="_blank" rel="noopener">点我直达</a> 如下图所示：<br>  <img src="https://githubblog.s3.bitiful.net/blog/202607211041040.webp" alt></p></li><li><p>官方专属代理软件下载地址: <a href="https://nexpath.vip/" target="_blank" rel="noopener">https://nexpath.vip/</a> 如下图所示：</p><p>  <img src="https://githubblog.s3.bitiful.net/blog/202607211043945.webp" alt></p></li></ul><p>自己根据自己的平台选择对应的客户端下载即可。</p><p>首次打开软件会让填写服务码，记住服务码为: <strong>红杏云</strong></p><h2 id="客户端使用"><a href="#客户端使用" class="headerlink" title="客户端使用"></a>客户端使用</h2><p>开源的代理平台网上教程很多，但是红杏这个官方 APP 才出来，可能还没有使用方法，这里我大概截图演示下方法。我使用 Mac 和 Android 来演示下。</p><h3 id="红杏-Mac-APP-客户端使用"><a href="#红杏-Mac-APP-客户端使用" class="headerlink" title="红杏 Mac APP 客户端使用"></a>红杏 Mac APP 客户端使用</h3><p>下载对应的 Mac 客户端后（我是 ARM 版本的 Mac ）如下：</p><p><img src="https://githubblog.s3.bitiful.net/blog/202603311224430.webp" alt></p><p>双击安装包打开如下，将红杏云拖入 Applications 就行:</p><p><img src="https://githubblog.s3.bitiful.net/blog/202603311225364.webp" alt></p><p>然后在 Mac 菜单列表搜索红杏云即可:</p><p><img src="https://githubblog.s3.bitiful.net/blog/202603311226156.webp" alt></p><p>点击打开，可能会出现如下 <strong>已损坏</strong> 提示:</p><p><img src="https://githubblog.s3.bitiful.net/blog/202603311226536.webp" alt></p><p>不用害怕，红杏云官方已经给出了修复方法:</p><p><img src="https://githubblog.s3.bitiful.net/blog/202603311227472.webp" alt></p><p>双击打开:</p><p><img src="https://githubblog.s3.bitiful.net/blog/202603311227677.webp" alt></p><p>两种方法都可以试试，我是直接使用第一种方法就行了，命令行里输入后，输入密码，然后回车。然后重新打开就行了。</p><p><img src="https://githubblog.s3.bitiful.net/blog/202603311229832.webp" alt></p><p>重新打开红杏云客户端，如下界面，登录红杏云的账号和密码就行:</p><p><img src="https://githubblog.s3.bitiful.net/blog/202603311229319.webp" alt></p><p>登录完成后：</p><p><img src="https://githubblog.s3.bitiful.net/blog/202603311230249.webp" alt></p><p>底部有菜单:</p><ul><li>仪表盘: 代理整体概览</li><li>我的: 我的套餐、使用量、以及通知消息。</li><li>商店：官方的套餐列表</li><li>邀请: 邀请的用户情况</li><li>订单: 购买的订单记录</li><li>更多：个人资料、配置、修改密码、连接管理、流量明细等等。</li></ul><p>实际上最有用的就是 <strong>仪表盘</strong> 了，其他的大家可以自己探索，因为我们只想要能科学上网就行。</p><p>在仪表盘，首先看 <strong>当前节点</strong> 情况:</p><p><img src="https://githubblog.s3.bitiful.net/blog/202603311235611.webp" alt></p><p>点击 <strong>当前节点</strong> 出现下面所有代理节点列表，可以自己选择节点，或者刷新订阅:</p><p><img src="https://githubblog.s3.bitiful.net/blog/202603311236900.webp" alt></p><p>这里如果大家是空白的，先点击刷新订阅，如果刷新订阅也没有的，大家关闭客户端，重新打开应该就会有的。再没有就推出登录重新登录。</p><p>然后，有节点列表后，看下这个两个代理方式:</p><p><img src="https://githubblog.s3.bitiful.net/blog/202603311238731.webp" alt></p><p>上面框起来是代理本机的两种方式，有什么区别？右边有个问号点击可以查看:</p><p><img src="https://githubblog.s3.bitiful.net/blog/202603311239959.webp" alt></p><p>这里我总结下:</p><ul><li>虚拟网卡: 是客户端给电脑安装一个虚拟网卡桥接方式，本机的所有流量都会走代理的。</li><li>系统代理: 是仅仅开启系统代理，一般只有浏览器会经过代理。</li></ul><p>这里大家如果仅仅想要通过浏览器查查 Google，上上 Youtube 或者 X 平台，那么建议用 <strong>系统代理</strong> 就足够了。如果你还有一些客户端想要上外网的，又不会配置代理，那么建议用 <strong>虚拟网卡</strong> 模式。这里大家自己选择。</p><p>我这里只用 <strong>系统代理</strong>，所以点击 <strong>系统代理</strong> 即可：</p><p><img src="https://githubblog.s3.bitiful.net/blog/202603311243990.webp" alt></p><p>打开浏览器访问谷歌，可以访问了:</p><p><img src="https://githubblog.s3.bitiful.net/blog/202603311244223.webp" alt></p><p>如果大家有用我之前推荐的 ZeroOmega 浏览器代理插件的话，需要选择系统代理即可（没有使用的忽略）:</p><p><img src="https://githubblog.s3.bitiful.net/blog/202603311245335.webp" alt></p><p>好了，这样大家就可以科学上网了。要想关闭代理，点击那个圆点就可以关闭了。</p><h3 id="红杏-Android-安卓客户端使用"><a href="#红杏-Android-安卓客户端使用" class="headerlink" title="红杏 Android 安卓客户端使用"></a>红杏 Android 安卓客户端使用</h3><p>安卓使用则相似，安装应用后，打开登录即可:</p><p><img src="https://githubblog.s3.bitiful.net/blog/202603311248585.webp" alt></p><p><img src="https://githubblog.s3.bitiful.net/blog/202603311252436.webp" alt></p><p>界面分为:</p><ul><li>仪表盘: 套餐情况</li><li>代理: 代理连接操作，是主要操作入口</li><li>套餐：套餐情况</li><li>我的: 账号情况，邀请信息，修改密码等等都在这里。</li></ul><p>这里我们主要使用 <strong>代理</strong> 菜单即可。</p><ul><li>VPN 未连接：这个就是连接状态，上面的按钮是可以点击的，点击就可以连接代理了</li><li>节点列表：则是可用节点列表</li><li>代理模式：有 规则模式(默认)，全局模式、直连模式。建议默认使用规则模式就行</li><li>刷新订阅: 就是刷新订阅的节点列表。</li></ul><p>点击最大的 <strong>连接按钮</strong> ，需要先增加 一个 VPN 连接，点击确定即可:</p><p><img src="https://githubblog.s3.bitiful.net/blog/202603311256775.webp" alt></p><p><img src="https://githubblog.s3.bitiful.net/blog/202603311256492.webp" alt></p><p>打开 Youtube 或者 Google 就都可以使用了。对于代理模式，规则模式就是这红杏代理会根据是否是大陆的 IP 自动选择是否走代理。有时候如果你需要全局走代理，那么代理模式选择全局代理即可。</p><p>网页打开 Youtube 速度非常快，且更加稳定:</p><p><img src="https://githubblog.s3.bitiful.net/blog/202603311304128.webp" alt></p><h2 id="参考"><a href="#参考" class="headerlink" title="参考"></a>参考</h2><p>红杏官网入口:</p><ul><li>地址1: <a href="https://hongxingdl.one/web/#/login?code=q3fYRALY" target="_blank" rel="noopener">https://hongxingdl.one</a></li><li>地址1: <a href="https://hongxingdl.love/web/#/login?code=7DMqlIHX" target="_blank" rel="noopener">https://hongxingdl.love</a></li><li>地址1: <a href="https://hongxingdl.it/web/#/login?code=co807yjf" target="_blank" rel="noopener">https://hongxingdl.it</a></li><li>地址1: <a href="https://hongxingdl.club/web/#/login?code=7nqjtGCl" target="_blank" rel="noopener">https://hongxingdl.club</a></li><li>地址1: <a href="https://hongxingdl.co/web/#/login?code=CFzmn7Rk" target="_blank" rel="noopener">https://hongxingdl.co</a></li></ul>]]></content>
    
    
    <summary type="html">&lt;p align=&quot;center&quot; style=&quot;margin: 30px 0 35px;&quot;&gt;本文不提供翻墙服务，只作为技术交流教程！&lt;/p&gt;

&lt;p&gt;很多人看了这篇文章 &lt;a href=&quot;/2025/01/09/fanqianghx/&quot;&gt;最新稳定翻墙服务：高速代理翻墙，支持全球28多个国家，4K流媒体秒播，支持奈飞GPT等流媒体&lt;/a&gt; 选择使用红杏云科学上网。(不要干违法的事情，专注于学习)。&lt;/p&gt;
&lt;p&gt;但是最近，无论是使用 V2RayNG、Clash 还是 FiClash 等等各种开源工具都显示连接超时情况。今天教大家使用官方代理 APP 来使用代理，速度和效率更快更好。&lt;/p&gt;
&lt;p&gt;&lt;img src=&quot;https://githubblog.s3.bitiful.net/blog/202603311304128.webp&quot; alt&gt;&lt;/p&gt;
&lt;p&gt;&lt;img src=&quot;https://githubblog.s3.bitiful.net/blog/202603311243990.webp&quot; alt&gt;&lt;/p&gt;</summary>


    <category term="翻墙" scheme="https://jiyiren.github.io/categories/翻墙/"/>
    
    <category term="梯子" scheme="https://jiyiren.github.io/categories/翻墙/梯子/"/>
    
    <category term="代理" scheme="https://jiyiren.github.io/categories/翻墙/梯子/代理/"/>
    
    
    <category term="ChatGPT" scheme="https://jiyiren.github.io/tags/ChatGPT/"/>
    
    <category term="梯子" scheme="https://jiyiren.github.io/tags/梯子/"/>
    
    <category term="代理" scheme="https://jiyiren.github.io/tags/代理/"/>
    
    <category term="翻墙" scheme="https://jiyiren.github.io/tags/翻墙/"/>
    
    <category term="Youtube" scheme="https://jiyiren.github.io/tags/Youtube/"/>
    
    <category term="Shadowsocks" scheme="https://jiyiren.github.io/tags/Shadowsocks/"/>
    
    <category term="V2Ray" scheme="https://jiyiren.github.io/tags/V2Ray/"/>
    
    <category term="Clash" scheme="https://jiyiren.github.io/tags/Clash/"/>
    
    <category term="红杏云" scheme="https://jiyiren.github.io/tags/红杏云/"/>
    
  </entry>
  
  <entry>
    <title>最新稳定翻墙服务：高速代理翻墙，支持全球28多个国家，4K流媒体秒播，支持奈飞GPT等流媒体</title>
    <link href="https://jiyiren.github.io/2025/01/09/fanqianghx/"/>
    <id>https://jiyiren.github.io/2025/01/09/fanqianghx/</id>
    <published>2025-01-09T06:16:40.000Z</published>
    <updated>2026-03-31T05:09:34.953Z</updated>
    
    <content type="html"><![CDATA[<p align="center" style="margin: 30px 0 35px;">本文不提供翻墙服务，只作为技术交流教程！</p><p><strong>2026年3月31日更新</strong>: 下面的<a href="https://hongxingdl.one/web/#/login?code=q3fYRALY" target="_blank" rel="noopener">红杏云</a>很多人反应用开源的代理工具会无法使用，今天更新使用 <a href="/2026/03/31/fqhongxing/">红杏云代理官方客户端使用方法</a>，再也不用担心节点被封了，官方使用了私有协议，速度更快，稳定性更高。</p><hr><p>今天给大家带来一种稳定的<strong>最新的翻墙教程</strong>，高速代理翻墙平台，支持全球28+国家，4K流媒体秒播，支持奈飞GPT等流媒体，只需几步就可以轻松搭建一个可以非常流畅访问 Youtube、ChatGPT、Netflix 平台的梯子。</p><p><img src="https://githubblog.s3.bitiful.net/blog/202501091624829.webp" alt></p><p><img src="https://githubblog.s3.bitiful.net/blog/202501091631016.webp" alt></p><p>按下面的教程，只需要 5 分钟就能搭建一个稳定翻墙服务：</p><a id="more"></a><h2 id="介绍"><a href="#介绍" class="headerlink" title="介绍"></a>介绍</h2><p>今天给大家分享一个我使用的比较稳定的梯子，翻墙稳定，名字叫<strong>红杏云</strong>。</p><p>这是一家提供高速中转服务的网络机场：</p><ul><li>支持全球 28 个国家的流量转发。</li><li>该平台以其安全性和速度著称，用户可通过专线绕过防火墙，确保隐私保护。</li><li>红杏云提供多种套餐选择，包括低至 10 元包月套餐。</li><li>且无同时在线设备限制，适合流媒体解锁。</li></ul><p>用户还可以利用优惠码享受折扣，进一步提升性价比。</p><p><img src="https://githubblog.s3.bitiful.net/blog/202501091503359.webp" alt></p><h2 id="注册登录"><a href="#注册登录" class="headerlink" title="注册登录"></a>注册登录</h2><p>打开红杏云，地址有如下备用地址，点击就能打开:</p><ul><li>地址1: <a href="https://hongxingdl.one/web/#/login?code=q3fYRALY" target="_blank" rel="noopener">https://hongxingdl.one</a></li><li>地址1: <a href="https://hongxingdl.love/web/#/login?code=7DMqlIHX" target="_blank" rel="noopener">https://hongxingdl.love</a></li><li>地址1: <a href="https://hongxingdl.it/web/#/login?code=co807yjf" target="_blank" rel="noopener">https://hongxingdl.it</a></li><li>地址1: <a href="https://hongxingdl.club/web/#/login?code=7nqjtGCl" target="_blank" rel="noopener">https://hongxingdl.club</a></li><li>地址1: <a href="https://hongxingdl.co/web/#/login?code=CFzmn7Rk" target="_blank" rel="noopener">https://hongxingdl.co</a></li></ul><p>打开如下界面，填写你的邮箱，再输入两次密码就能注册成功。</p><p><img src="https://githubblog.s3.bitiful.net/blog/202501091513817.webp" alt></p><h2 id="选择套餐"><a href="#选择套餐" class="headerlink" title="选择套餐"></a>选择套餐</h2><p>登录后进入红杏云后台页面，选择左侧<strong>「购买套餐」</strong>菜单:</p><p><img src="https://githubblog.s3.bitiful.net/blog/202501091515322.webp" alt></p><p>我们可以看到如下套餐选项，限时套餐和限量套餐，两者说明如下:</p><ul><li><strong>限时套餐</strong>：可按月，按季购买，会限制时间和流量。这个套餐单 GB 流量会便宜，适合长期有翻墙需求，且用量较多的的用户。<br>  <img src="https://githubblog.s3.bitiful.net/blog/202501091515115.webp" alt></li></ul><ul><li><p><strong>限量套餐</strong>：按量购买，不限时间，流量用完即止。这个套餐流量无时间限制，适合用量较少，但长期有需要的用户。</p><p>  <img src="https://githubblog.s3.bitiful.net/blog/202501091517613.webp" alt></p></li></ul><p>这两个套餐大家可以按自己的需求购买，如果担心机场跑路，可以先买 10 元的限时套餐试试水，每个月有 222 GB 流量，带宽为 300Mbps，基本够个人使用了。</p><p>我来购买个 10元/月 套餐给大家做教程，如下:</p><p><img src="https://githubblog.s3.bitiful.net/blog/202501091525644.webp" alt></p><p>再点击下单如下图所示，选择微信/支付宝支付就行:</p><p><img src="https://githubblog.s3.bitiful.net/blog/202501091526622.webp" alt></p><p>支付成功后，在我的订单里可以看到支付成功的记录:</p><p><img src="https://githubblog.s3.bitiful.net/blog/202501091528435.webp" alt></p><p>在首页也能看到自己购买的套餐剩余的流量和天数：</p><p><img src="https://githubblog.s3.bitiful.net/blog/202501091530153.webp" alt></p><h2 id="如何使用"><a href="#如何使用" class="headerlink" title="如何使用"></a>如何使用</h2><p>如何使用上面购买的翻墙服务流量呢？我们还像之前<a href="https://jiyiren.github.io/2019/06/16/justmysocks/">搭建翻墙服务器</a>的情况，获得到一个账号和密码吗？</p><p>现在的翻墙平台普遍给的是一个订阅地址。</p><h3 id="订阅地址"><a href="#订阅地址" class="headerlink" title="订阅地址"></a>订阅地址</h3><p>我们购买红杏服务，实际上红杏平台为我们提供了很多台翻墙服务器，全球各个国家的都有。</p><p>我们可以点开左侧的节点状态可以看到如下:</p><p><img src="https://githubblog.s3.bitiful.net/blog/202501091534290.webp" alt></p><p>这些服务器都是红杏平台维护的，难道我们只能用其中一台服务吗？答案是否的，我们可以使用到所有的机器。因为如果我们使用的单台机器，如果单台机器挂了或者 IP 被墙了，那么使用就会有问题了，用户就会投诉。</p><p>因此为了解决上面单个机器故障问题，翻墙平台会直接提供一个 URL 链接，这个链接请求后会包含所有服务器的翻墙协议+密码。这个就称为<strong>【订阅地址】</strong>。</p><p>红杏平台也提供了这个订阅地址，我们打开首页，有个<strong>【复制链接】</strong>按钮，这个就是属于你的订阅地址，这个地址不要泄露给其他人，因为通过这个地址翻墙的数据流量都计算在你的套餐里的。</p><p><img src="https://githubblog.s3.bitiful.net/blog/202501091539642.webp" alt></p><h3 id="使用订阅地址"><a href="#使用订阅地址" class="headerlink" title="使用订阅地址"></a>使用订阅地址</h3><p>订阅地址的含义知道后，那我们只需要一个代理工具，解析这个地址得到所有服务器就行了。</p><p>目前的代理工具都是开源的，比较著名的就是 <strong>Clash 工具</strong>。这个工具仅仅是一个工具，里面没有订阅地址的话，是无法翻墙的。因此我们需要按照自己的平台下载对应的 Clash 工具就行。</p><p>红杏后台已经为我们准备好了，首页里有客户端下载:</p><p><img src="https://githubblog.s3.bitiful.net/blog/202501091544785.webp" alt></p><p>大家下载好工具后。下面分别给大家演示下 Windows 和 MacOS 系统的操作:</p><h3 id="Windows-Clash"><a href="#Windows-Clash" class="headerlink" title="Windows Clash"></a>Windows Clash</h3><p>Windows Clash 下载地址有这两种:</p><ul><li>Clash for Windows: <a href="https://github.com/Z-Siqi/Clash-for-Windows_Chinese/releases" target="_blank" rel="noopener">https://github.com/Z-Siqi/Clash-for-Windows_Chinese/releases</a></li><li>Clash Verge: <a href="https://github.com/clash-verge-rev/clash-verge-rev/releases" target="_blank" rel="noopener">https://github.com/clash-verge-rev/clash-verge-rev/releases</a></li></ul><p>上面是 Github 下载地址，你也可以去红杏后台里客户端下载，选择 Windows 下载也行的。安装好就行。</p><p>然后到红杏后台首页点击<strong>「复制链接」</strong>，然后打开 Clash 如下（我用的是英文版的 Clash for Windows，大家中文本对应就行）:</p><p><img src="https://githubblog.s3.bitiful.net/blog/202501091553534.webp" alt></p><p>我们点击 Profile，将复制的链接粘贴到红框框里：</p><p><img src="https://githubblog.s3.bitiful.net/blog/202501091554173.webp" alt></p><p><img src="https://githubblog.s3.bitiful.net/blog/202501091556978.webp" alt></p><p>点击 Download 后会出现「红杏云」订阅流量信息，这个就是你的订阅服务，且显示你的流量使用量，</p><p><img src="https://githubblog.s3.bitiful.net/blog/202501091557563.webp" alt></p><p>此时已经加载了订阅地址，但是仍然无法翻墙的：</p><p><img src="https://githubblog.s3.bitiful.net/blog/202501091559808.webp" alt></p><p>需要点击 General，打开 System Proxy 就行了。</p><p><img src="https://githubblog.s3.bitiful.net/blog/202501091602718.webp" alt></p><p>再此打开 Google:</p><p><img src="https://githubblog.s3.bitiful.net/blog/202501091604220.webp" alt></p><p><img src="https://githubblog.s3.bitiful.net/blog/202501091605249.webp" alt></p><h3 id="MacOS-Clash"><a href="#MacOS-Clash" class="headerlink" title="MacOS Clash"></a>MacOS Clash</h3><p>MacOS 上的 Clash 有两种：ClashX 和 Clash Pro。老版本的 MacOS 用 ClashX，M 芯片的用 Clash Pro，我电脑用的是 Clash Pro：</p><p><img src="https://githubblog.s3.bitiful.net/blog/202501091614645.webp" alt></p><p> Github 上地址为: <a href="https://github.com/bannedbook/ClashX/releases" target="_blank" rel="noopener">https://github.com/bannedbook/ClashX/releases</a></p><p> 或者走红杏后台有提供 ClashX 和 ClashPro 的下载方式。</p><p>Mac 上先装好 Clash Pro，然后在红杏后台，点击「Clash 订阅」点击后</p><p><img src="https://githubblog.s3.bitiful.net/blog/202501091618773.webp" alt></p><p>选择打开 Clash Pro 即可:</p><p><img src="https://githubblog.s3.bitiful.net/blog/202501091619745.webp" alt></p><p>然后回自动添加红杏云的订阅地址:</p><p><img src="https://githubblog.s3.bitiful.net/blog/202501091619911.webp" alt></p><p>然后，点击系统菜单栏，点击 Clash Pro 就能看到如下情况:</p><p><img src="https://githubblog.s3.bitiful.net/blog/202501091621793.webp" alt></p><p>如果浏览器没有 Proxy 相关的插件，选择勾选系统代理就行。打开 youtube 就能看了：</p><p><img src="https://githubblog.s3.bitiful.net/blog/202501091624829.webp" alt></p><p>其他客户端的教程红杏的客户端里都有提供，我就不给大家演示了。</p><ul><li>Android Clash 配置: <a href="https://hongxingdl.com/web/#/docsDetail?id=3" target="_blank" rel="noopener">https://hongxingdl.com/web/#/docsDetail?id=3</a></li><li>iOS 小火箭配置: <a href="https://hongxingdl.com/web/#/docsDetail?id=12" target="_blank" rel="noopener">https://hongxingdl.com/web/#/docsDetail?id=12</a></li></ul><h2 id="参考"><a href="#参考" class="headerlink" title="参考"></a>参考</h2><ul><li>Clash Mac <a href="https://github.com/bannedbook/ClashX/releases" target="_blank" rel="noopener">https://github.com/bannedbook/ClashX/releases</a></li><li>Clash Windows: <ul><li>Clash for Windows: <a href="https://github.com/Z-Siqi/Clash-for-Windows_Chinese/releases" target="_blank" rel="noopener">https://github.com/Z-Siqi/Clash-for-Windows_Chinese/releases</a></li><li>Clash Verge: <a href="https://github.com/clash-verge-rev/clash-verge-rev/releases" target="_blank" rel="noopener">https://github.com/clash-verge-rev/clash-verge-rev/releases</a></li></ul></li><li>Android Clash 配置: <a href="https://hongxingdl.com/web/#/docsDetail?id=3" target="_blank" rel="noopener">https://hongxingdl.com/web/#/docsDetail?id=3</a></li></ul>]]></content>
    
    
    <summary type="html">&lt;p align=&quot;center&quot; style=&quot;margin: 30px 0 35px;&quot;&gt;本文不提供翻墙服务，只作为技术交流教程！&lt;/p&gt;

&lt;p&gt;&lt;strong&gt;2026年3月31日更新&lt;/strong&gt;: 下面的&lt;a href=&quot;https://hongxingdl.one/web/#/login?code=q3fYRALY&quot; target=&quot;_blank&quot; rel=&quot;noopener&quot;&gt;红杏云&lt;/a&gt;很多人反应用开源的代理工具会无法使用，今天更新使用 &lt;a href=&quot;/2026/03/31/fqhongxing/&quot;&gt;红杏云代理官方客户端使用方法&lt;/a&gt;，再也不用担心节点被封了，官方使用了私有协议，速度更快，稳定性更高。&lt;/p&gt;
&lt;hr&gt;
&lt;p&gt;今天给大家带来一种稳定的&lt;strong&gt;最新的翻墙教程&lt;/strong&gt;，高速代理翻墙平台，支持全球28+国家，4K流媒体秒播，支持奈飞GPT等流媒体，只需几步就可以轻松搭建一个可以非常流畅访问 Youtube、ChatGPT、Netflix 平台的梯子。&lt;/p&gt;
&lt;p&gt;&lt;img src=&quot;https://githubblog.s3.bitiful.net/blog/202501091624829.webp&quot; alt&gt;&lt;/p&gt;
&lt;p&gt;&lt;img src=&quot;https://githubblog.s3.bitiful.net/blog/202501091631016.webp&quot; alt&gt;&lt;/p&gt;
&lt;p&gt;按下面的教程，只需要 5 分钟就能搭建一个稳定翻墙服务：&lt;/p&gt;</summary>


    <category term="翻墙" scheme="https://jiyiren.github.io/categories/翻墙/"/>
    
    <category term="梯子" scheme="https://jiyiren.github.io/categories/翻墙/梯子/"/>
    
    <category term="代理" scheme="https://jiyiren.github.io/categories/翻墙/梯子/代理/"/>
    
    
    <category term="ChatGPT" scheme="https://jiyiren.github.io/tags/ChatGPT/"/>
    
    <category term="梯子" scheme="https://jiyiren.github.io/tags/梯子/"/>
    
    <category term="代理" scheme="https://jiyiren.github.io/tags/代理/"/>
    
    <category term="翻墙" scheme="https://jiyiren.github.io/tags/翻墙/"/>
    
    <category term="Youtube" scheme="https://jiyiren.github.io/tags/Youtube/"/>
    
    <category term="Shadowsocks" scheme="https://jiyiren.github.io/tags/Shadowsocks/"/>
    
    <category term="V2Ray" scheme="https://jiyiren.github.io/tags/V2Ray/"/>
    
    <category term="Clash" scheme="https://jiyiren.github.io/tags/Clash/"/>
    
    <category term="红杏云" scheme="https://jiyiren.github.io/tags/红杏云/"/>
    
  </entry>
  
  <entry>
    <title>香港10大银行最全开户攻略</title>
    <link href="https://jiyiren.github.io/2024/12/18/hongkong_bank/"/>
    <id>https://jiyiren.github.io/2024/12/18/hongkong_bank/</id>
    <published>2024-12-18T01:07:25.000Z</published>
    <updated>2024-12-18T05:42:55.887Z</updated>
    
    <content type="html"><![CDATA[<p>赴港旅游、购物血拼、商业谈判、为孩子汇学费或生活费，还是投资港股、美股，进行境外资产配置或购买海外理财保险…这一切的一切，都离不开一张香港银行卡。那你是否曾为申请香港银行账户而感到困扰？</p><p><img src="https://githubblog.s3.bitiful.net/blog/202412181342406.webp" alt></p><p>现在，办理香港银行账户的门槛越来越高。别担心，这边为你整理了一份详详细的资料，内含香港 10 大银行开户攻略，让你轻松搞定香港银行开户！</p><h2 id="一、香港汇丰银行（公户-amp-个户）"><a href="#一、香港汇丰银行（公户-amp-个户）" class="headerlink" title="一、香港汇丰银行（公户&amp;个户）"></a>一、香港汇丰银行（公户&amp;个户）</h2><p><img src="https://githubblog.s3.bitiful.net/blog/202412181156352.webp" alt></p><a id="more"></a><h3 id="01-公司账户"><a href="#01-公司账户" class="headerlink" title="01 公司账户"></a>01 公司账户</h3><p>①开户资料：</p><ul><li>A.香港公司全套资料，如果有做过审计报税，可提供审计报告和税表；</li><li>B.董事身份证、港澳通行证/护照、近三个月个人流水；</li><li>C.最近三个月的采购合同、销售合同、发票、货运单和报关单各 2 份；</li><li>D.近半年公司对账单；</li><li>E.大陆公司营业执照。</li></ul><p>②开户流程（过港）：</p><ul><li>A.提交开户资料给银行经理预审；</li><li>B.银行经理电话联系董事 KYC 尽职调查；</li><li>C.审核完成后 3-5 个工作日出面签时间；</li><li>D.按时到香港指定分行面签；</li><li>E.开户成功，当天可取得编码器和密码信。</li></ul><h3 id="02-个人账户"><a href="#02-个人账户" class="headerlink" title="02 个人账户"></a>02 个人账户</h3><p>①开户资料：</p><ul><li>A.身份证、港澳通行证或护照;</li><li>B.过港小票（过关时海关会提供）；</li><li>C.银行 KYC 表格；</li><li>D.个人地址证明（如水电费单发票等）。</li></ul><p>②开户方案：</p><p>方案一：</p><ul><li>A.年龄要求：22-55 岁；</li><li>B.存款要求：存款 50 万（三个月）；</li><li>C.开户方式：国内汇丰柜台办理；</li><li>D.开户周期：4-6 周；</li><li>E.开户城市：全国汇丰分行皆可办理。</li></ul><p>方案二：</p><ul><li>A.年龄要求：22-25 岁；</li><li>B.存款要求：存款 3.5 万（即每月 3.5 万流水）；</li><li>C.开户方式：国内汇丰柜台办理；</li><li>D.开户周期：4-6 周；</li><li>E.开户城市：北京、上海、深圳、广州、天津。</li></ul><p>03 开户流程：</p><p>内地见证：</p><ul><li>A.提交开户资料到我司进行初审；</li><li>B.由我司提交银行审核，预约分行办理；</li><li>C.指定分行办理内地汇丰账户，存入资金；</li><li>D.2-4 周可接到汇丰银行电汇；</li><li>E.收到银行邮件，按指示操作；</li><li>F.接银行回访电话，确认个人开户信息；</li><li>G.收到实体卡后，只需激活即可正常使用。</li></ul><p>过港开户：</p><ul><li>A.准备开户资料；</li><li>B.提前预约开户时间；</li><li>C.开户本人携带开户资料，亲自前往香港指定汇丰网点进行办理；</li><li>D.现场开立香港汇丰银行账户，当场下账户</li></ul><h2 id="二、香港渣打银行（公户-amp-个户）"><a href="#二、香港渣打银行（公户-amp-个户）" class="headerlink" title="二、香港渣打银行（公户&amp;个户）"></a>二、香港渣打银行（公户&amp;个户）</h2><p><img src="https://githubblog.s3.bitiful.net/blog/202412181335773.webp" alt></p><h3 id="01-公司账户-1"><a href="#01-公司账户-1" class="headerlink" title="01 公司账户"></a>01 公司账户</h3><p>①开户资料：</p><p>香港公司资料：</p><ul><li>A.公司注册证书、最新商业登记证、最新周年申报表/法团成立表和章程；</li><li>B.业务合同两套；</li><li>C.提单报关单；</li><li>D.公司近 3 个月的流水账单（如没有国内关联公司，必须要提供）。</li></ul><p>国内关联公司资料：</p><ul><li>A.营业执照；</li><li>B.近三个月增值税发票（采购及销售各 2）；</li><li>C.最近三个月的银行月结单。</li></ul><p>董事/股东个人资料：</p><ul><li>A.董事/股东的身份证、港澳通行证或护照；</li><li>B.董事/股东的近 3 个月银行流水；</li></ul><p>②开户流程（过港）：</p><ul><li>A.联系我司为您初审开户资料；</li><li>B.确认初审无误后，预约开户面签时间；</li><li>C.本人在面签时间携带开户资料，亲过港到指定的分行办理；</li><li>D.面签完成后，2-3 周完成开户；</li><li>E.激活账户后即可正常使用。</li></ul><h3 id="02-个人账户-1"><a href="#02-个人账户-1" class="headerlink" title="02 个人账户"></a>02 个人账户</h3><p>①开户资料：</p><ul><li>A.身份证（有效期 6 个月）；</li><li>B.护照/港澳通行证（有效期 6 个月）；</li><li>C.过港小票（过关时海关会提供）；</li><li>D.银行 KYC 表格；</li></ul><p>②开户流程（过港）：</p><ul><li>A.提交个人开户资料；</li><li>B.资料审核通过后，提前预约面签时间；</li><li>C.开户本人根据预约时间，携带开户资料，亲自过港到指定分行进行办理；</li><li>D.当场下账户，在线激活账户后即可使用。</li></ul><h2 id="三、香港创新银行（公户）"><a href="#三、香港创新银行（公户）" class="headerlink" title="三、香港创新银行（公户）"></a>三、香港创新银行（公户）</h2><p><img src="https://githubblog.s3.bitiful.net/blog/202412181334085.webp" alt></p><h3 id="01-公司账户-2"><a href="#01-公司账户-2" class="headerlink" title="01 公司账户"></a>01 公司账户</h3><p>①开户资料：</p><ul><li>A.注册证书、商业登记证、法团成立表、周年申报表、章程；</li><li>B.（董事和所有股东）身份证、港澳通行证或护照，过港小票（过关时海关会提供）；</li><li>C.两份业务合同（采购合同及销售合同），若有报关、提单、两套意向合同以及商业计划书，可提供；</li><li>D.若有香港公司的银行流水，审计报告或水单，可提供；</li><li>E.若有关联公司，可提供；</li><li>F.银行 KYC 表格。</li></ul><p>②开户流程（过港）：</p><ul><li>A.确认开户需求后，提交 KYC、身份证文件以及公司注册文件；</li><li>B.开户资质初审通过后，与我司签署相关合作协议；</li><li>C.递交资料，审核完成后 3 个工作日左右出面签时间；</li><li>D.按时携带开户资料，到指定分行进行面签，2-3 周完成开户。</li></ul><h2 id="四、香港东亚银行（公户-amp-个户）"><a href="#四、香港东亚银行（公户-amp-个户）" class="headerlink" title="四、香港东亚银行（公户&amp;个户）"></a>四、香港东亚银行（公户&amp;个户）</h2><p><img src="https://githubblog.s3.bitiful.net/blog/202412181159270.webp" alt></p><h3 id="01-公司账户-3"><a href="#01-公司账户-3" class="headerlink" title="01 公司账户"></a>01 公司账户</h3><p>①开户资料：</p><ul><li>A.香港公司基本资料（公司注册证书 CI、商业登记证 BR、NNC1/NAR1、如涉及股权变更需提供相应股权变更资料）；</li><li>B.香港公司业务合同两份（采购合同及销售合同）；</li><li>C.公司董事及股东身份证、通行证/护照、过港小票（过关时海关会提供）、近半年银行流水；</li><li>D.银行 KYC 表格；</li><li>E.国内公司营业执照及近半年银行流水，国内公司采购销售合同上下游对应的两套，需要增值税发票及提单（若有，可提供）；</li></ul><p>②开户流程（过港）：</p><ul><li>A.预先审核资料；</li><li>B.审核完成后 3 个工作日左右出面签时间；</li><li>C.按时亲自过港到指定分行进行面签；</li><li>D.面签完成后 2-3 周完成开户。</li></ul><h3 id="02-个人账户-2"><a href="#02-个人账户-2" class="headerlink" title="02 个人账户"></a>02 个人账户</h3><p>①开户资料：</p><ul><li>A.身份证、通行证/护照、过港小票（过关时海关会提供）；</li><li>B.银行 KYC 表格；</li><li>C.个人近三个月银行流水证明；</li><li>D.个人地址证明。</li></ul><p>②开户流程（过港）：</p><ul><li>A.预先审核资料；</li><li>B.预审后，提前预约面签时间；</li><li>C.根据预约时间，携带开户资料，亲自前往香港指定分行进行办理；</li><li>D.办理完成，当场下账户。</li></ul><h2 id="五、香港集友银行（公户-amp-个户）"><a href="#五、香港集友银行（公户-amp-个户）" class="headerlink" title="五、香港集友银行（公户&amp;个户）"></a>五、香港集友银行（公户&amp;个户）</h2><p><img src="https://githubblog.s3.bitiful.net/blog/202412181159378.webp" alt></p><h3 id="01-公司账户-4"><a href="#01-公司账户-4" class="headerlink" title="01 公司账户"></a>01 公司账户</h3><p>①开户资料：</p><ul><li>A.董事身份证、港澳通行证或护照、过港小票（过关时海关会提供）；</li><li>B.近半年个人银行流水账单；</li><li>C.香港公司完整资料(CI, BR, NNC1/NAR1)；</li><li>D.香港公司业务证明各 2 份（采购合同及销售合同）、商业计划书；</li><li>E.国内营业执照、对公流水账单(三个月左右)和业务证明各 2 份(若有，可提供）；</li></ul><p>②开户流程（过港）：</p><ul><li>A.预先审核资料；</li><li>B.审核完成后 3 个工作日左右出面签时间；</li><li>C.按时亲自过港到指定分行进行面签；</li><li>D.面签完成后 2-3 周完成开户。</li></ul><h3 id="02-个人账户-3"><a href="#02-个人账户-3" class="headerlink" title="02 个人账户"></a>02 个人账户</h3><p>①开户资料：</p><ul><li>A.身份证、通行证/护照，必须在有效期内；</li><li>B.过港小票（过关时海关会提供）；</li></ul><p>②开户流程（过港）：</p><ul><li>A.提交个人开户资料；</li><li>B.资料审核通过后，提前预约面签时间；</li><li>C.开户本人根据预约时间携带开户资料，亲自过港到指定分行进行办理；</li><li>D.办理完成，当场下账户。</li></ul><h2 id="六、中国银行-香港（个户）"><a href="#六、中国银行-香港（个户）" class="headerlink" title="六、中国银行-香港（个户）"></a>六、中国银行-香港（个户）</h2><p><img src="https://githubblog.s3.bitiful.net/blog/202412181200563.webp" alt></p><h3 id="01-个人账户"><a href="#01-个人账户" class="headerlink" title="01 个人账户"></a>01 个人账户</h3><p>①开户资料：</p><ul><li>A.身份证、通行证/护照；</li><li>B.过港小票（过关时会提供）；</li></ul><p>②开户流程（过港）：</p><ul><li>A.准备开户资料；</li><li>B.提前预约面签时间；</li><li>C.开户本人根据预约时间携带开户资料，亲自过港到指定分行进行办理；</li><li>D.办理完成，当场下账户。</li></ul><h2 id="七、香港招商永隆银行（个户）"><a href="#七、香港招商永隆银行（个户）" class="headerlink" title="七、香港招商永隆银行（个户）"></a>七、香港招商永隆银行（个户）</h2><p><img src="https://githubblog.s3.bitiful.net/blog/202412181200220.webp" alt></p><h3 id="01-个人账户-1"><a href="#01-个人账户-1" class="headerlink" title="01 个人账户"></a>01 个人账户</h3><p>①开户资料：</p><ul><li>A.身份证、通行证/护照；</li><li>B.过港小票（过关时会提供）；</li></ul><p>②开户流程（过港）：</p><ul><li>A.准备开户资料；</li><li>B.提前预约面签时间；</li><li>C.开户本人根据预约时间携带开户资料，亲自过港到指定分行进行办理；</li><li>D.办理完成，当场下账户。</li></ul><h2 id="八、香港花旗银行（个户）"><a href="#八、香港花旗银行（个户）" class="headerlink" title="八、香港花旗银行（个户）"></a>八、香港花旗银行（个户）</h2><p><img src="https://githubblog.s3.bitiful.net/blog/202412181201344.webp" alt></p><h3 id="01-个人账户-2"><a href="#01-个人账户-2" class="headerlink" title="01 个人账户"></a>01 个人账户</h3><p>①开户资料：</p><ul><li>A.身份证、通行证/护照；</li><li>B.过港小票（过关时会提供）；</li></ul><p>②开户流程（过港）：</p><ul><li>A.准备开户资料；</li><li>B.提前预约面签时间；</li><li>C.开户本人根据预约时间携带开户资料，亲自过港到指定分行进行办理；</li><li>D.办理完成，当场下账户。</li></ul><h2 id="九、交通银行-香港（个户）"><a href="#九、交通银行-香港（个户）" class="headerlink" title="九、交通银行-香港（个户）"></a>九、交通银行-香港（个户）</h2><p><img src="https://githubblog.s3.bitiful.net/blog/202412181202381.webp" alt></p><h3 id="01-个人账户-3"><a href="#01-个人账户-3" class="headerlink" title="01 个人账户"></a>01 个人账户</h3><p>①开户资料：</p><ul><li>A.身份证、通行证/护照；</li><li>B.过港小票（过关时会提供）；</li><li>C.开户本人根据预约时间携带开户资料，亲自过港到指定分行进行办理；</li></ul><h2 id="十、中国建设银行-亚洲（公户）"><a href="#十、中国建设银行-亚洲（公户）" class="headerlink" title="十、中国建设银行-亚洲（公户）"></a>十、中国建设银行-亚洲（公户）</h2><p><img src="https://githubblog.s3.bitiful.net/blog/202412181203062.webp" alt></p><h3 id="01-公司账户-5"><a href="#01-公司账户-5" class="headerlink" title="01 公司账户"></a>01 公司账户</h3><p>①开户资料：</p><ul><li>A.香港公司基本资料（公司注册证书 CI、商业登记证 BR、NNC1/NAR1）；</li><li>B.香港公司业务合同两套（采购合同及销售合同）；</li><li>C.公司董事及股东身份证、通行证/护照、过港小票（过关时海关会提供）；</li><li>D.银行 KYC 表格；</li><li>E.国内公司营业执照及近半年银行流水（若无，可提供社保流水+劳务合同）；</li></ul><p>②开户流程（过港）：</p><ul><li>A.预先审核资料；</li><li>B.审核完成后 3 个工作日左右出面签时间；</li><li>C.按时携带开户亲自过港到指定分行进行面签；</li><li>D.面签完成后 2-3 周完成开户。</li></ul><p>在香港，金融监管制度严格，银行在开户时常常会向你推荐他们的理财产品或基金。开户经理也有销售这些产品的任务。如果你成功开户，那真是幸运儿了！希望你在开户过程中一切顺利。</p><h2 id="其他"><a href="#其他" class="headerlink" title="其他"></a>其他</h2><ul><li>海趣社导航入口: <a href="https://link3.cc/haiqushe" target="_blank" rel="noopener">https://link3.cc/haiqushe</a></li><li>在线观影网站合集: <a href="https://haiqushe.notion.site/0f0e937204924ad5b8c14b405ceb320b" target="_blank" rel="noopener">https://haiqushe.notion.site/0f0e937204924ad5b8c14b405ceb320b</a></li></ul>]]></content>
    
    
    <summary type="html">&lt;p&gt;赴港旅游、购物血拼、商业谈判、为孩子汇学费或生活费，还是投资港股、美股，进行境外资产配置或购买海外理财保险…这一切的一切，都离不开一张香港银行卡。那你是否曾为申请香港银行账户而感到困扰？&lt;/p&gt;
&lt;p&gt;&lt;img src=&quot;https://githubblog.s3.bitiful.net/blog/202412181342406.webp&quot; alt&gt;&lt;/p&gt;
&lt;p&gt;现在，办理香港银行账户的门槛越来越高。别担心，这边为你整理了一份详详细的资料，内含香港 10 大银行开户攻略，让你轻松搞定香港银行开户！&lt;/p&gt;
&lt;h2 id=&quot;一、香港汇丰银行（公户-amp-个户）&quot;&gt;&lt;a href=&quot;#一、香港汇丰银行（公户-amp-个户）&quot; class=&quot;headerlink&quot; title=&quot;一、香港汇丰银行（公户&amp;amp;个户）&quot;&gt;&lt;/a&gt;一、香港汇丰银行（公户&amp;amp;个户）&lt;/h2&gt;&lt;p&gt;&lt;img src=&quot;https://githubblog.s3.bitiful.net/blog/202412181156352.webp&quot; alt&gt;&lt;/p&gt;</summary>


    <category term="香港银行" scheme="https://jiyiren.github.io/categories/香港银行/"/>
    
    
    <category term="香港" scheme="https://jiyiren.github.io/tags/香港/"/>
    
    <category term="银行" scheme="https://jiyiren.github.io/tags/银行/"/>
    
    <category term="银行开户" scheme="https://jiyiren.github.io/tags/银行开户/"/>
    
    <category term="跨境" scheme="https://jiyiren.github.io/tags/跨境/"/>
    
    <category term="汇丰银行" scheme="https://jiyiren.github.io/tags/汇丰银行/"/>
    
    <category term="渣打银行" scheme="https://jiyiren.github.io/tags/渣打银行/"/>
    
    <category term="创新银行" scheme="https://jiyiren.github.io/tags/创新银行/"/>
    
    <category term="东亚银行" scheme="https://jiyiren.github.io/tags/东亚银行/"/>
    
    <category term="中银香港" scheme="https://jiyiren.github.io/tags/中银香港/"/>
    
    <category term="花旗银行" scheme="https://jiyiren.github.io/tags/花旗银行/"/>
    
  </entry>
  
  <entry>
    <title>最强永久免费 VPN 不限流量，Cloudflare WARP+，新 MASQUE 协议王者归来</title>
    <link href="https://jiyiren.github.io/2024/09/23/cloudflare_warp/"/>
    <id>https://jiyiren.github.io/2024/09/23/cloudflare_warp/</id>
    <published>2024-09-23T14:16:40.000Z</published>
    <updated>2025-01-09T08:42:00.115Z</updated>
    
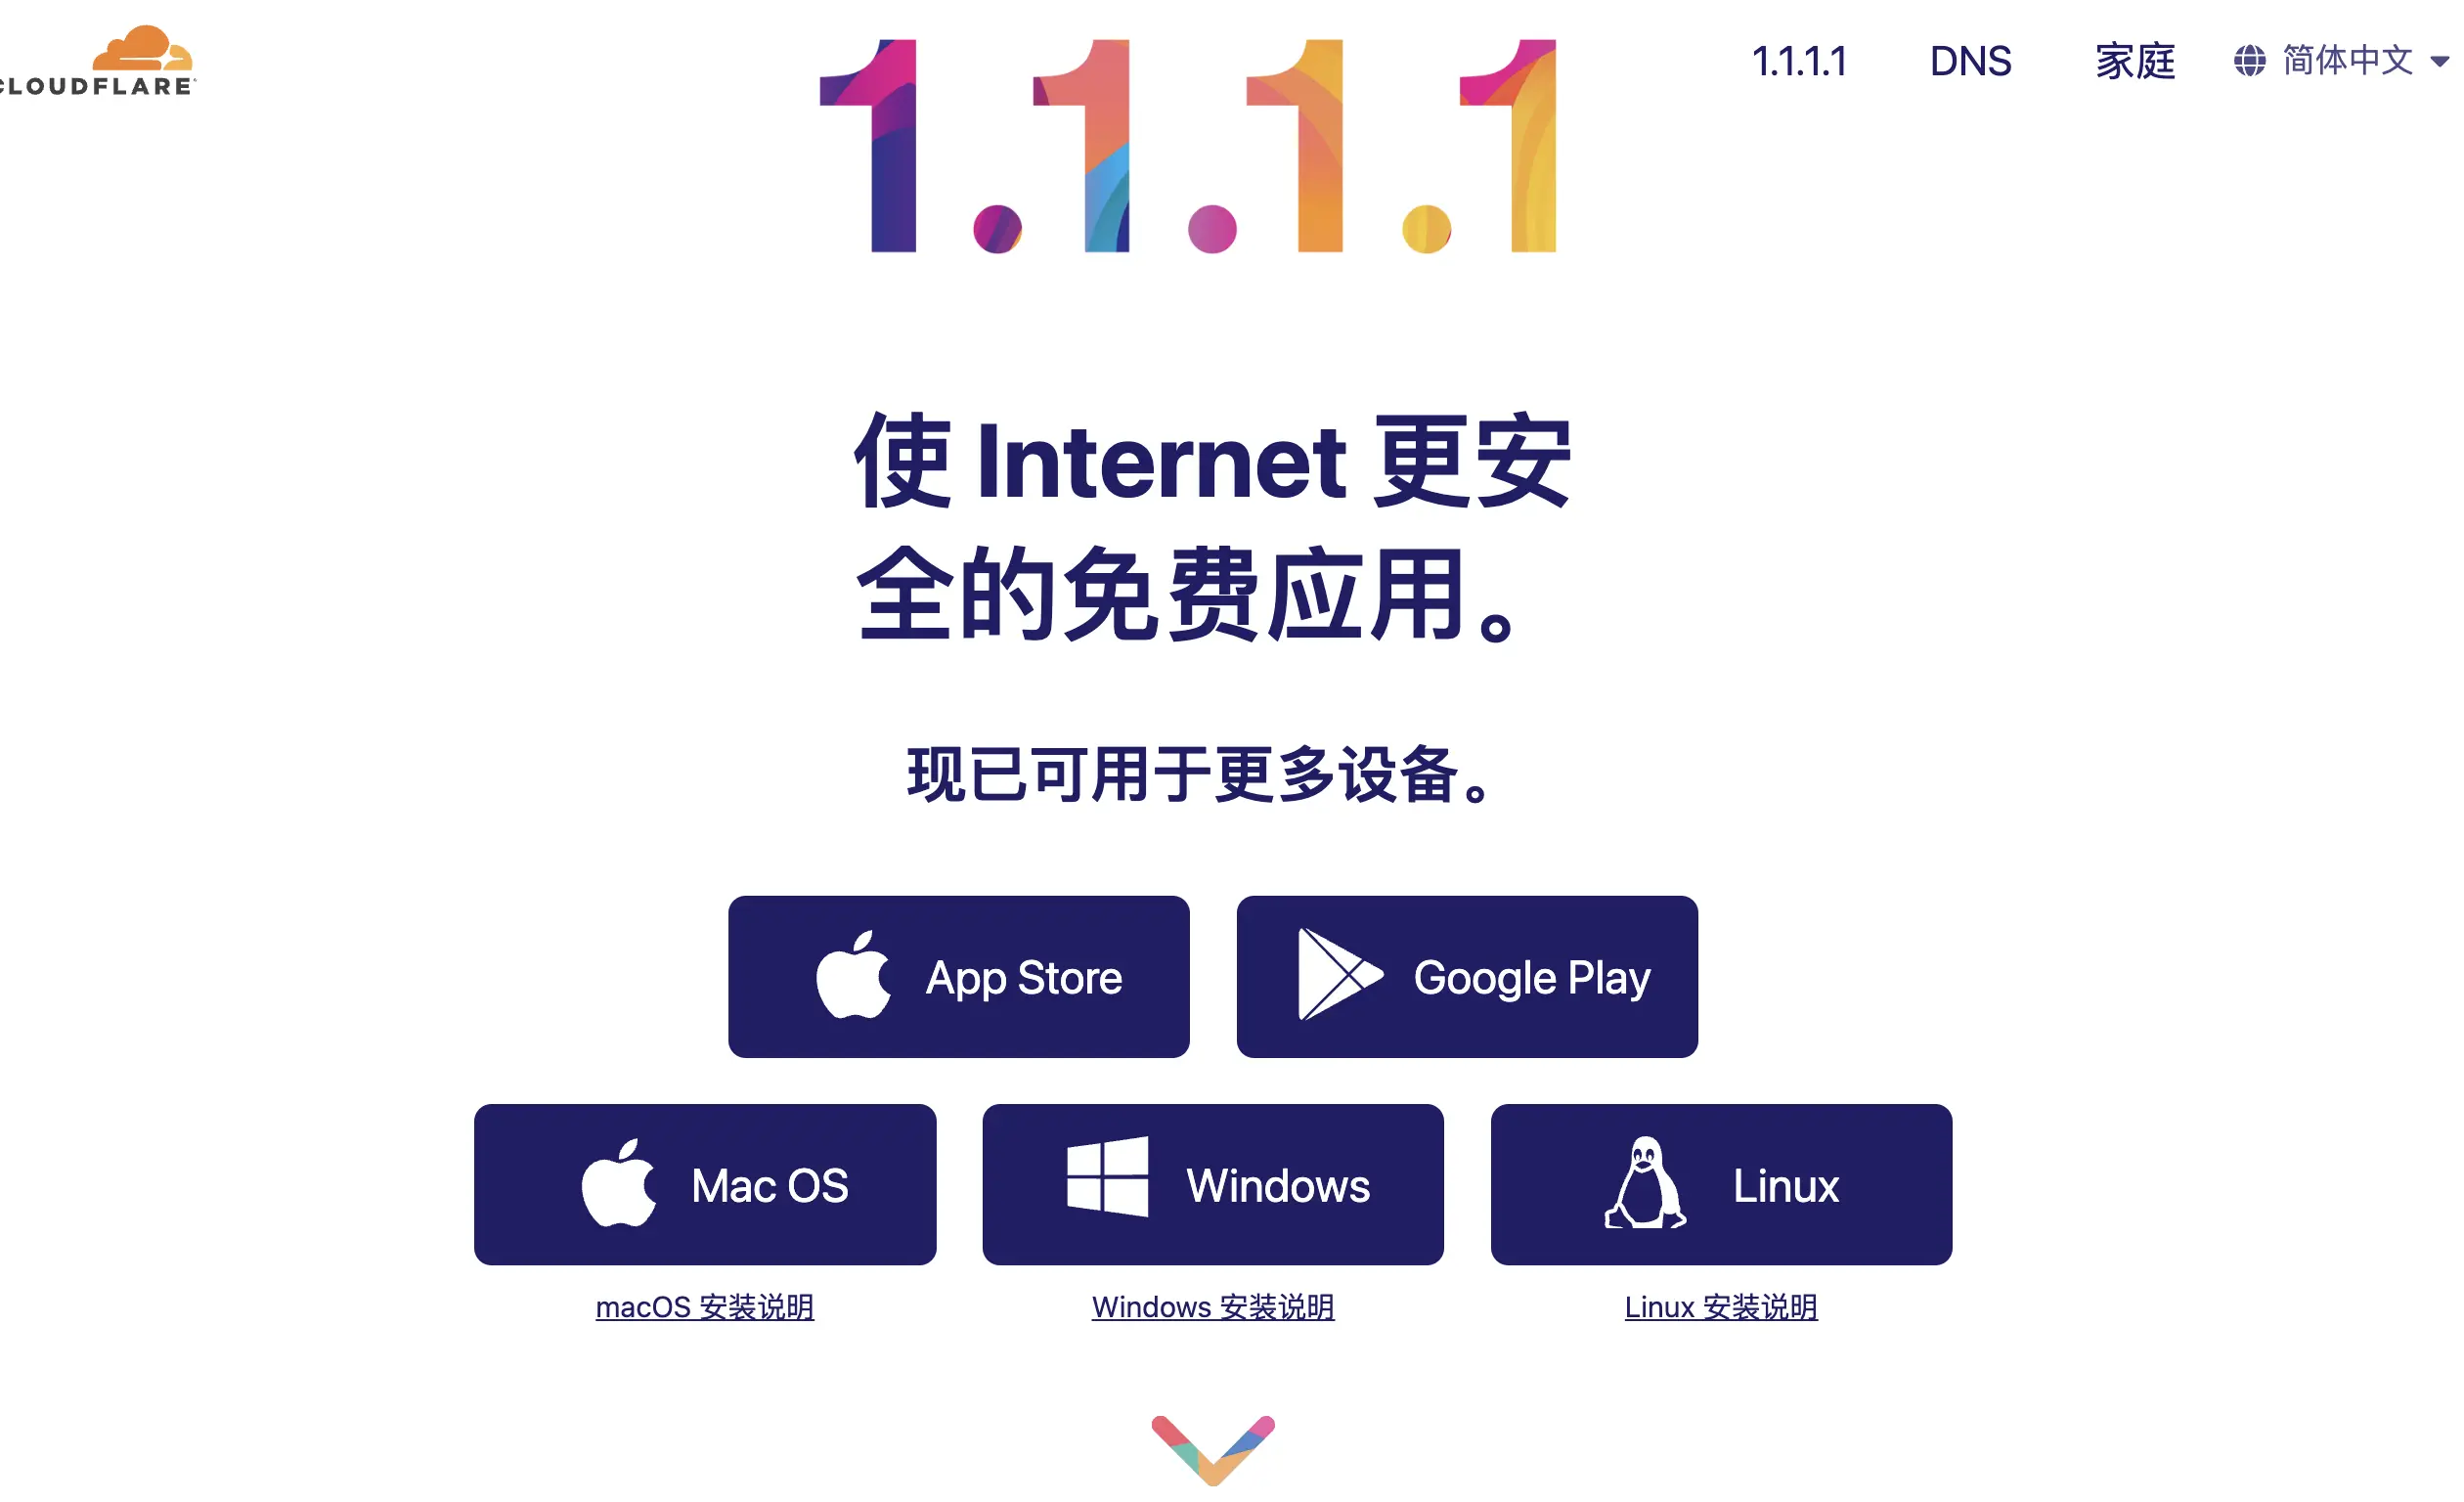
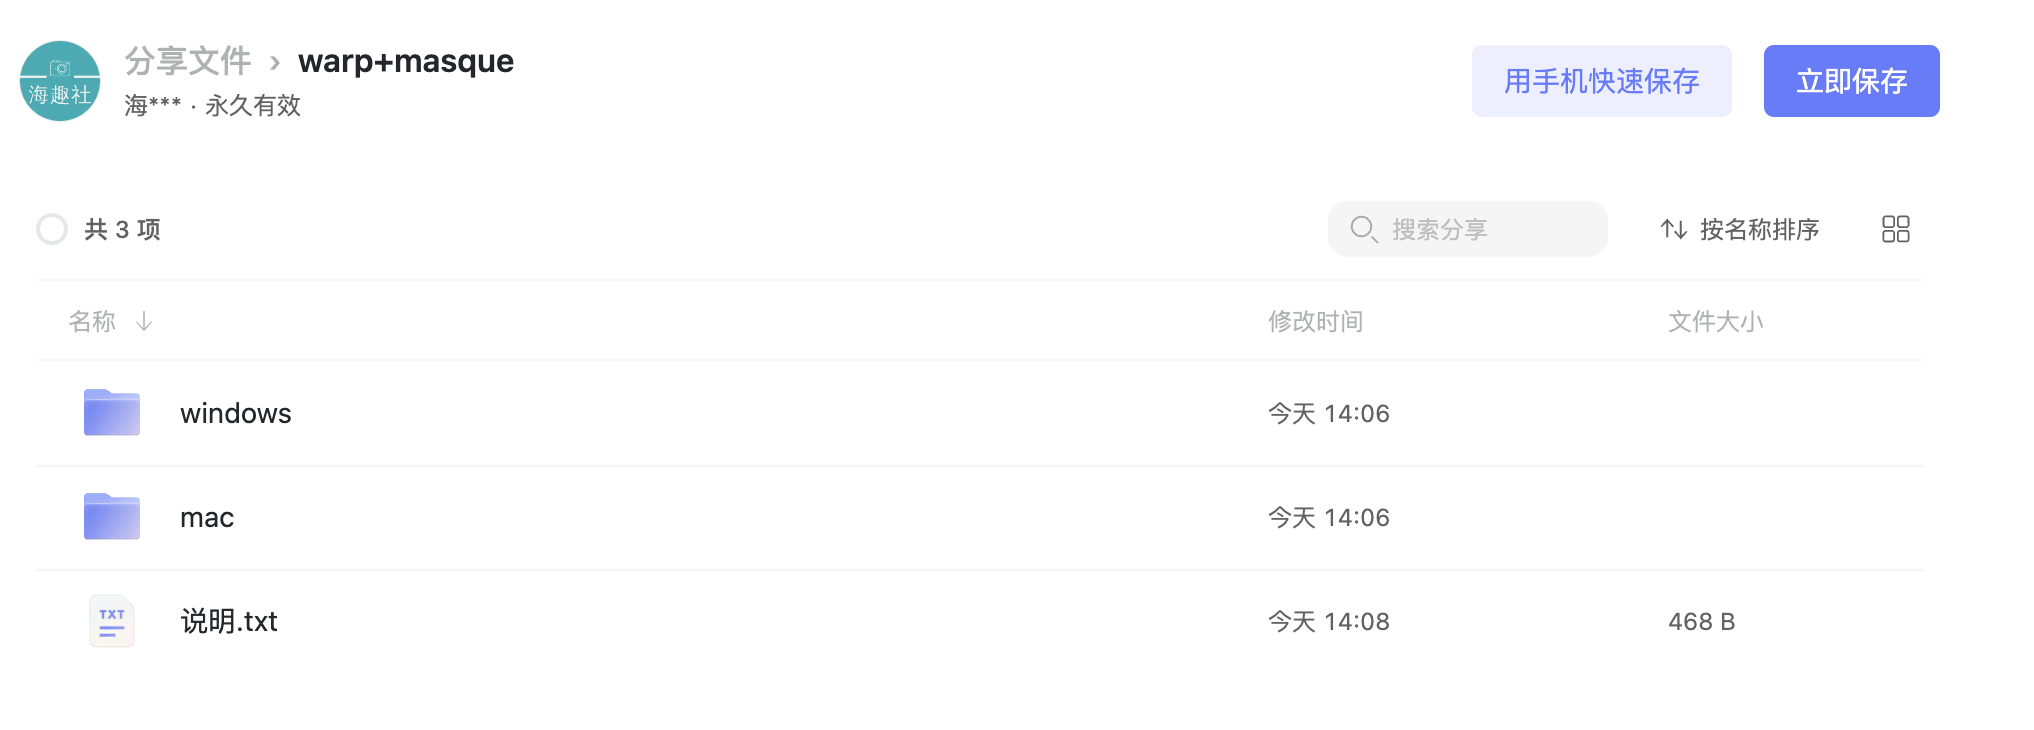
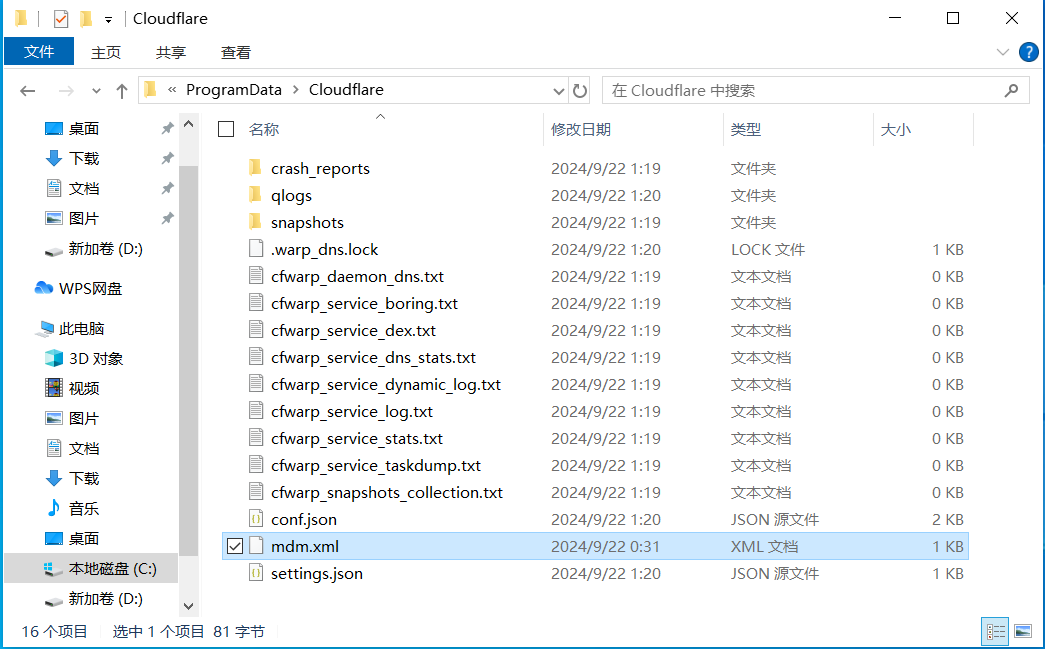
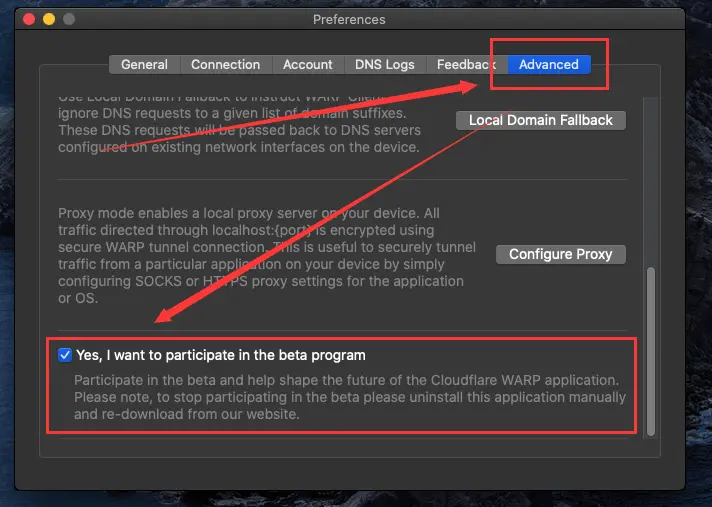
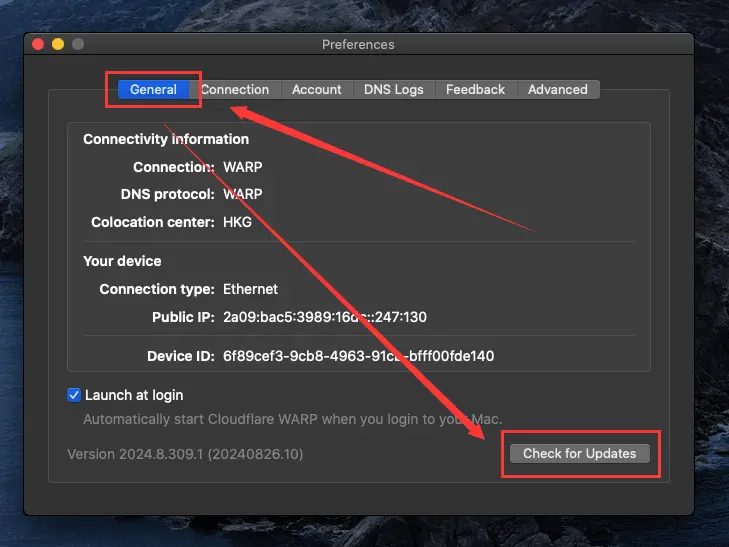
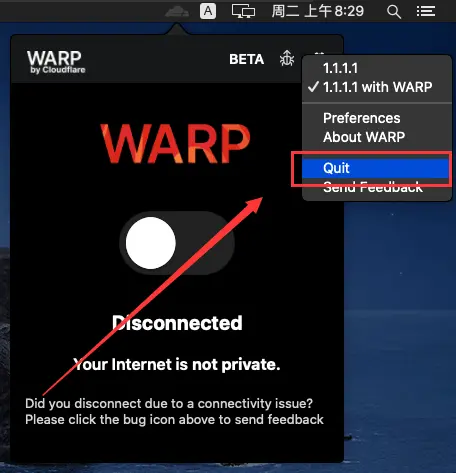
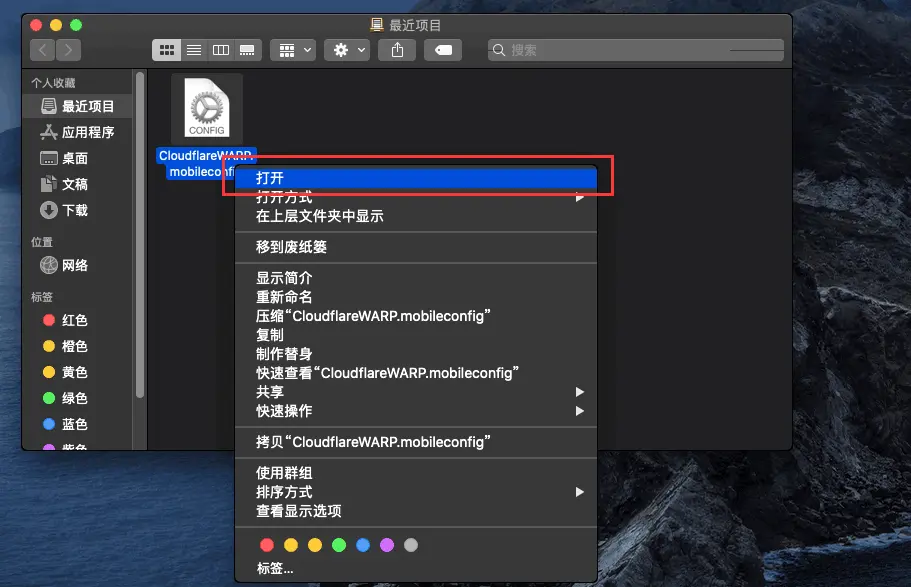
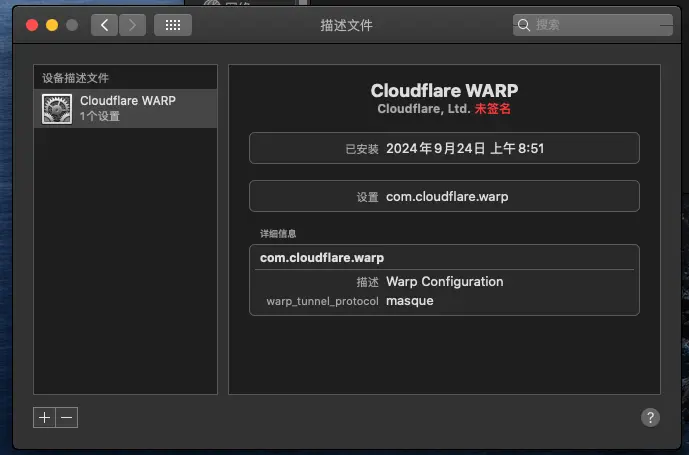
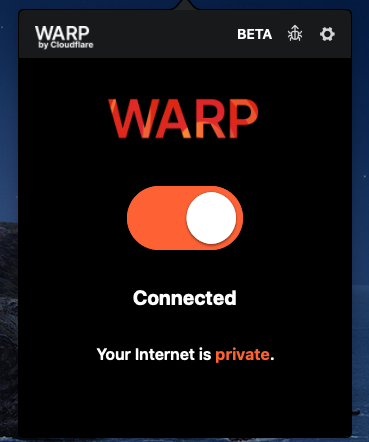
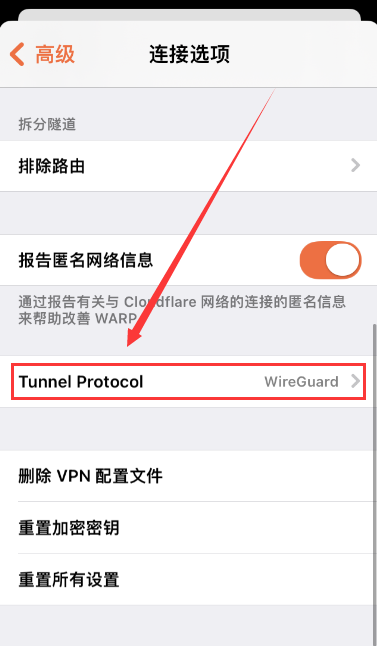
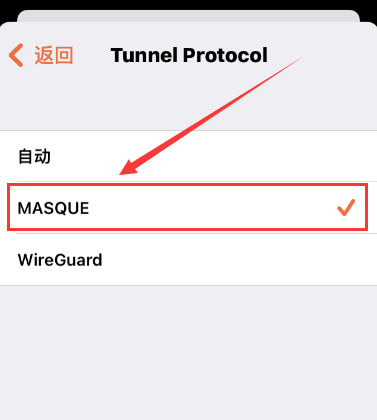
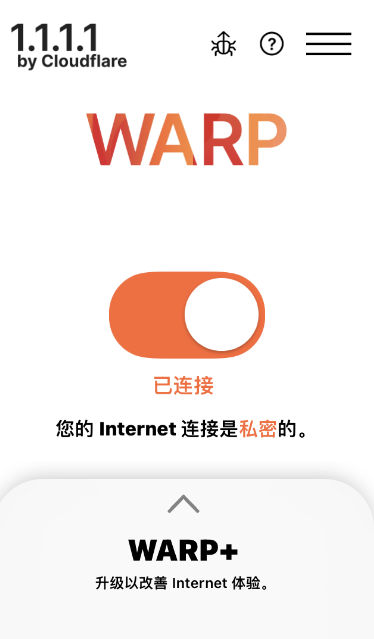
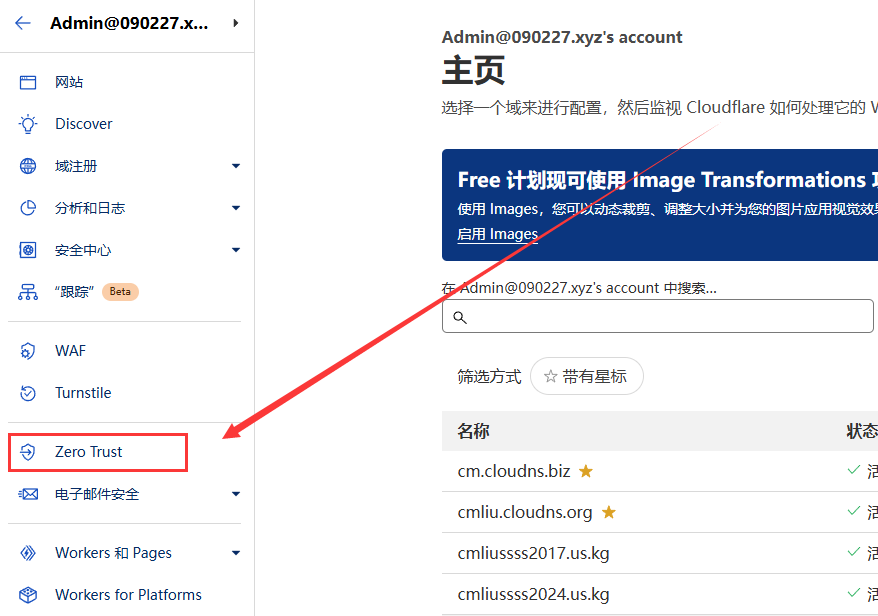
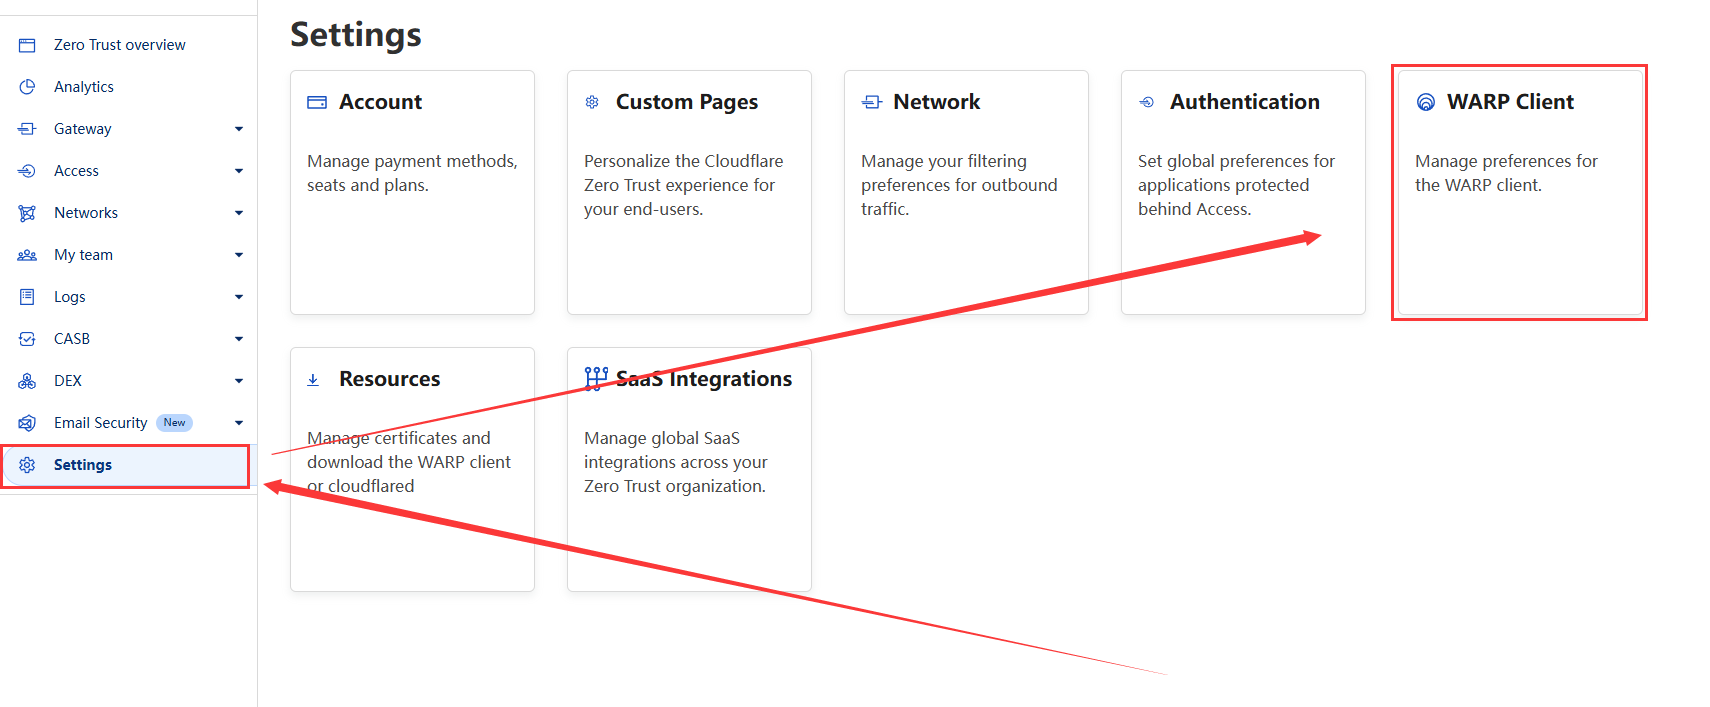
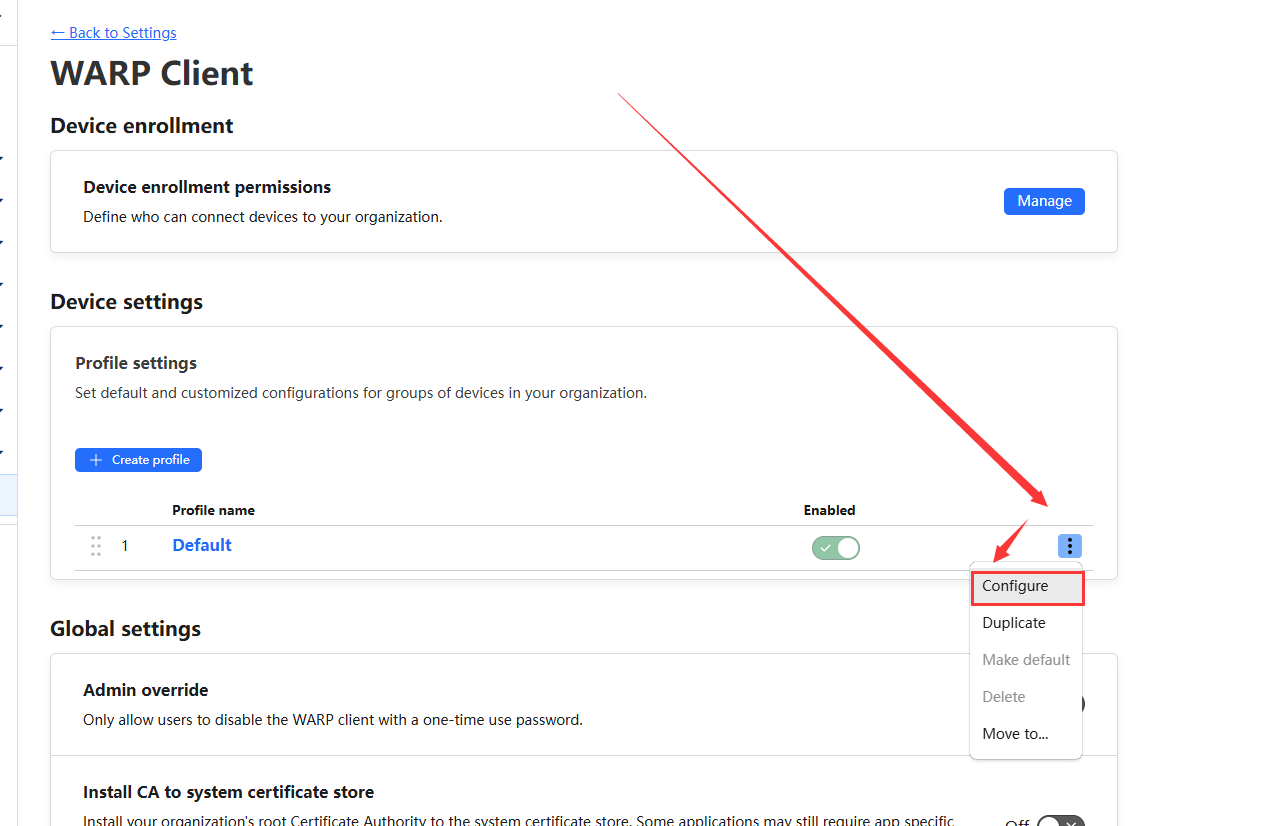
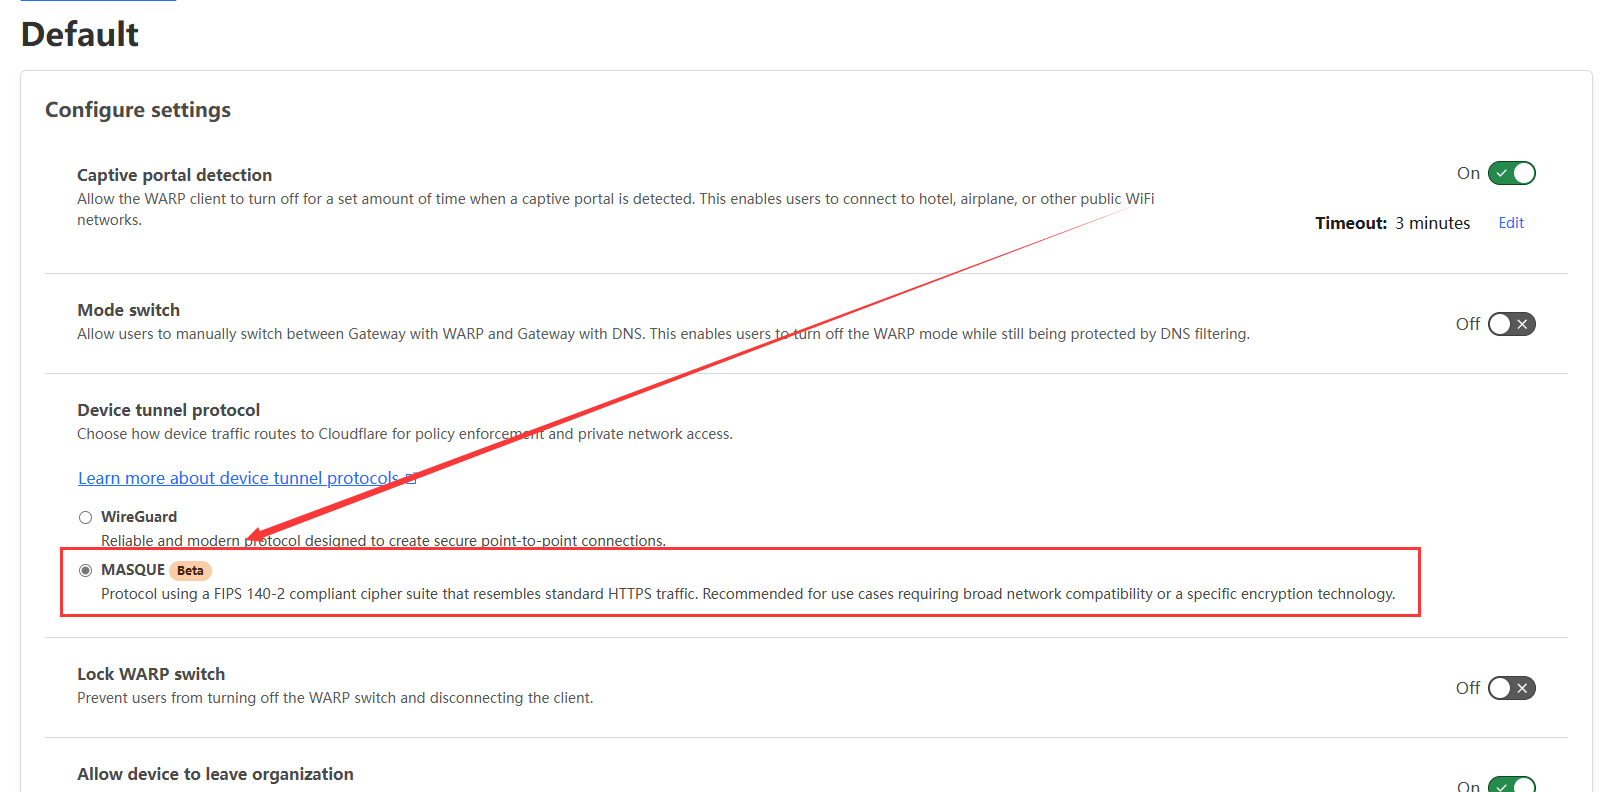
    <content type="html"><![CDATA[<p align="center" style="margin: 30px 0 35px;">本文不提供翻墙服务，只作为技术交流教程！</p><p><strong>2025.1.09号更新</strong>: <a href="/2025/01/09/fanqianghx/">最新稳定翻墙服务：高速代理翻墙，支持全球28多个国家，4K流媒体秒播，支持奈飞GPT等流媒体</a>。</p><p>今天给大家带来<strong>最新的免费翻墙教程</strong>，史上最强永久免费 VPN，不限流量。不需要自己花费一分钱，不需要购买服务器，也不需要购买域名，使用<strong>免费的 Cloudflare WARP+ 最新 MASQUE 协议</strong>, 就可以轻松实现流畅访问 Youtube、ChatGPT、Netflix 平台服务。</p><p><img src="https://githubblog.s3.bitiful.net/blog/202411121710868.webp" alt></p><p>按下面的教程，只需要 1 分钟你就能拥有访问全球网络的工具：</p><a id="more"></a><h2 id="下载客户端"><a href="#下载客户端" class="headerlink" title="下载客户端"></a>下载客户端</h2><p>进入 WARP+ 官网: <a href="https://one.one.one.one/zh-Hans/" target="_blank" rel="noopener">https://one.one.one.one/zh-Hans/</a>，下载并安装对应客户端。支持苹果 iOS、安卓平台、Windows、Mac、Linux 等几乎所有系统平台。</p><p><img src="https://githubblog.s3.bitiful.net/blog/202411121711769.webp" alt></p><p>为防止部分用户无法打开上面的网站，我这里下载了 Windows 和 Mac 安装软件，放在网盘里：</p><div class="highlight-wrap"autocomplete="off" autocorrect="off" autocapitalize="off" spellcheck="false" contenteditable="true"data-rel="PLAIN"><figure class="iseeu highlight /plain"><table><tr><td class="gutter"><pre><span class="line">1</span><br><span class="line">2</span><br></pre></td><td class="code"><pre><span class="line">网盘链接: https://www.alipan.com/s/VXVj1hgtd8d</span><br><span class="line">分享密码: qn22</span><br></pre></td></tr></table></figure></div><p><img src="https://githubblog.s3.bitiful.net/blog/202411121711138.webp" alt></p><p>下面分别从 Windows、Mac、iOS 客户端讲下如何配置。</p><h3 id="Windows-客户端"><a href="#Windows-客户端" class="headerlink" title="Windows 客户端"></a>Windows 客户端</h3><p>下载好 <code>Windows_Cloudflare_WARP_2024.6.473.0.msi</code> 安装文件后，打开安装即可。</p><p>然后，需要下载 <code>mdm.xml</code> 文件保存至 <code>C:\ProgramData\Cloudflare</code> 目录下，<code>mdm.xml</code> 文件获取方式有三种：</p><ul><li>第一种：上面的网盘分享链接的 windows 目录里有，自己可以下载。</li><li>第二种:  打开 <a href="https://github.com/jiyiren/warpconfig/blob/main/mdm.xml" target="_blank" rel="noopener">Github 的 mdm.xml</a>，点击下载即可。</li><li><p>第三种：你也可以直接在目录下面创建出此文件，并将下面内容复制进去就行，<code>mdm.xml</code> 的内容为:</p>  <div class="highlight-wrap"autocomplete="off" autocorrect="off" autocapitalize="off" spellcheck="false" contenteditable="true"data-rel="XML"><figure class="iseeu highlight /xml"><table><tr><td class="gutter"><pre><span class="line">1</span><br><span class="line">2</span><br><span class="line">3</span><br><span class="line">4</span><br></pre></td><td class="code"><pre><span class="line"><span class="tag">&lt;<span class="name">dict</span>&gt;</span></span><br><span class="line">    <span class="tag">&lt;<span class="name">key</span>&gt;</span>warp_tunnel_protocol<span class="tag">&lt;/<span class="name">key</span>&gt;</span></span><br><span class="line">    <span class="tag">&lt;<span class="name">string</span>&gt;</span>masque<span class="tag">&lt;/<span class="name">string</span>&gt;</span></span><br><span class="line"><span class="tag">&lt;/<span class="name">dict</span>&gt;</span></span><br></pre></td></tr></table></figure></div></li></ul><p>上面任意一种方式都可以，将 <code>mdm.xml</code> 放到 <code>C:\ProgramData\Cloudflare</code> 目录下即可:</p><p><img src="https://githubblog.s3.bitiful.net/blog/202411121711090.webp" alt></p><p>重启 WARP 程序后后，点击连接即可生效:</p><p><img src="https://githubblog.s3.bitiful.net/blog/202411121712912.webp" alt></p><h3 id="Mac-客户端"><a href="#Mac-客户端" class="headerlink" title="Mac 客户端"></a>Mac 客户端</h3><p>同样先下载 WARP 的 Mac 客户端程序，如果能访问 WARP+ 官网: <a href="https://one.one.one.one/zh-Hans/" target="_blank" rel="noopener">https://one.one.one.one/zh-Hans/</a> 的则选择 Mac 系统软件下载。如果不能访问的，则走上面的网盘地址的 mac 目录下载即可。</p><p>然后就是安装 Warp 客户端，安装完后默认 Mac 的 WARP 客户端是不支持 MASQUE 协议的。我们需要升级测试版，也就是 <strong>2024.8.309.1 或 更高的版本</strong>。</p><p>在配置页面，选择 Advanced 页面，然后选择 <code>Yes，I want to participate in the beta program</code>，如下所示:</p><p><img src="https://githubblog.s3.bitiful.net/blog/202411121712853.webp" alt></p><p>再点击 general 面板，点击 <code>Check for Updates</code>，安装到测试版本即可。</p><p><img src="https://githubblog.s3.bitiful.net/blog/202411121712932.webp" alt></p><p>然后，需要下载 <code>CloudflareWARP.mobileconfig</code> 配置文件，这个文件获取方法:</p><ul><li>第一种: 上面的网盘里的 mac 目录下就有，下载即可。</li><li>第二种: 打开 <a href="https://github.com/jiyiren/warpconfig/blob/main/CloudflareWARP.mobileconfig" target="_blank" rel="noopener">Github 的 CloudflareWARP.mobileconfig</a>，点击下载即可。</li></ul><p>下载好这个文件后，先退出 warp 软件：<br><img src="https://githubblog.s3.bitiful.net/blog/202411121712142.webp" alt></p><p>再安装 <code>CloudflareWARP.mobileconfig</code> 文件:</p><p><img src="https://githubblog.s3.bitiful.net/blog/202411121713392.webp" alt><br><img src="https://githubblog.s3.bitiful.net/blog/202411121713851.webp" alt><br><img src="https://githubblog.s3.bitiful.net/blog/202411121713294.webp" alt><br><img src="https://githubblog.s3.bitiful.net/blog/202411121713340.webp" alt></p><p>重启 WARP 后即可生效，点击连接即可:</p><p><img src="https://githubblog.s3.bitiful.net/blog/202411121713836.webp" alt></p><h3 id="IOS-客户端"><a href="#IOS-客户端" class="headerlink" title="IOS 客户端"></a>IOS 客户端</h3><p>1.进入更多设置:</p><p><img src="https://githubblog.s3.bitiful.net/blog/202411121713063.webp" alt></p><p>2.进入高级选项:</p><p><img src="https://githubblog.s3.bitiful.net/blog/202411121713910.webp" alt></p><p>3.进入连接选项:</p><p><img src="https://githubblog.s3.bitiful.net/blog/202411121713818.webp" alt></p><p>4.进入Tunnel Protocol 选项:</p><p><img src="https://githubblog.s3.bitiful.net/blog/202411121714532.webp" alt></p><p>5.选择 MASQUE 即可:</p><p><img src="https://githubblog.s3.bitiful.net/blog/202411121714785.webp" alt></p><p>6.连接成功！</p><p><img src="https://githubblog.s3.bitiful.net/blog/202411121714045.webp" alt></p><h2 id="Zero-Trust-用户"><a href="#Zero-Trust-用户" class="headerlink" title="Zero Trust 用户"></a>Zero Trust 用户</h2><p>如果你是 Zero Trust 用户，需要额外开启 MASQUE 协议！</p><ol><li><p>进入Zero Trust选项:</p><p> <img src="https://githubblog.s3.bitiful.net/blog/202411121714190.webp" alt></p></li><li><p>进入 Settings 后，点击 WARP Client:</p><p> <img src="https://githubblog.s3.bitiful.net/blog/202411121714091.webp" alt></p></li><li><p>选择 Default &gt; 更多选项 &gt; Configure:</p><p> <img src="https://githubblog.s3.bitiful.net/blog/202411121714972.webp" alt></p></li><li><p><code>Device tunnel protocol</code> 选择 <strong>MASQUE</strong> 协议后，拖至最下方，点击 <code>Save profile</code> 保存即可生效。</p><p> <img src="https://githubblog.s3.bitiful.net/blog/202411121715798.webp" alt></p></li></ol><h2 id="参考"><a href="#参考" class="headerlink" title="参考"></a>参考</h2><ul><li>Warp 配置文件: <a href="https://github.com/jiyiren/warpconfig" target="_blank" rel="noopener">https://github.com/jiyiren/warpconfig</a></li></ul>]]></content>
    
    
    <summary type="html">&lt;p align=&quot;center&quot; style=&quot;margin: 30px 0 35px;&quot;&gt;本文不提供翻墙服务，只作为技术交流教程！&lt;/p&gt;


&lt;p&gt;&lt;strong&gt;2025.1.09号更新&lt;/strong&gt;: &lt;a href=&quot;/2025/01/09/fanqianghx/&quot;&gt;最新稳定翻墙服务：高速代理翻墙，支持全球28多个国家，4K流媒体秒播，支持奈飞GPT等流媒体&lt;/a&gt;。&lt;/p&gt;
&lt;p&gt;今天给大家带来&lt;strong&gt;最新的免费翻墙教程&lt;/strong&gt;，史上最强永久免费 VPN，不限流量。不需要自己花费一分钱，不需要购买服务器，也不需要购买域名，使用&lt;strong&gt;免费的 Cloudflare WARP+ 最新 MASQUE 协议&lt;/strong&gt;, 就可以轻松实现流畅访问 Youtube、ChatGPT、Netflix 平台服务。&lt;/p&gt;
&lt;p&gt;&lt;img src=&quot;https://githubblog.s3.bitiful.net/blog/202411121710868.webp&quot; alt&gt;&lt;/p&gt;
&lt;p&gt;按下面的教程，只需要 1 分钟你就能拥有访问全球网络的工具：&lt;/p&gt;</summary>


    <category term="翻墙" scheme="https://jiyiren.github.io/categories/翻墙/"/>
    
    <category term="梯子" scheme="https://jiyiren.github.io/categories/翻墙/梯子/"/>
    
    <category term="代理" scheme="https://jiyiren.github.io/categories/翻墙/梯子/代理/"/>
    
    
    <category term="ChatGPT" scheme="https://jiyiren.github.io/tags/ChatGPT/"/>
    
    <category term="梯子" scheme="https://jiyiren.github.io/tags/梯子/"/>
    
    <category term="代理" scheme="https://jiyiren.github.io/tags/代理/"/>
    
    <category term="翻墙" scheme="https://jiyiren.github.io/tags/翻墙/"/>
    
    <category term="Youtube" scheme="https://jiyiren.github.io/tags/Youtube/"/>
    
    <category term="Cloudflare" scheme="https://jiyiren.github.io/tags/Cloudflare/"/>
    
    <category term="Shadowsocks" scheme="https://jiyiren.github.io/tags/Shadowsocks/"/>
    
  </entry>
  
  <entry>
    <title>不用买服务器，利用 Cloudflare 搭建免费翻墙服务</title>
    <link href="https://jiyiren.github.io/2024/06/16/cloudflare_vless/"/>
    <id>https://jiyiren.github.io/2024/06/16/cloudflare_vless/</id>
    <published>2024-06-16T14:16:40.000Z</published>
    <updated>2025-01-09T08:42:19.552Z</updated>
    
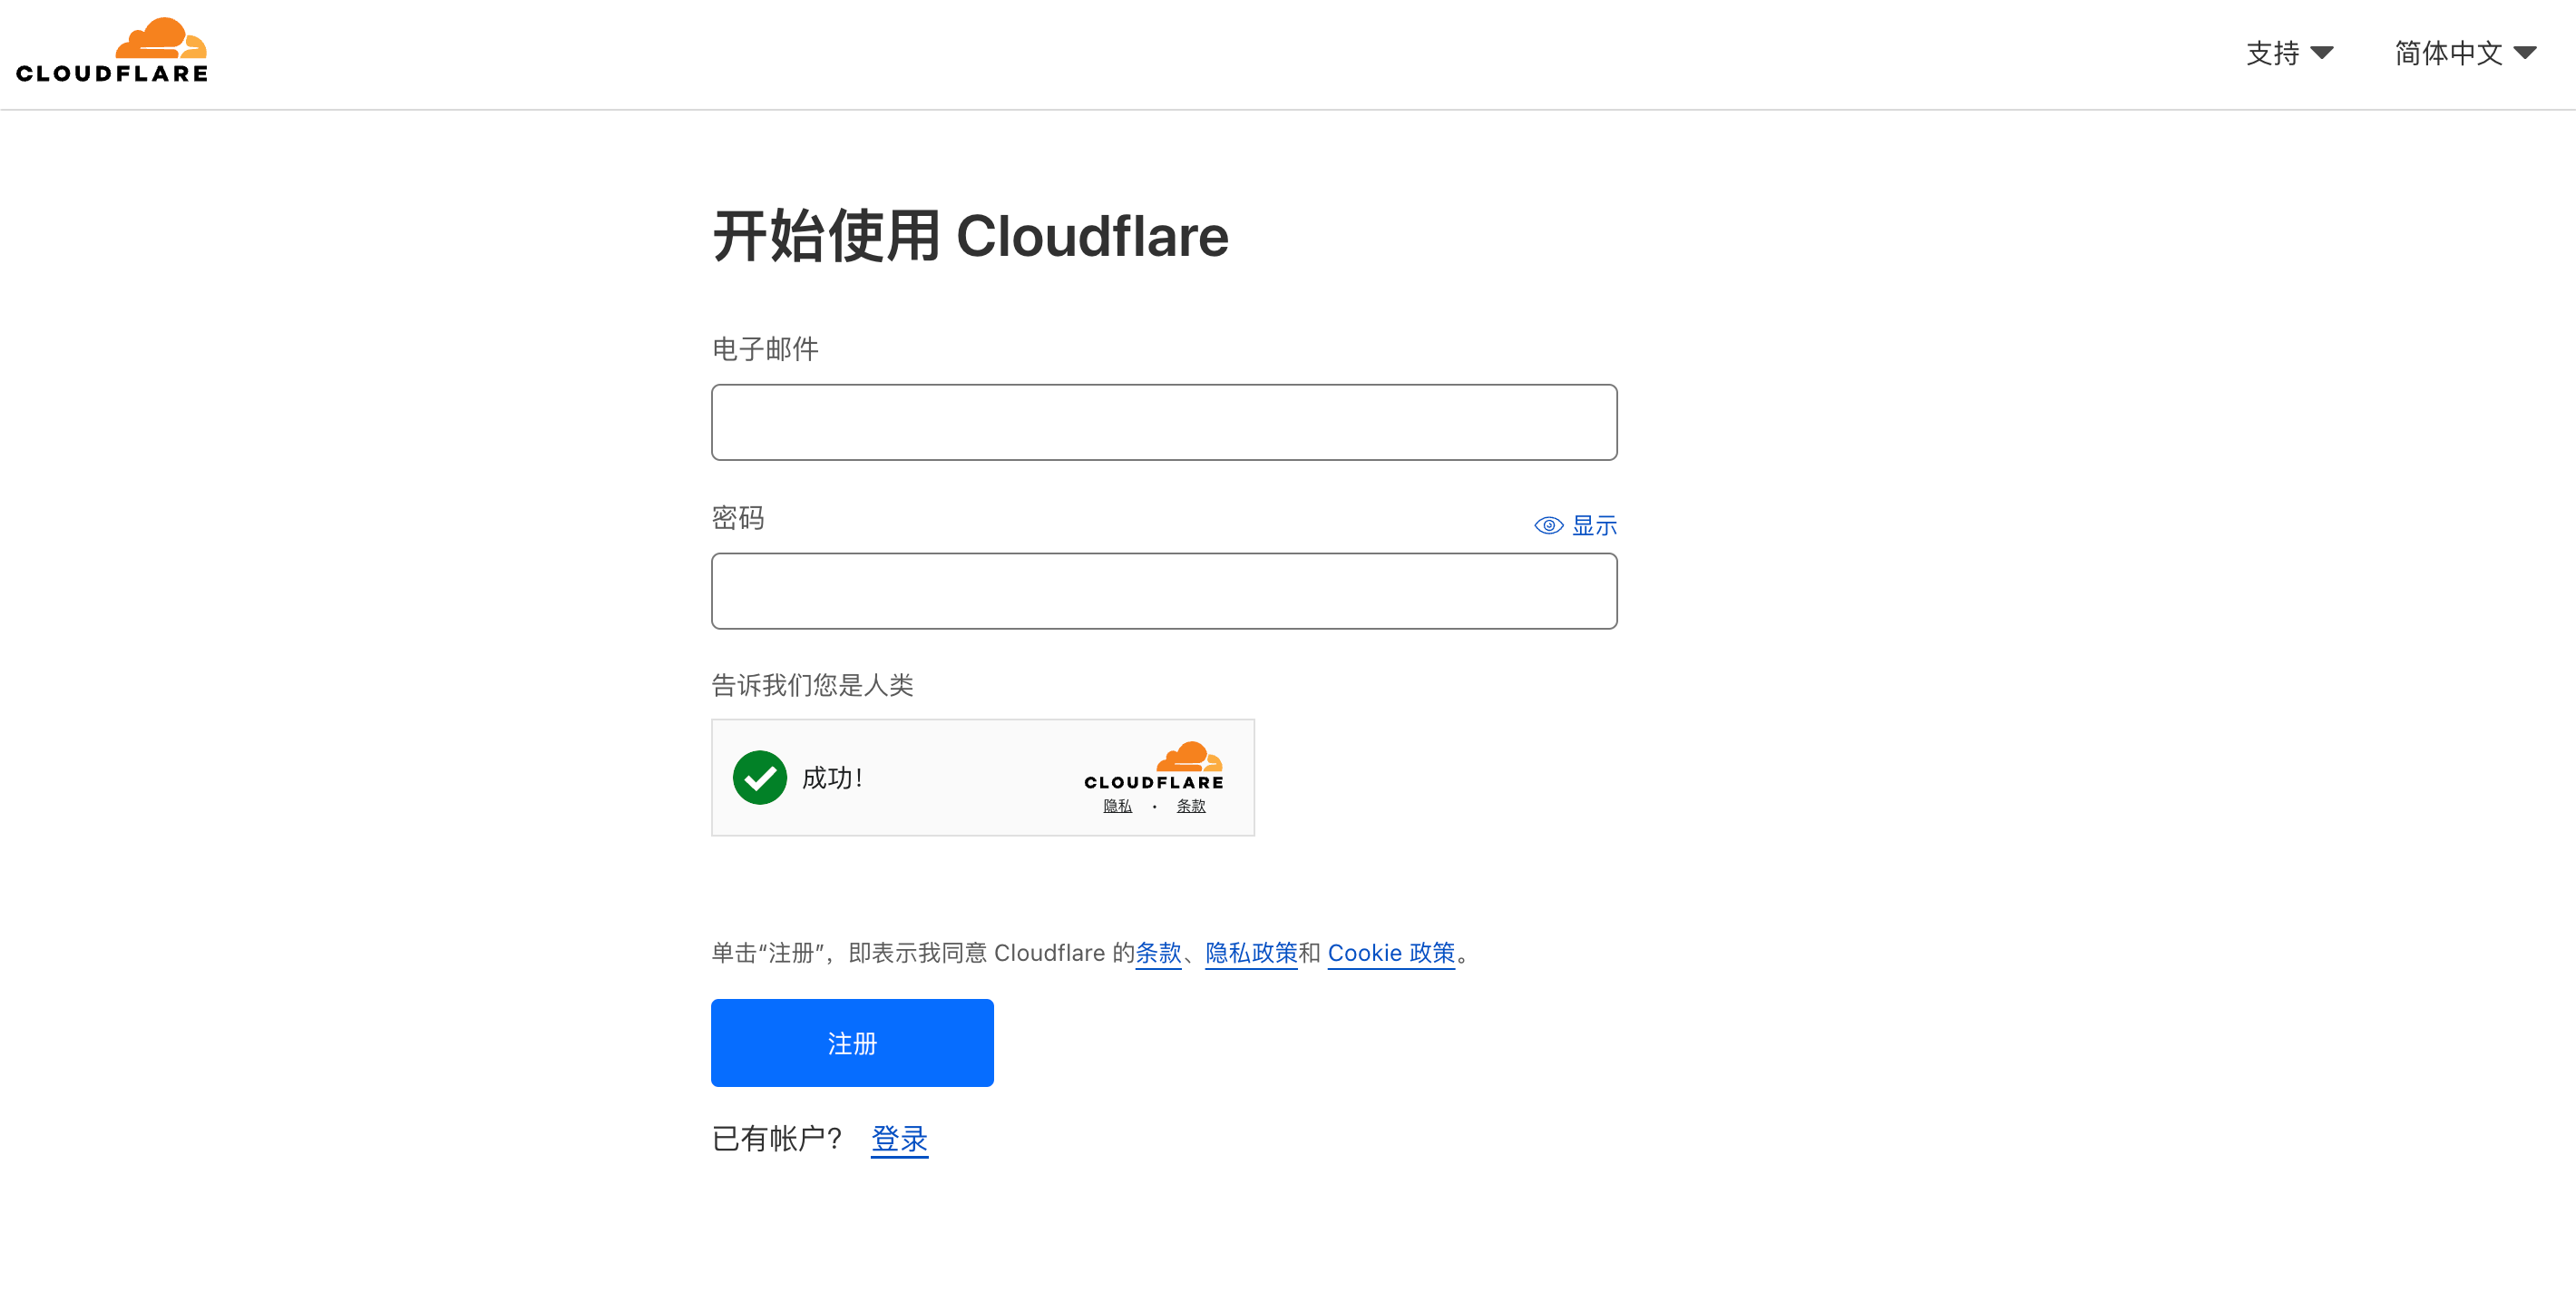
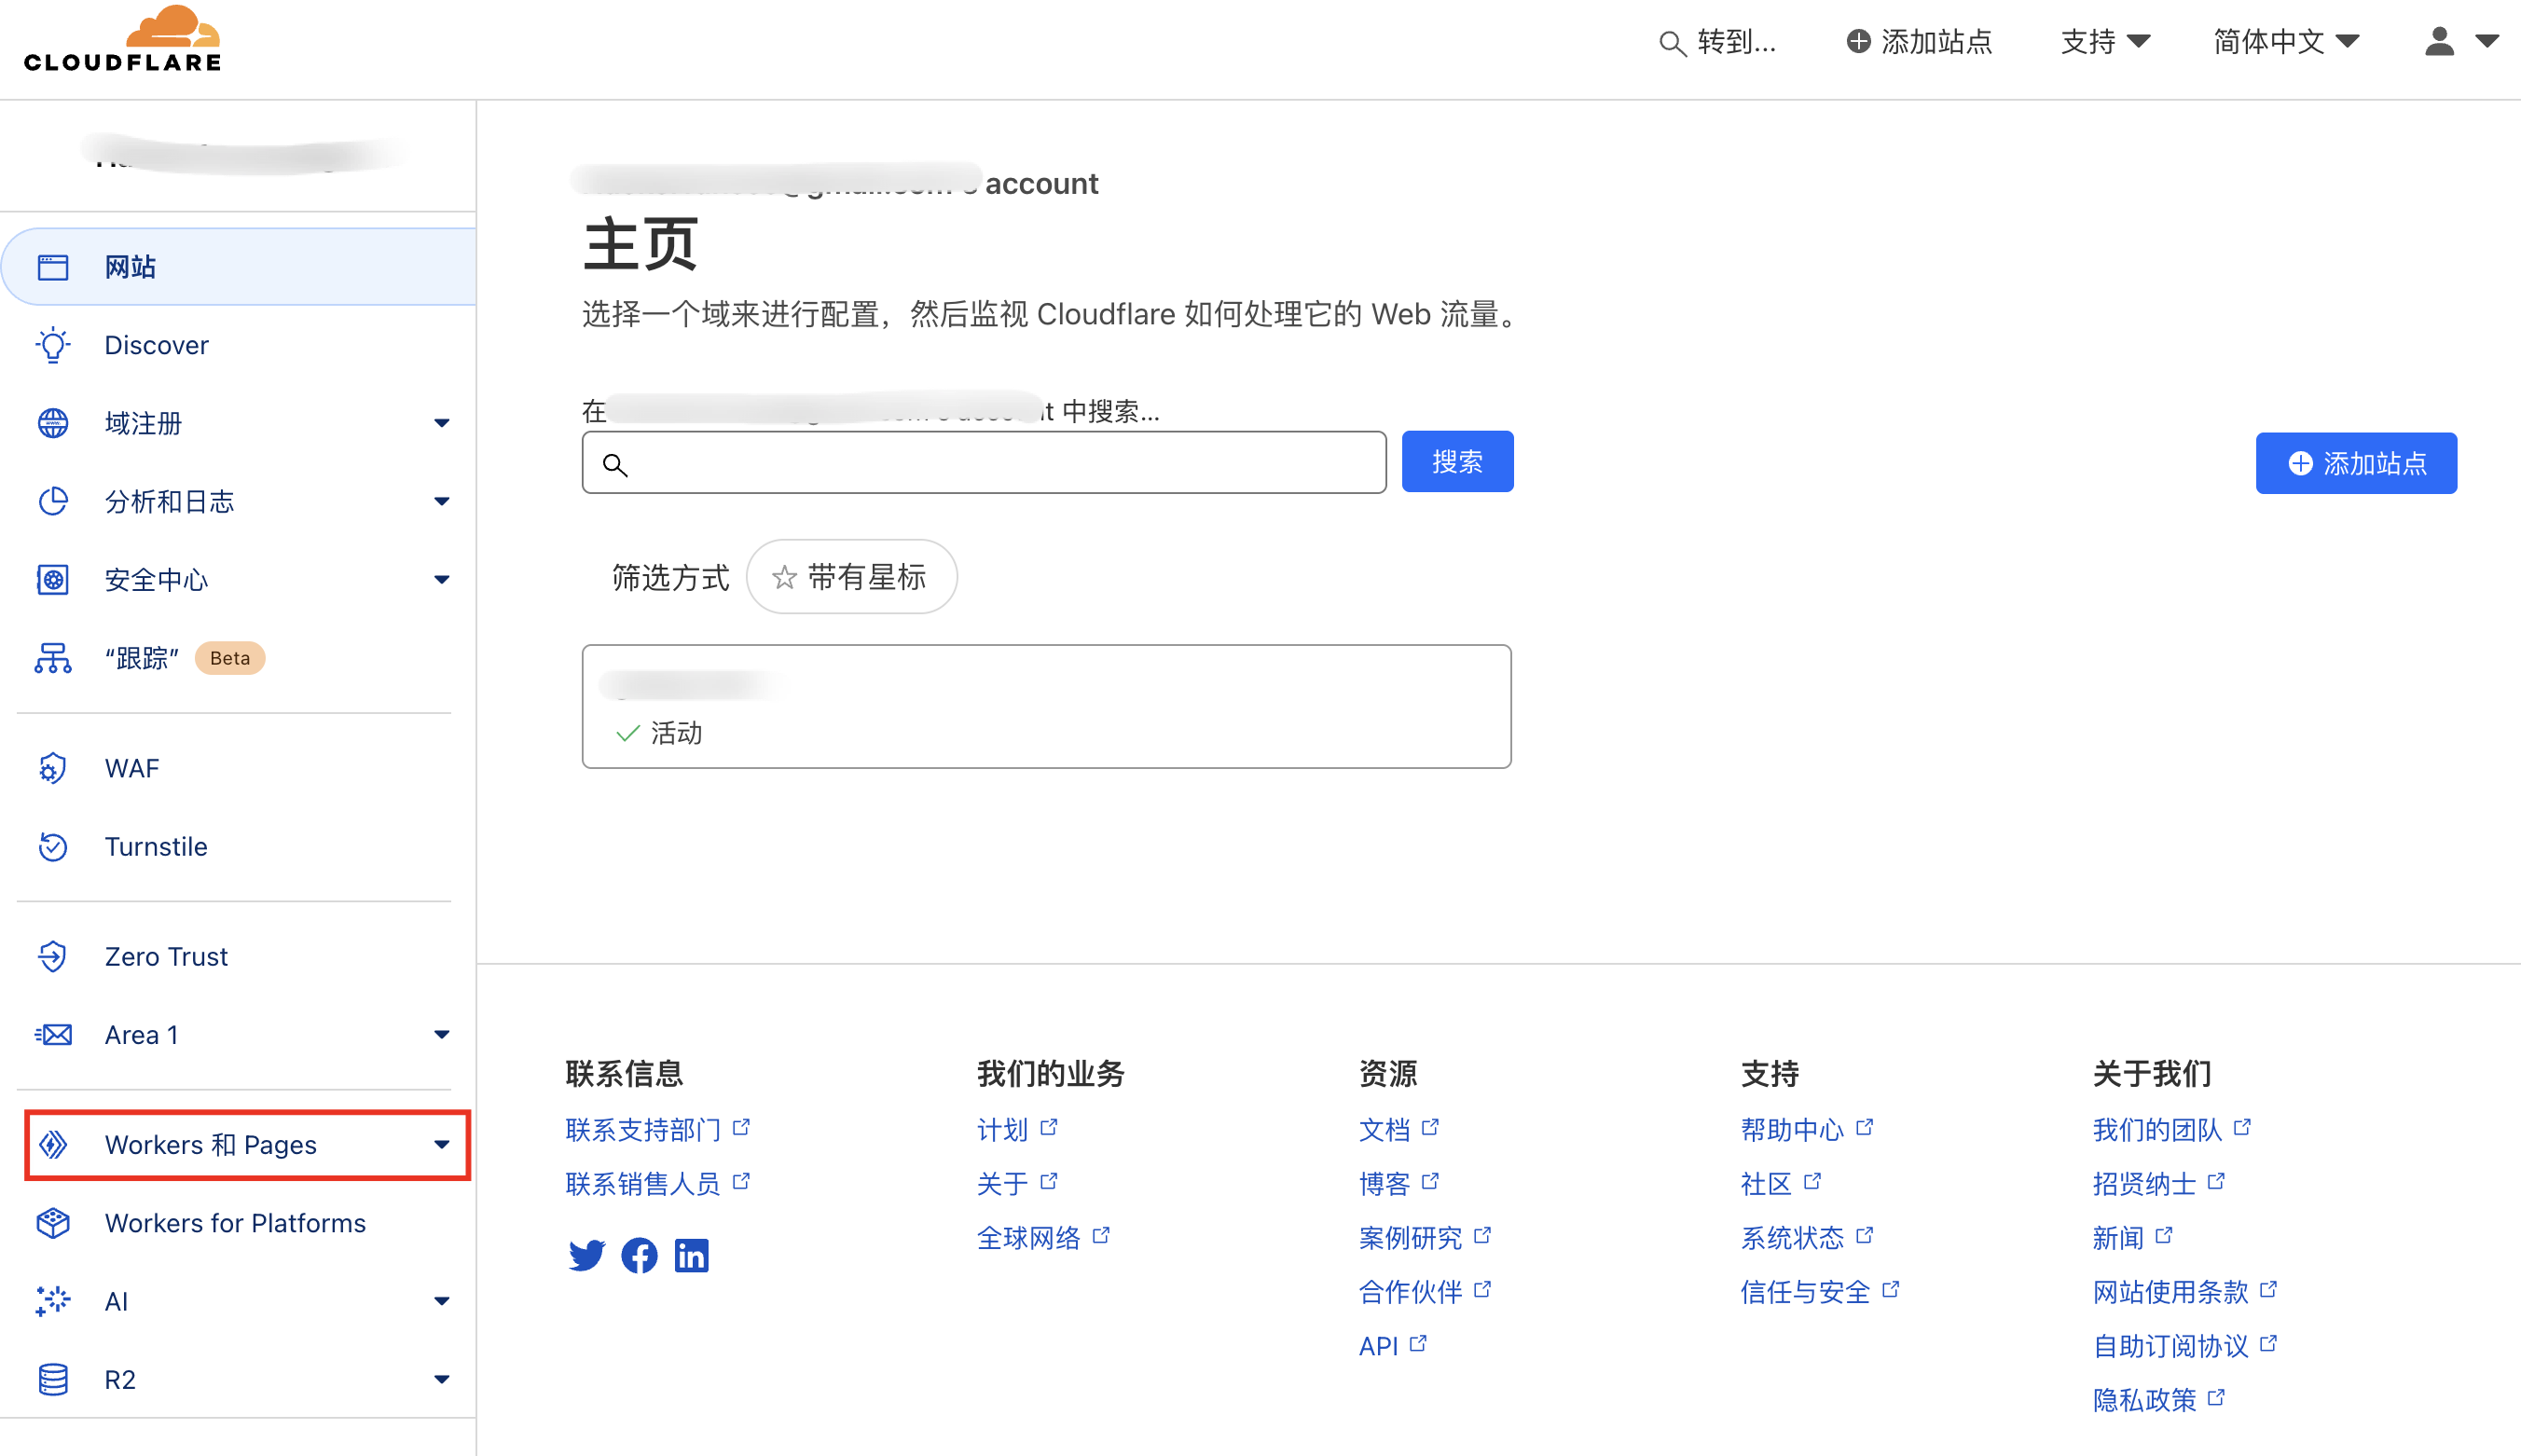
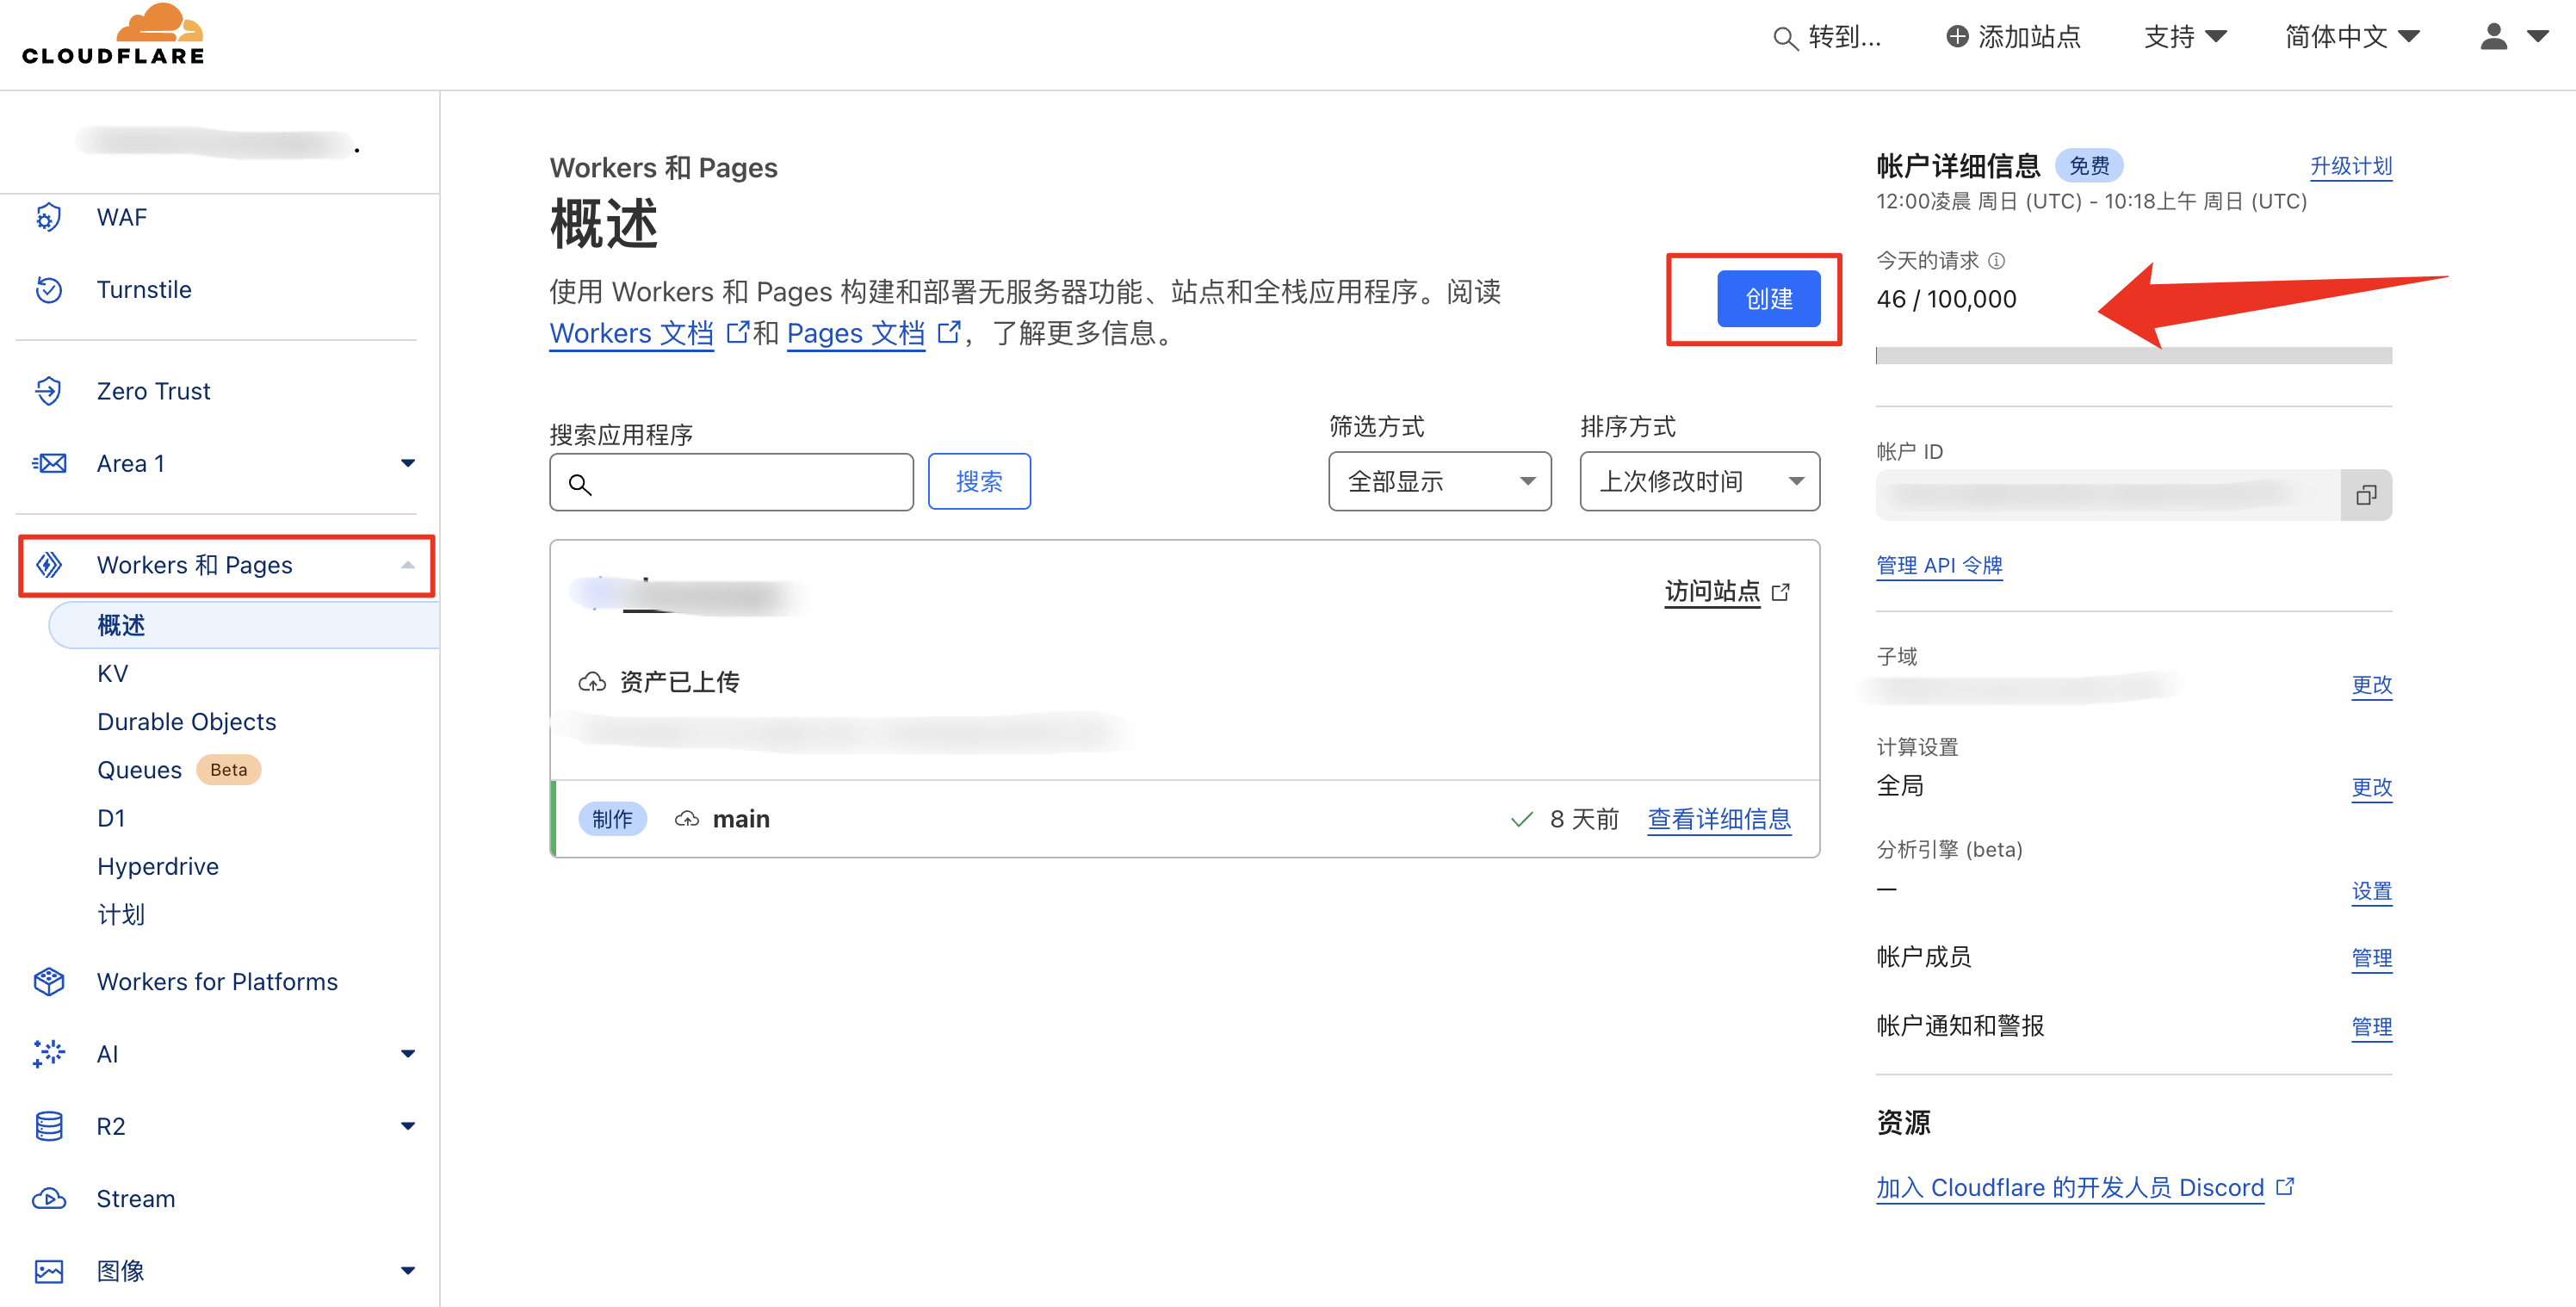
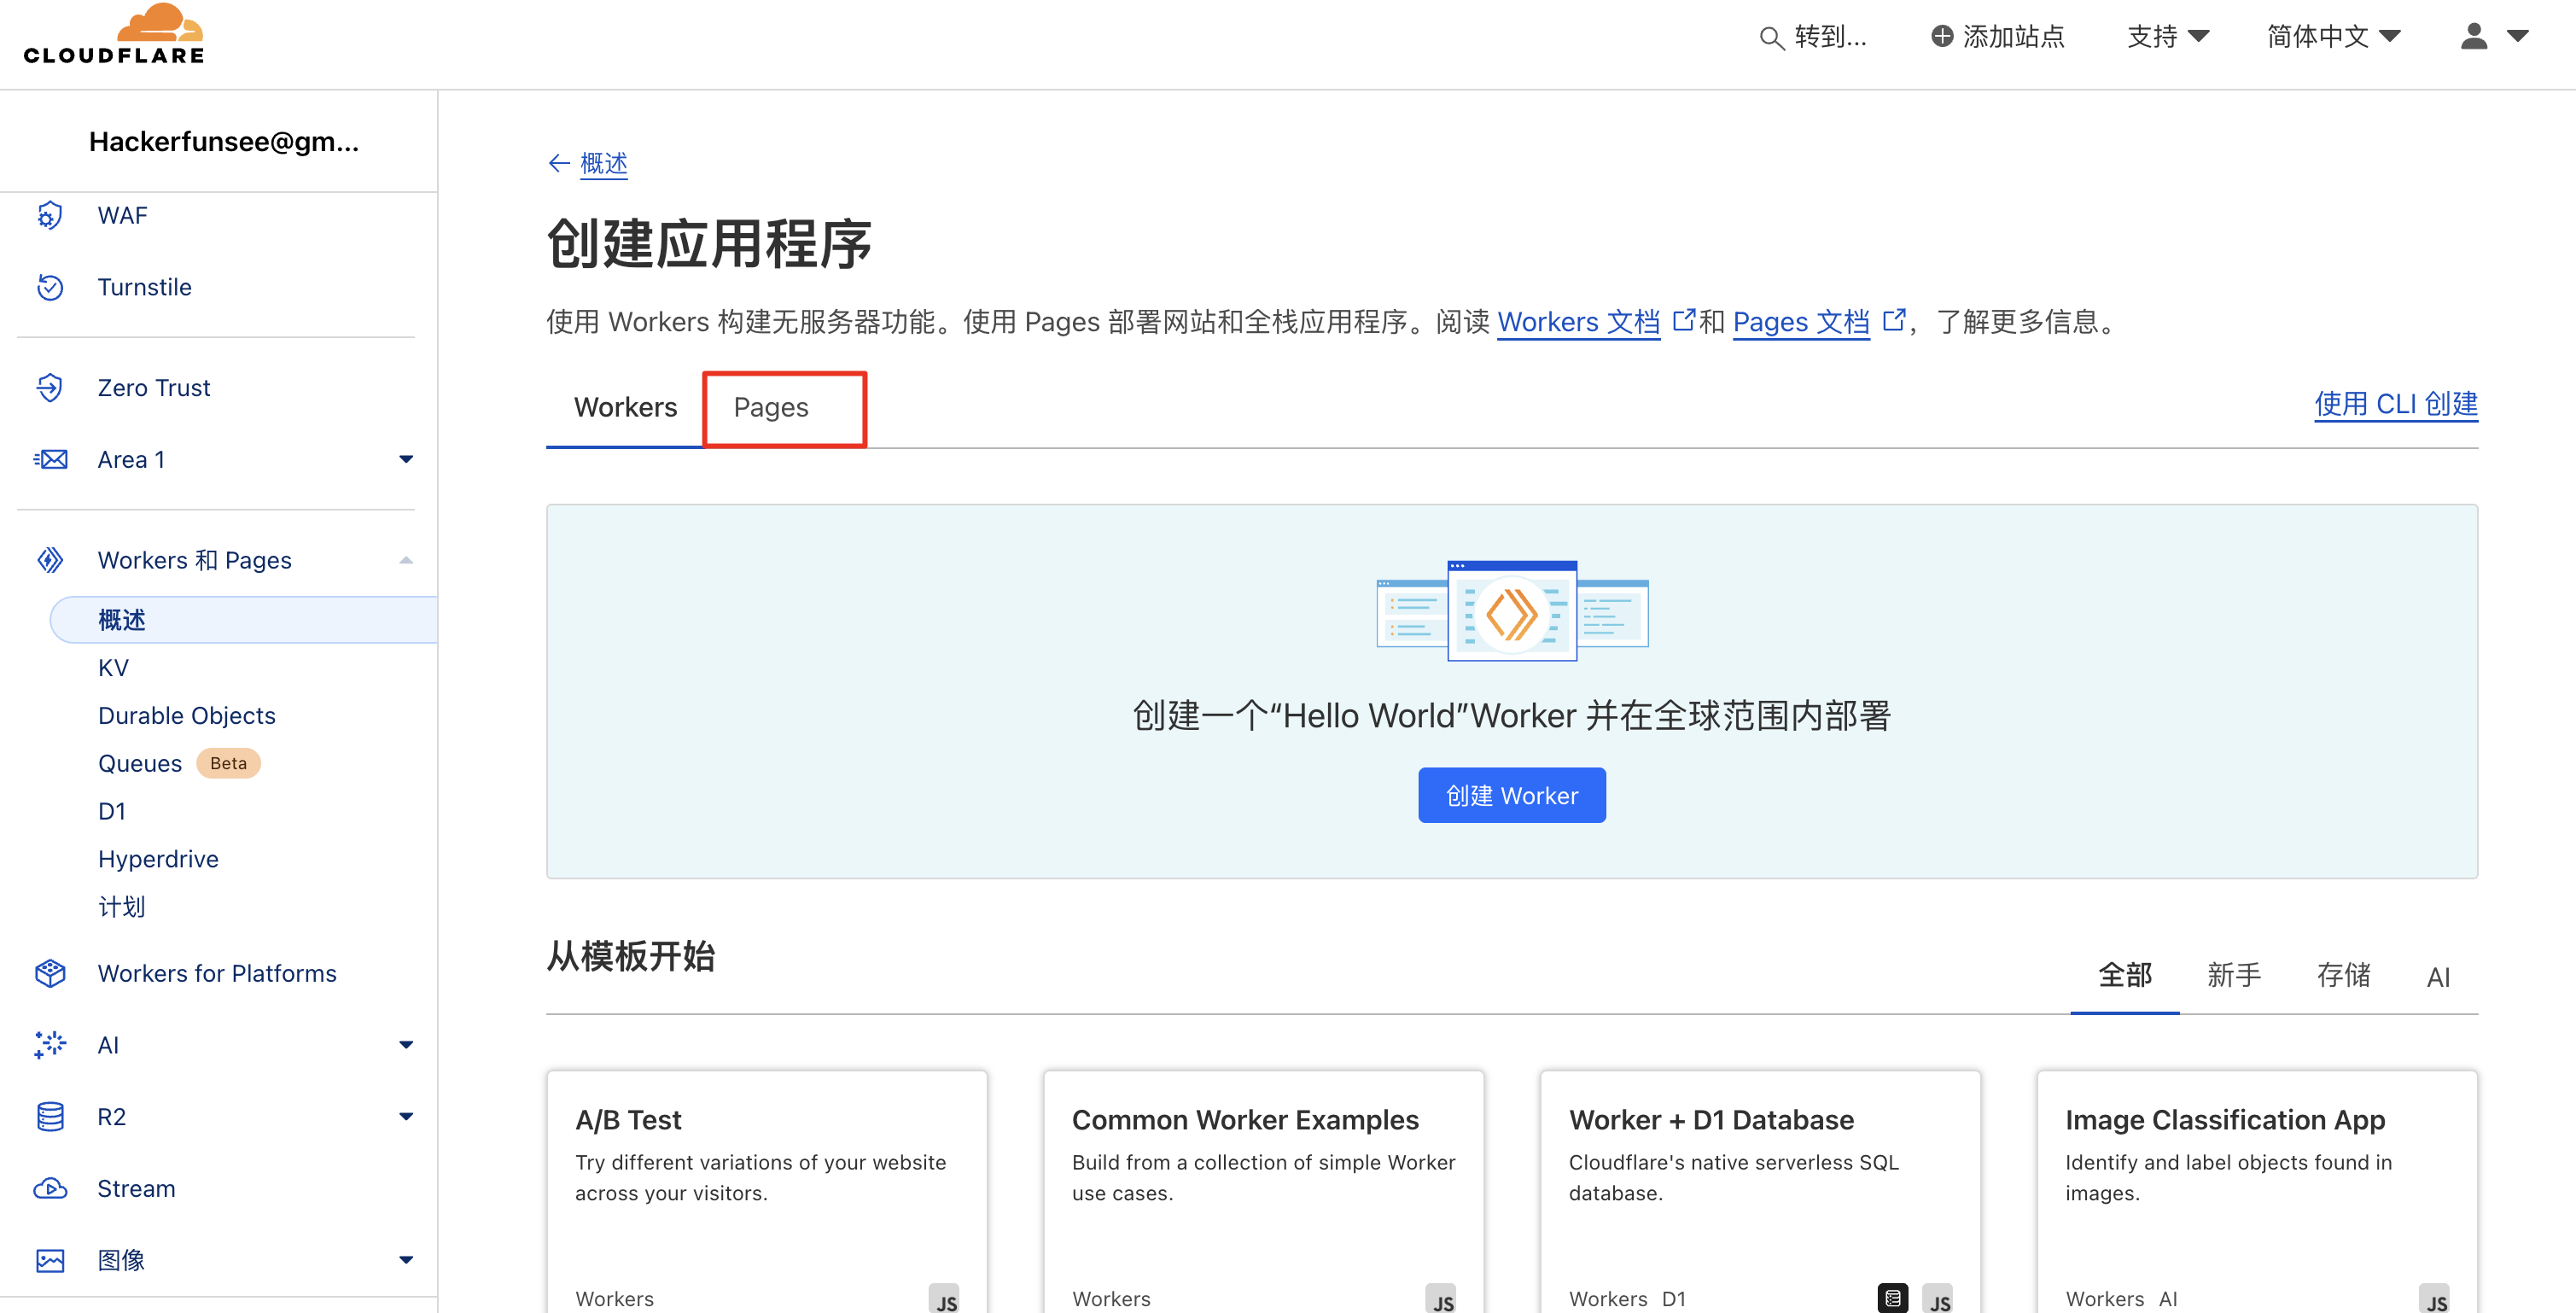
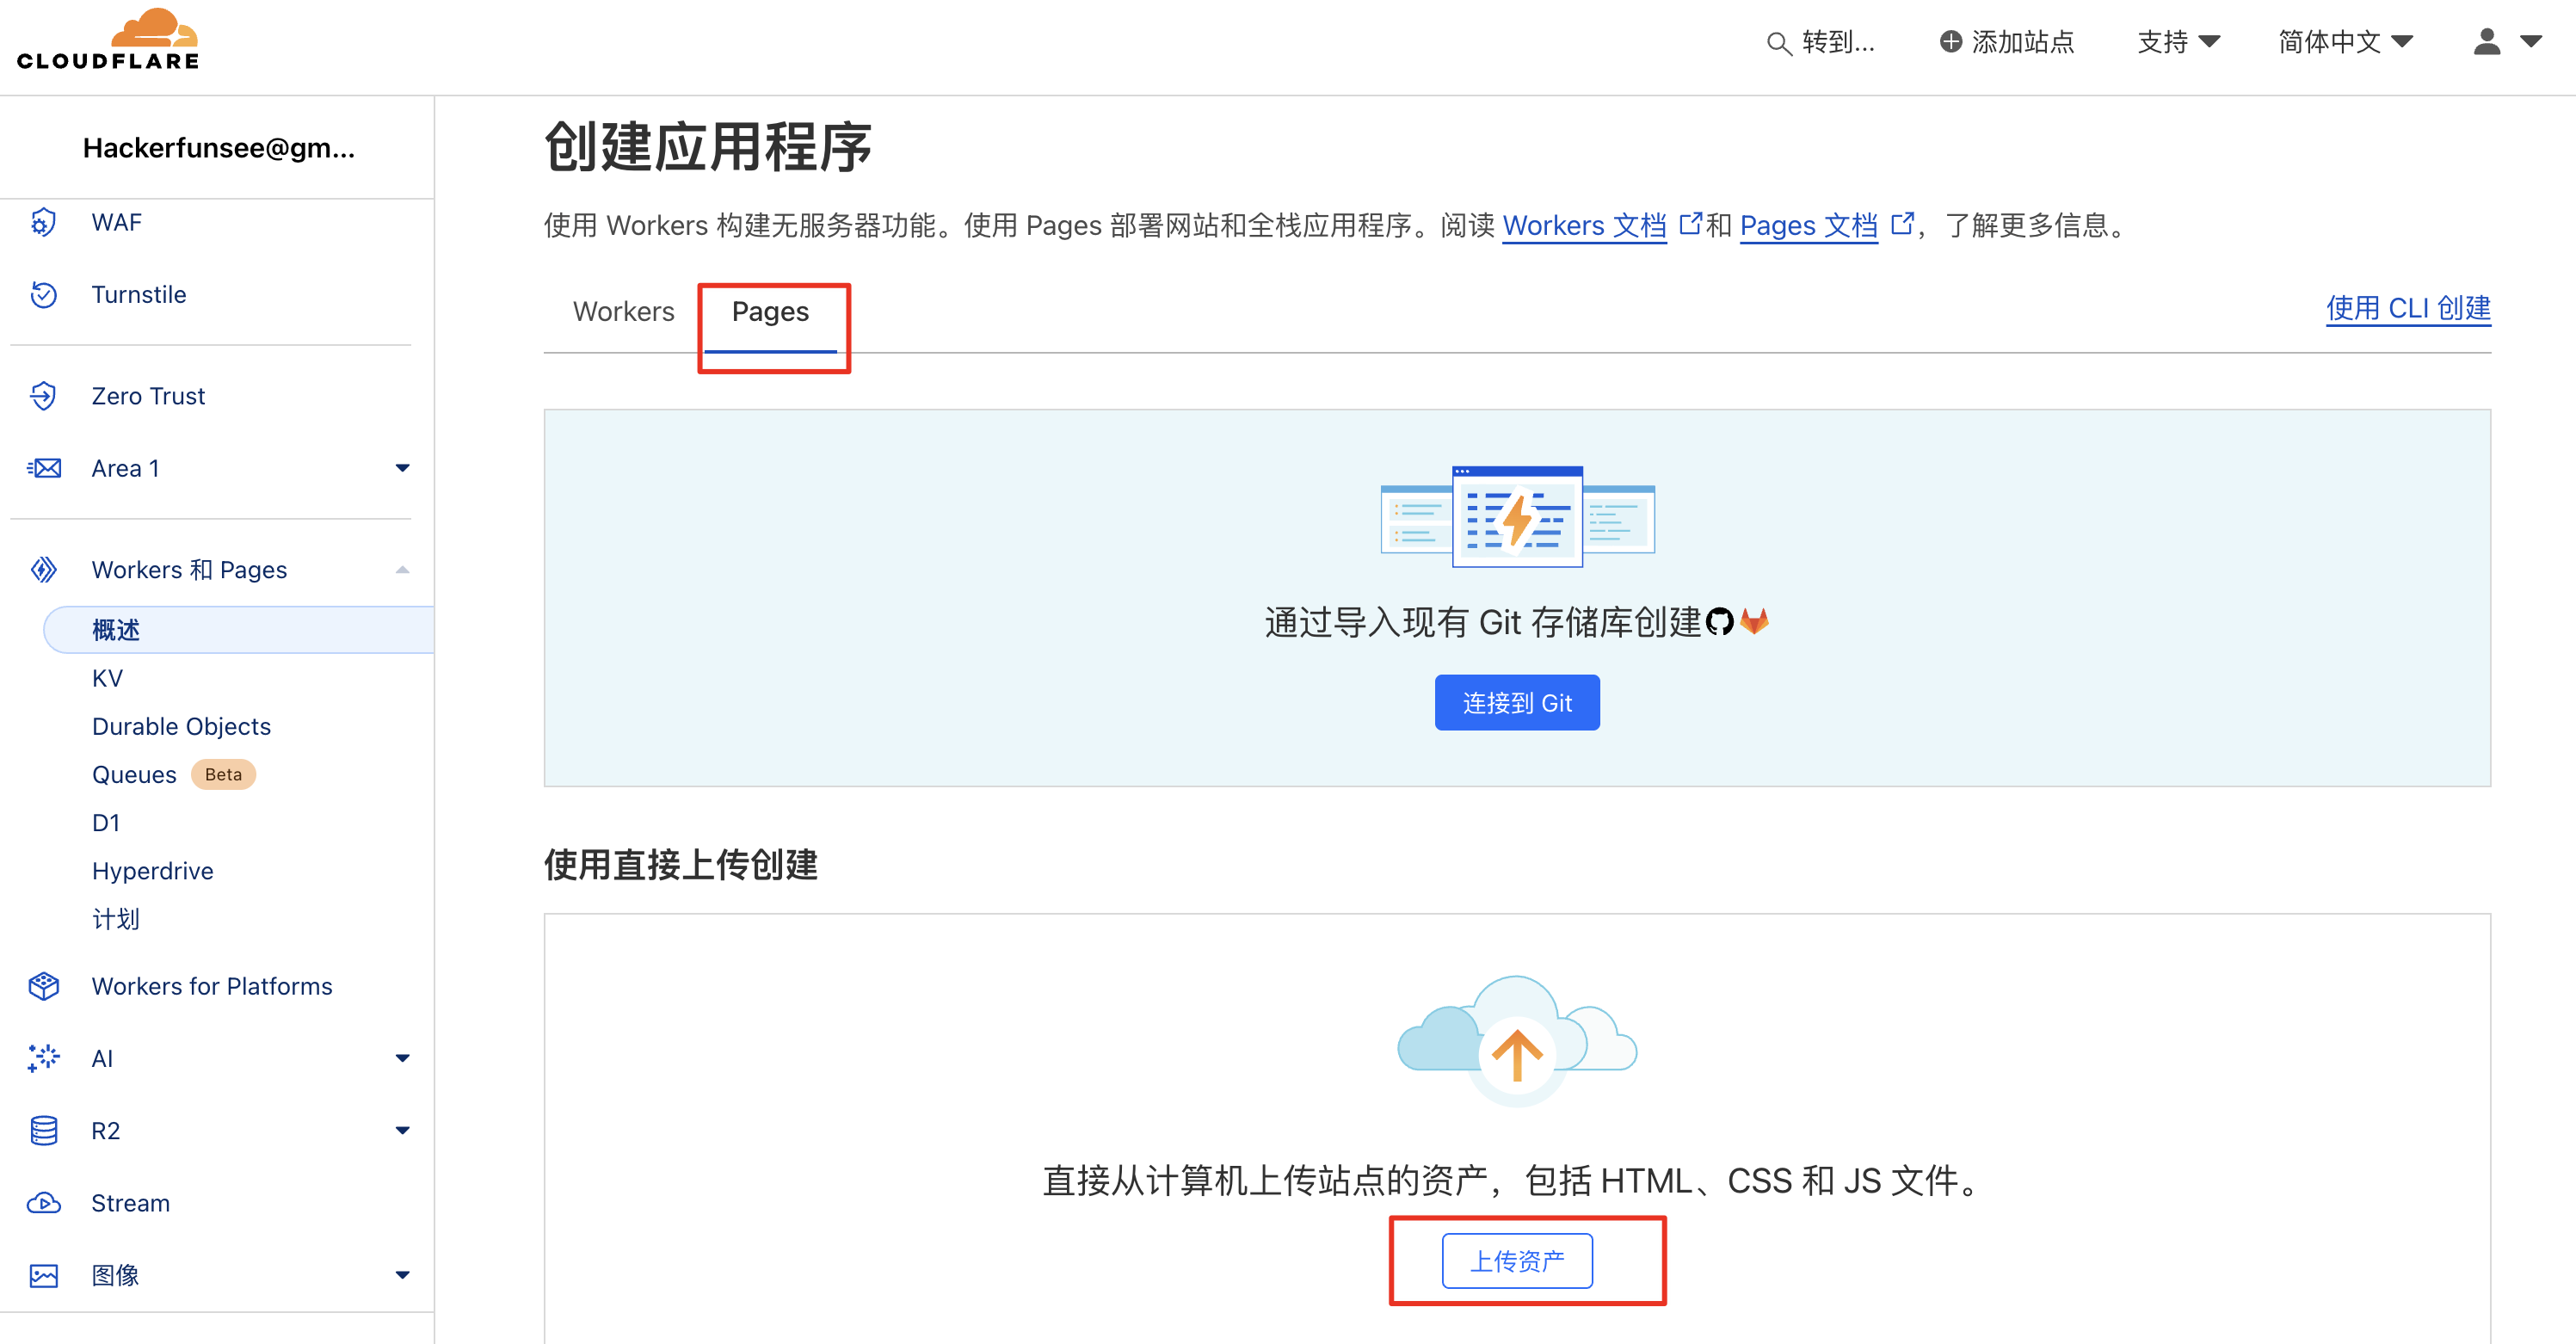
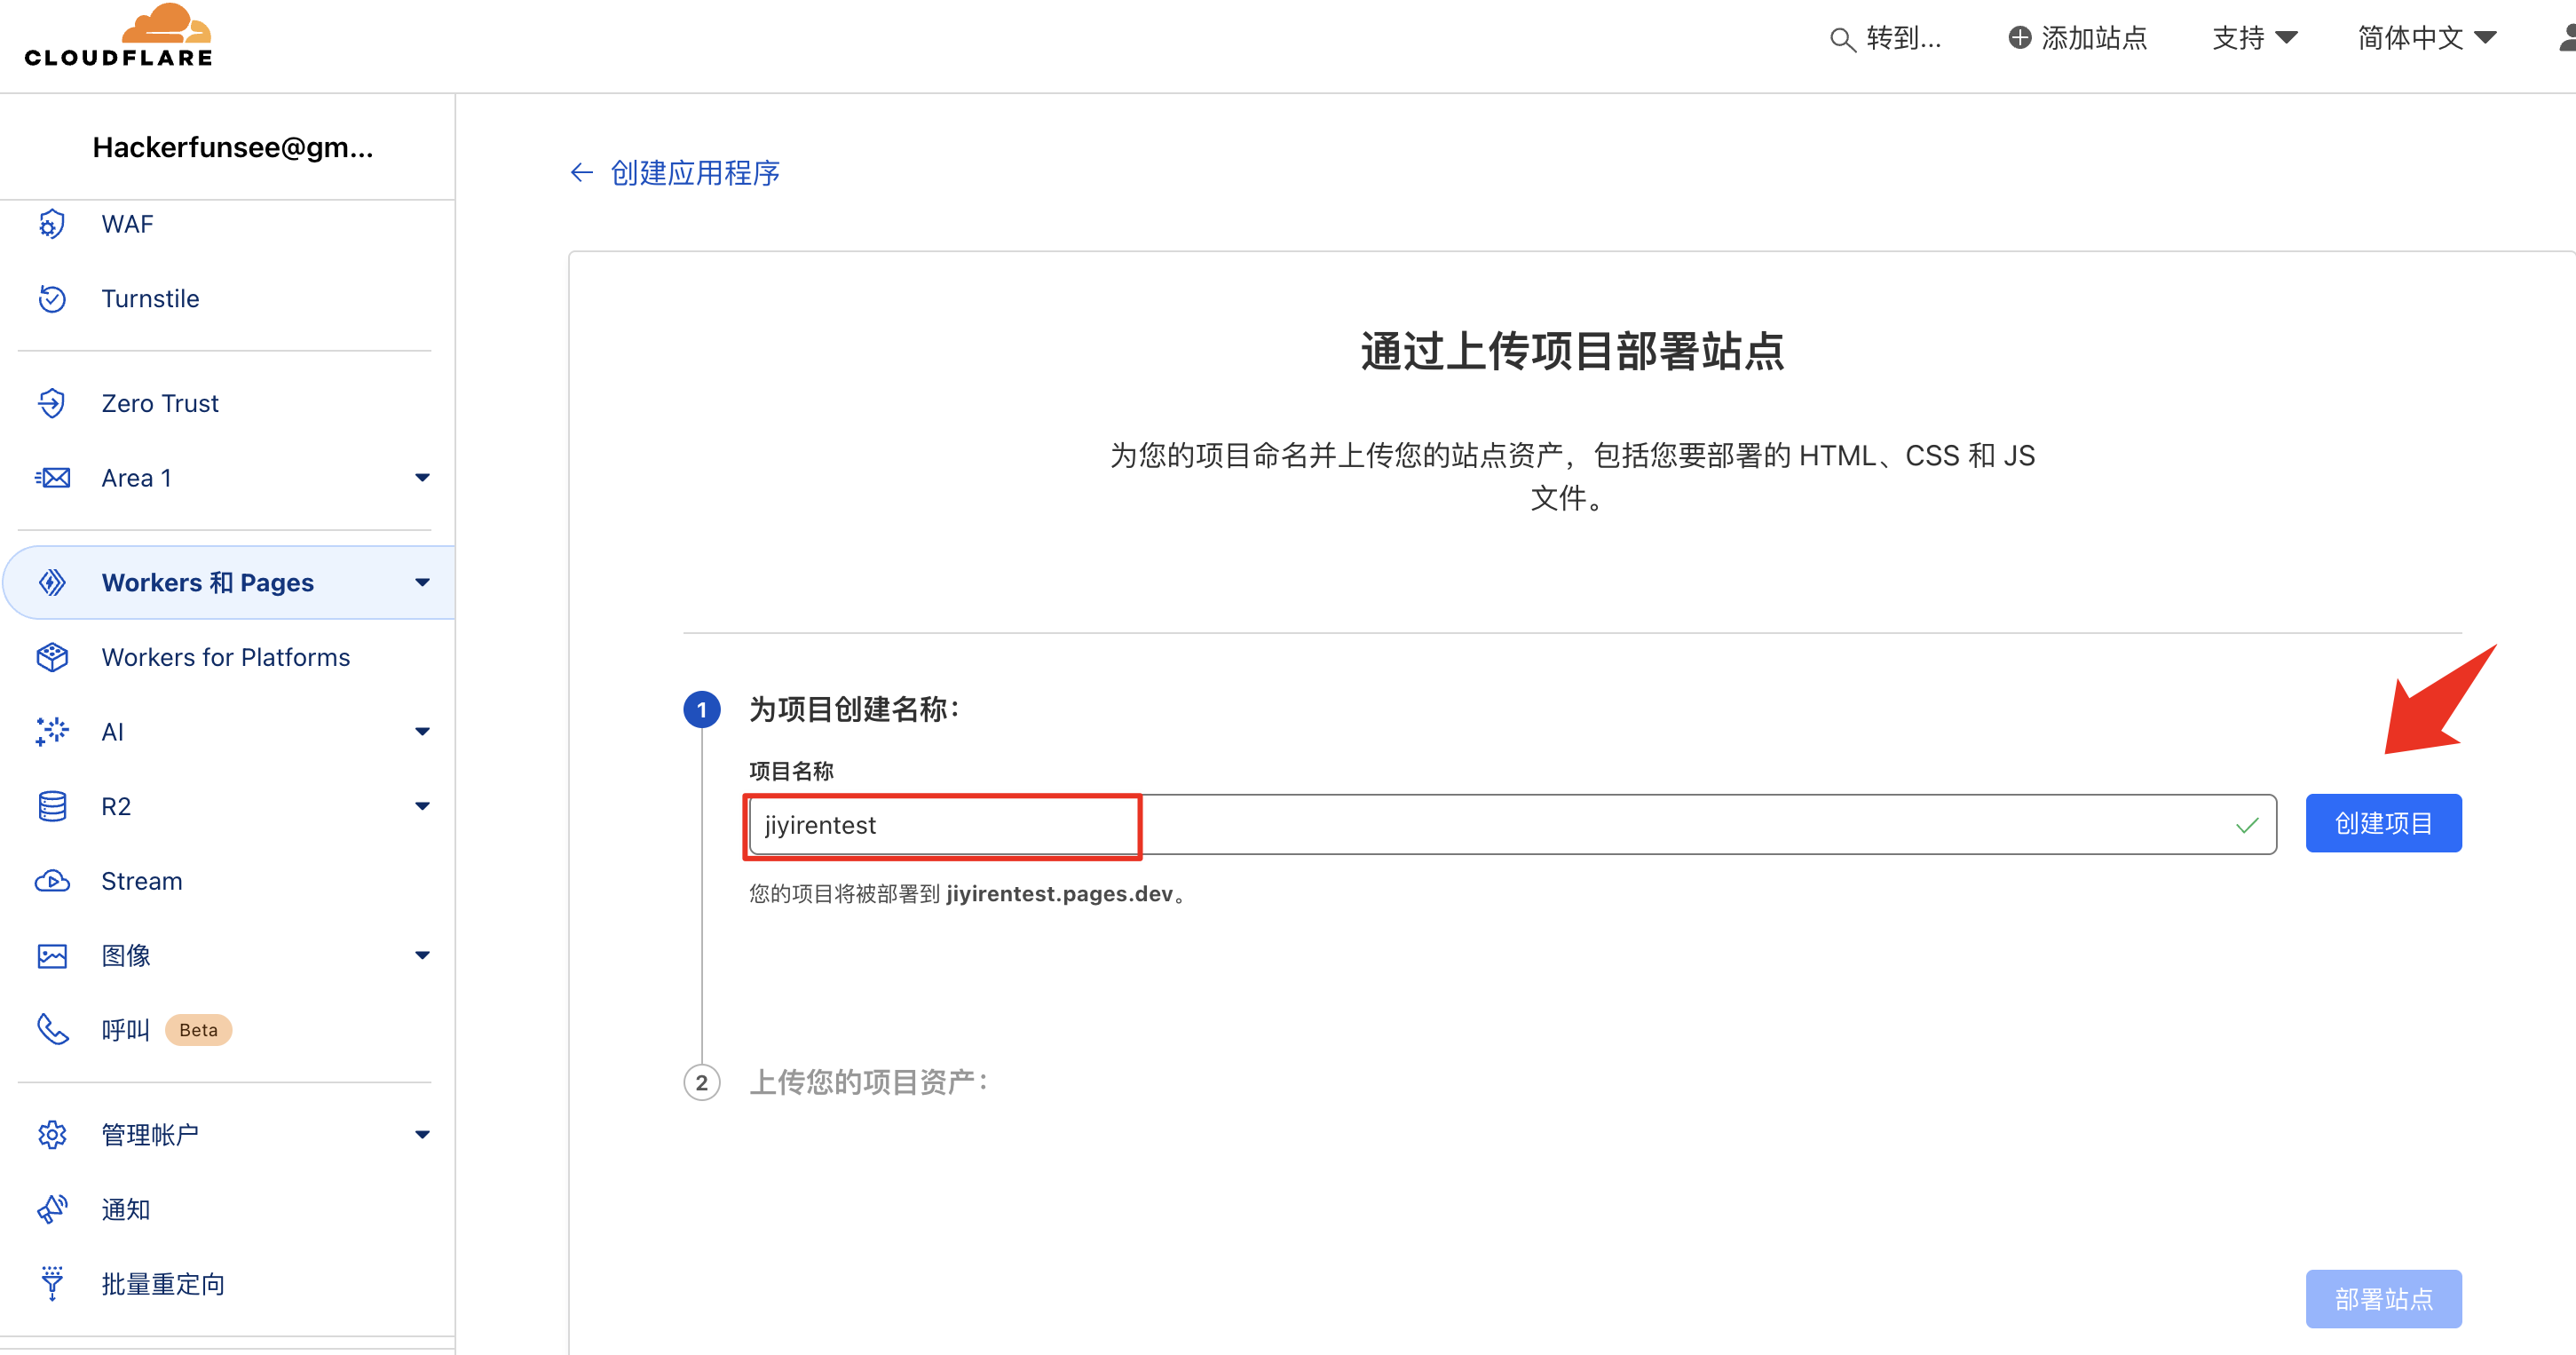
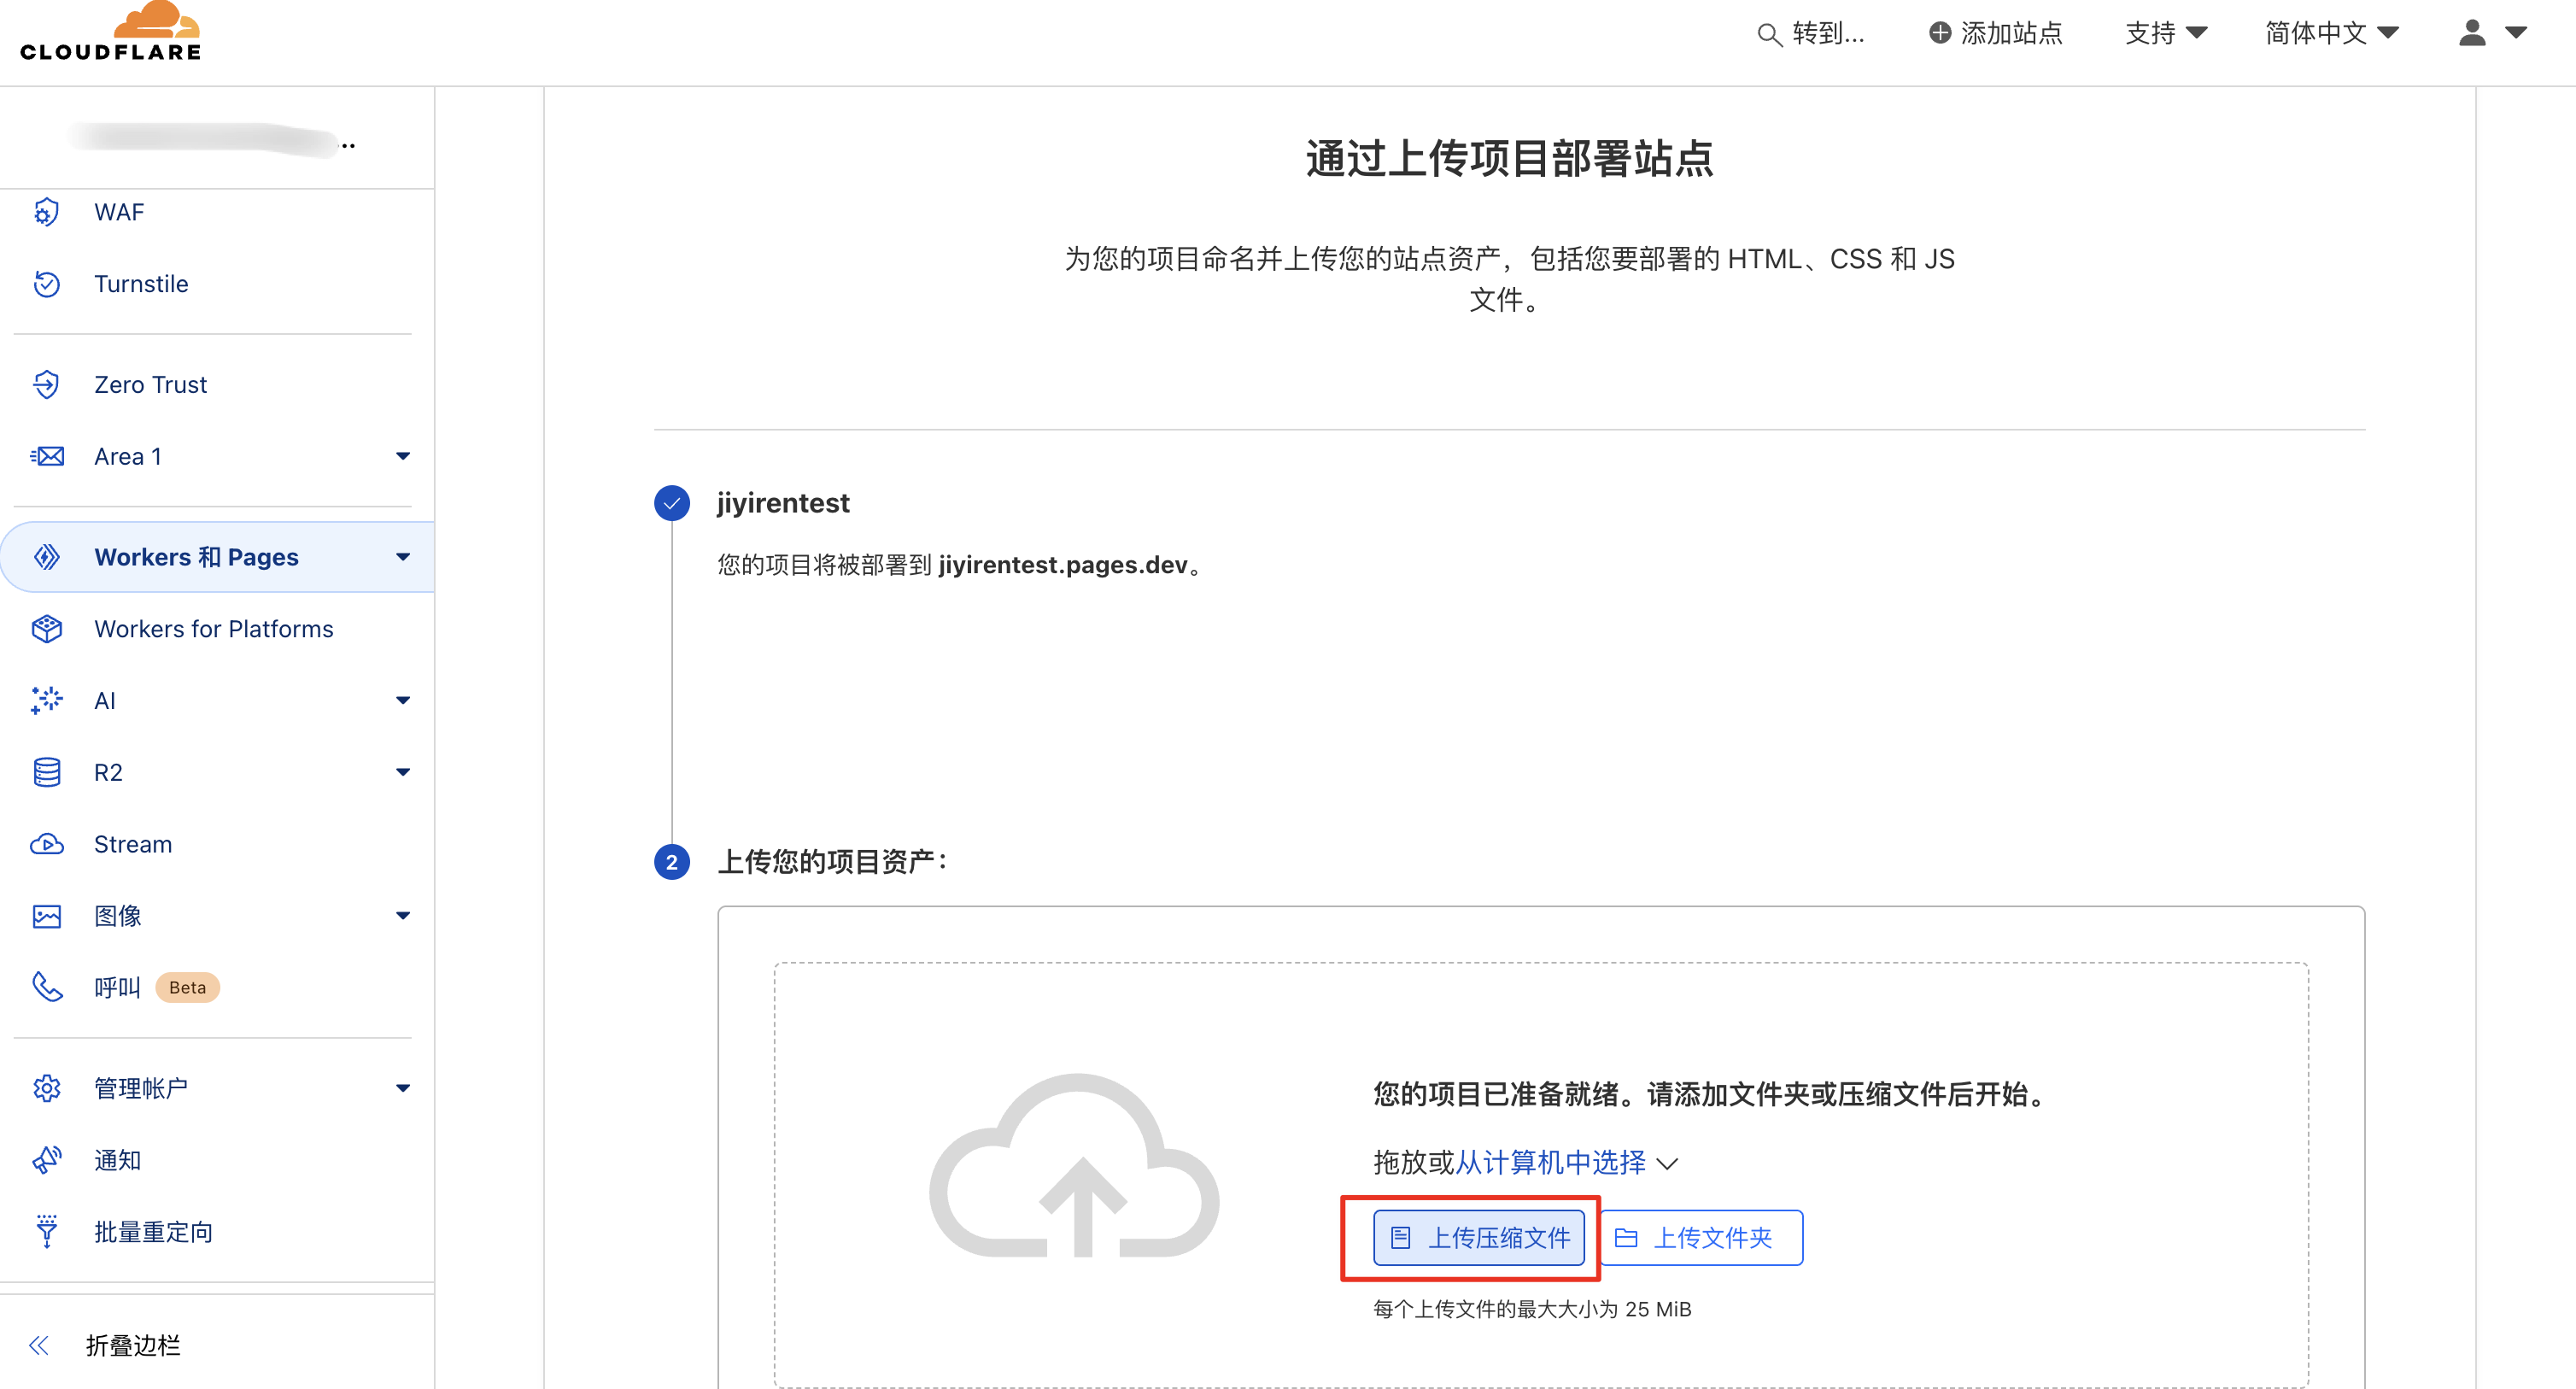
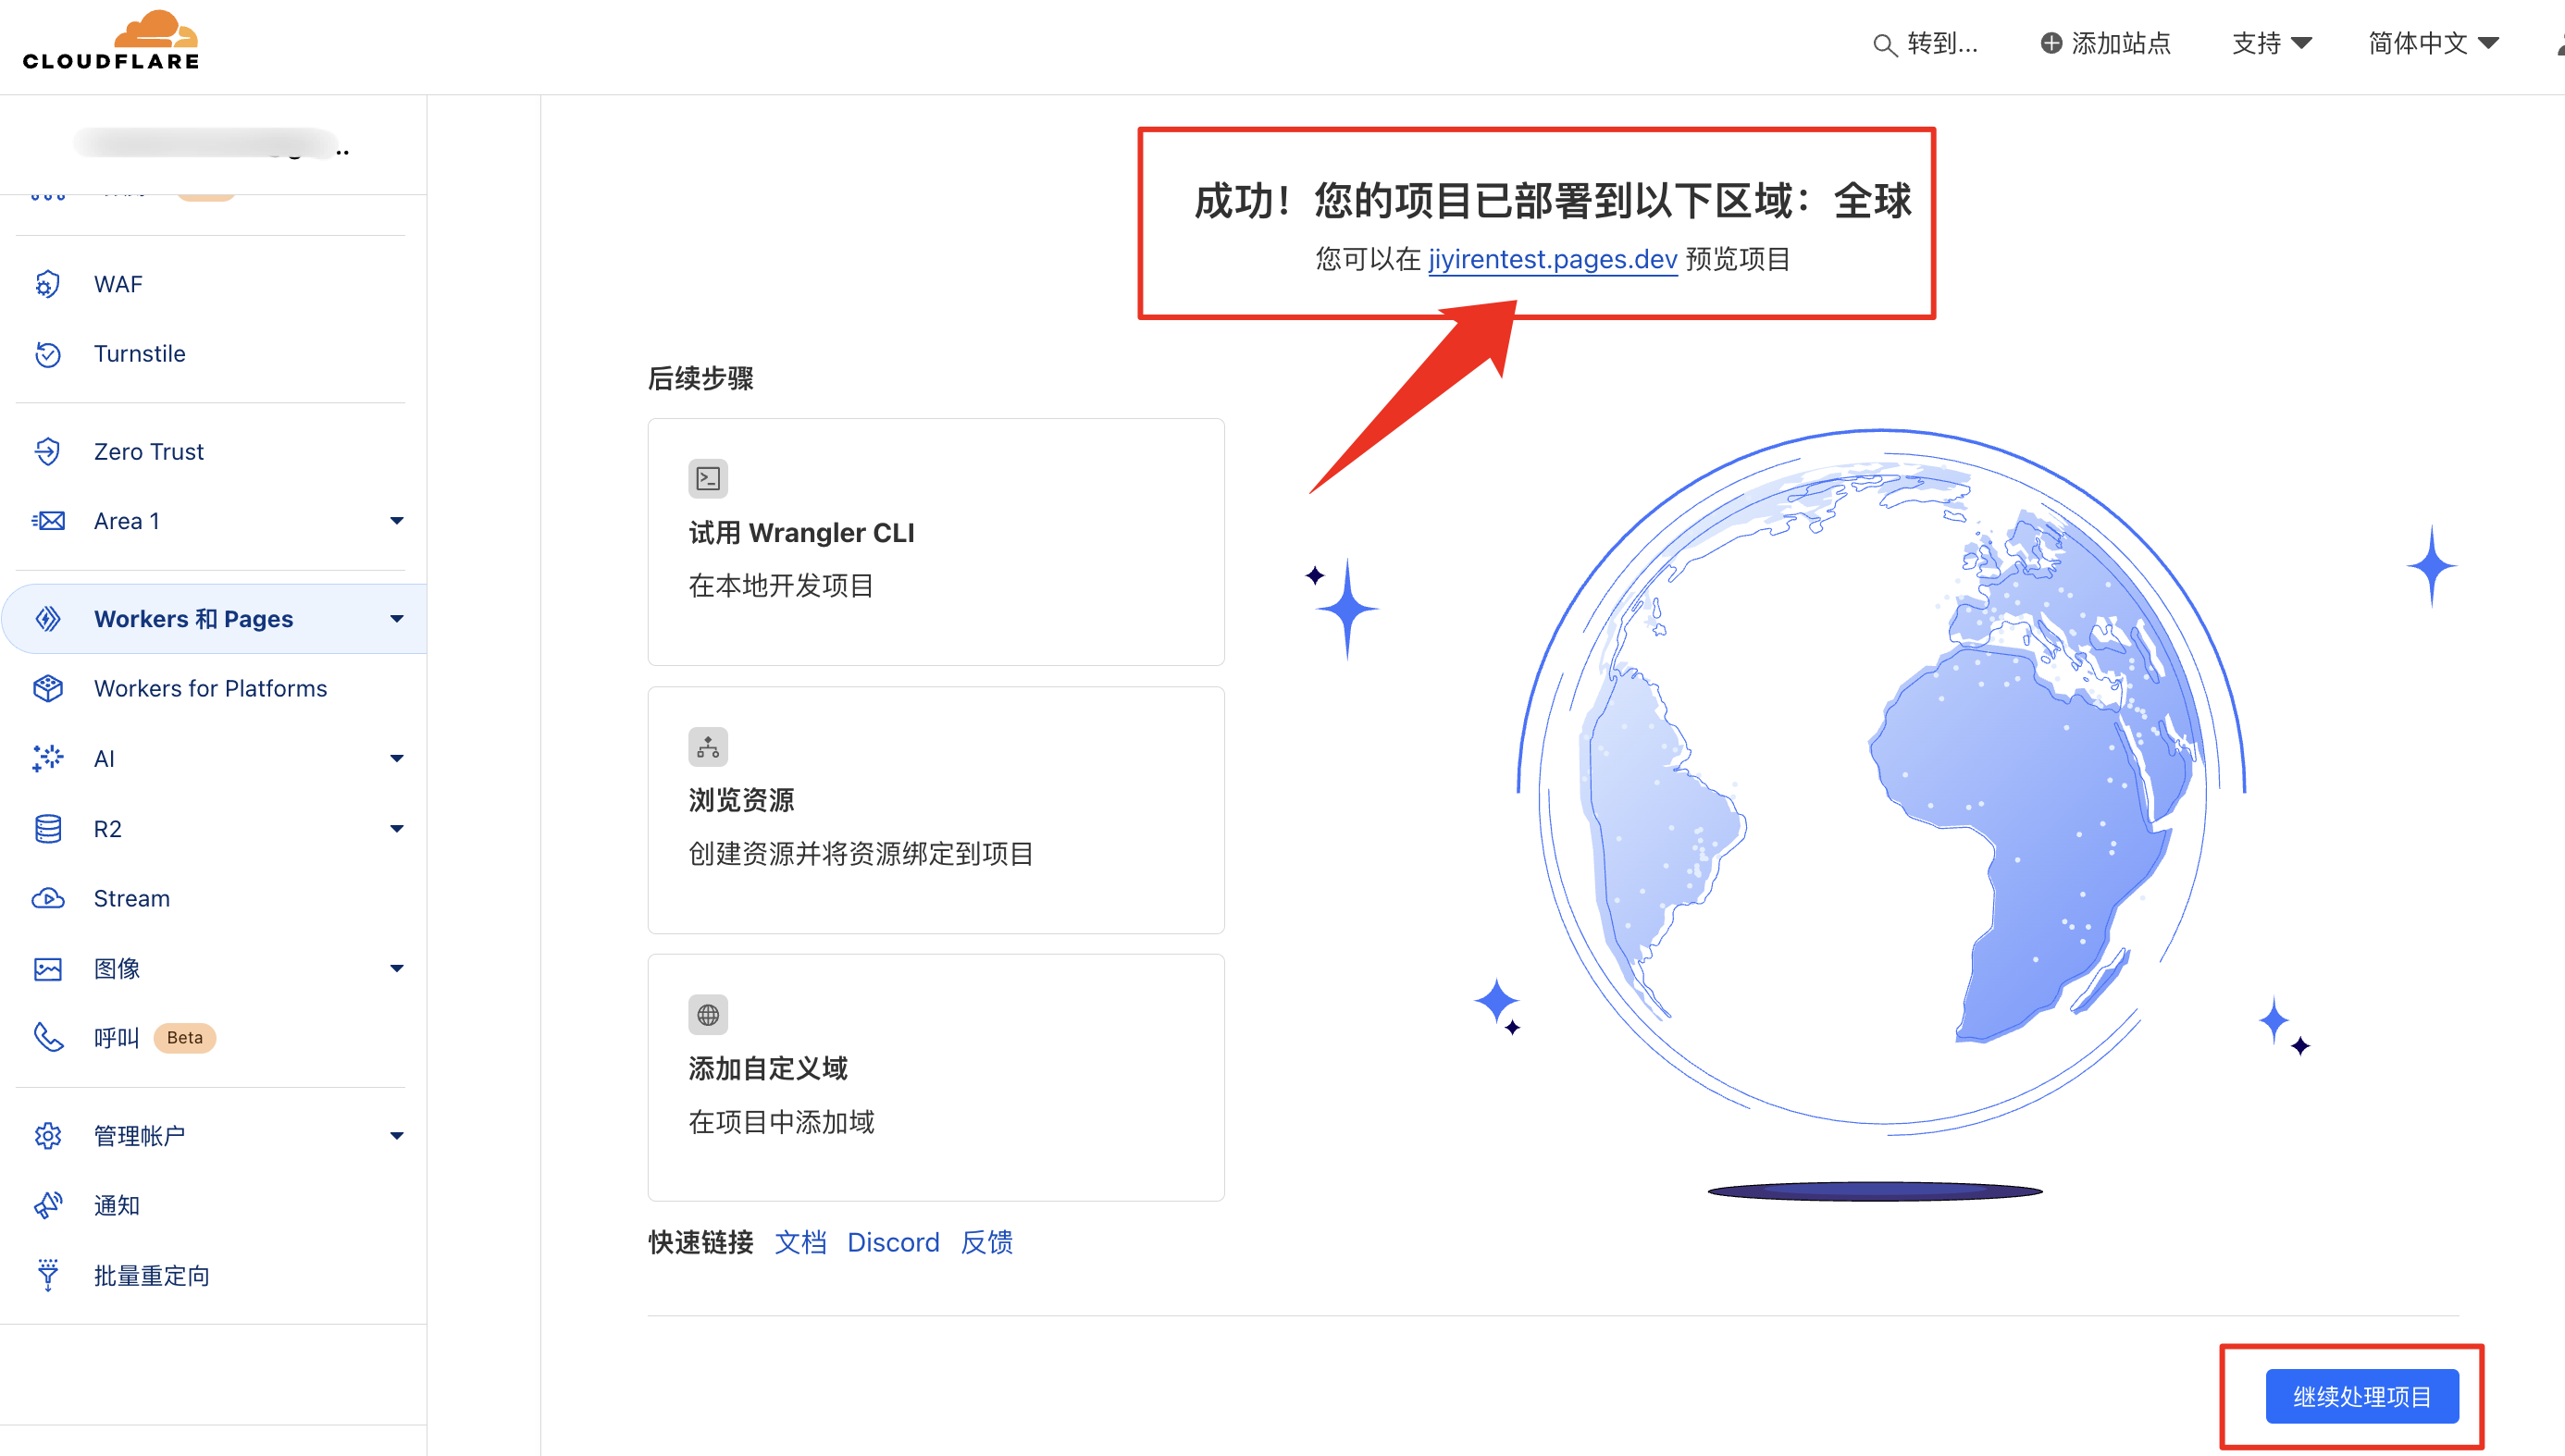
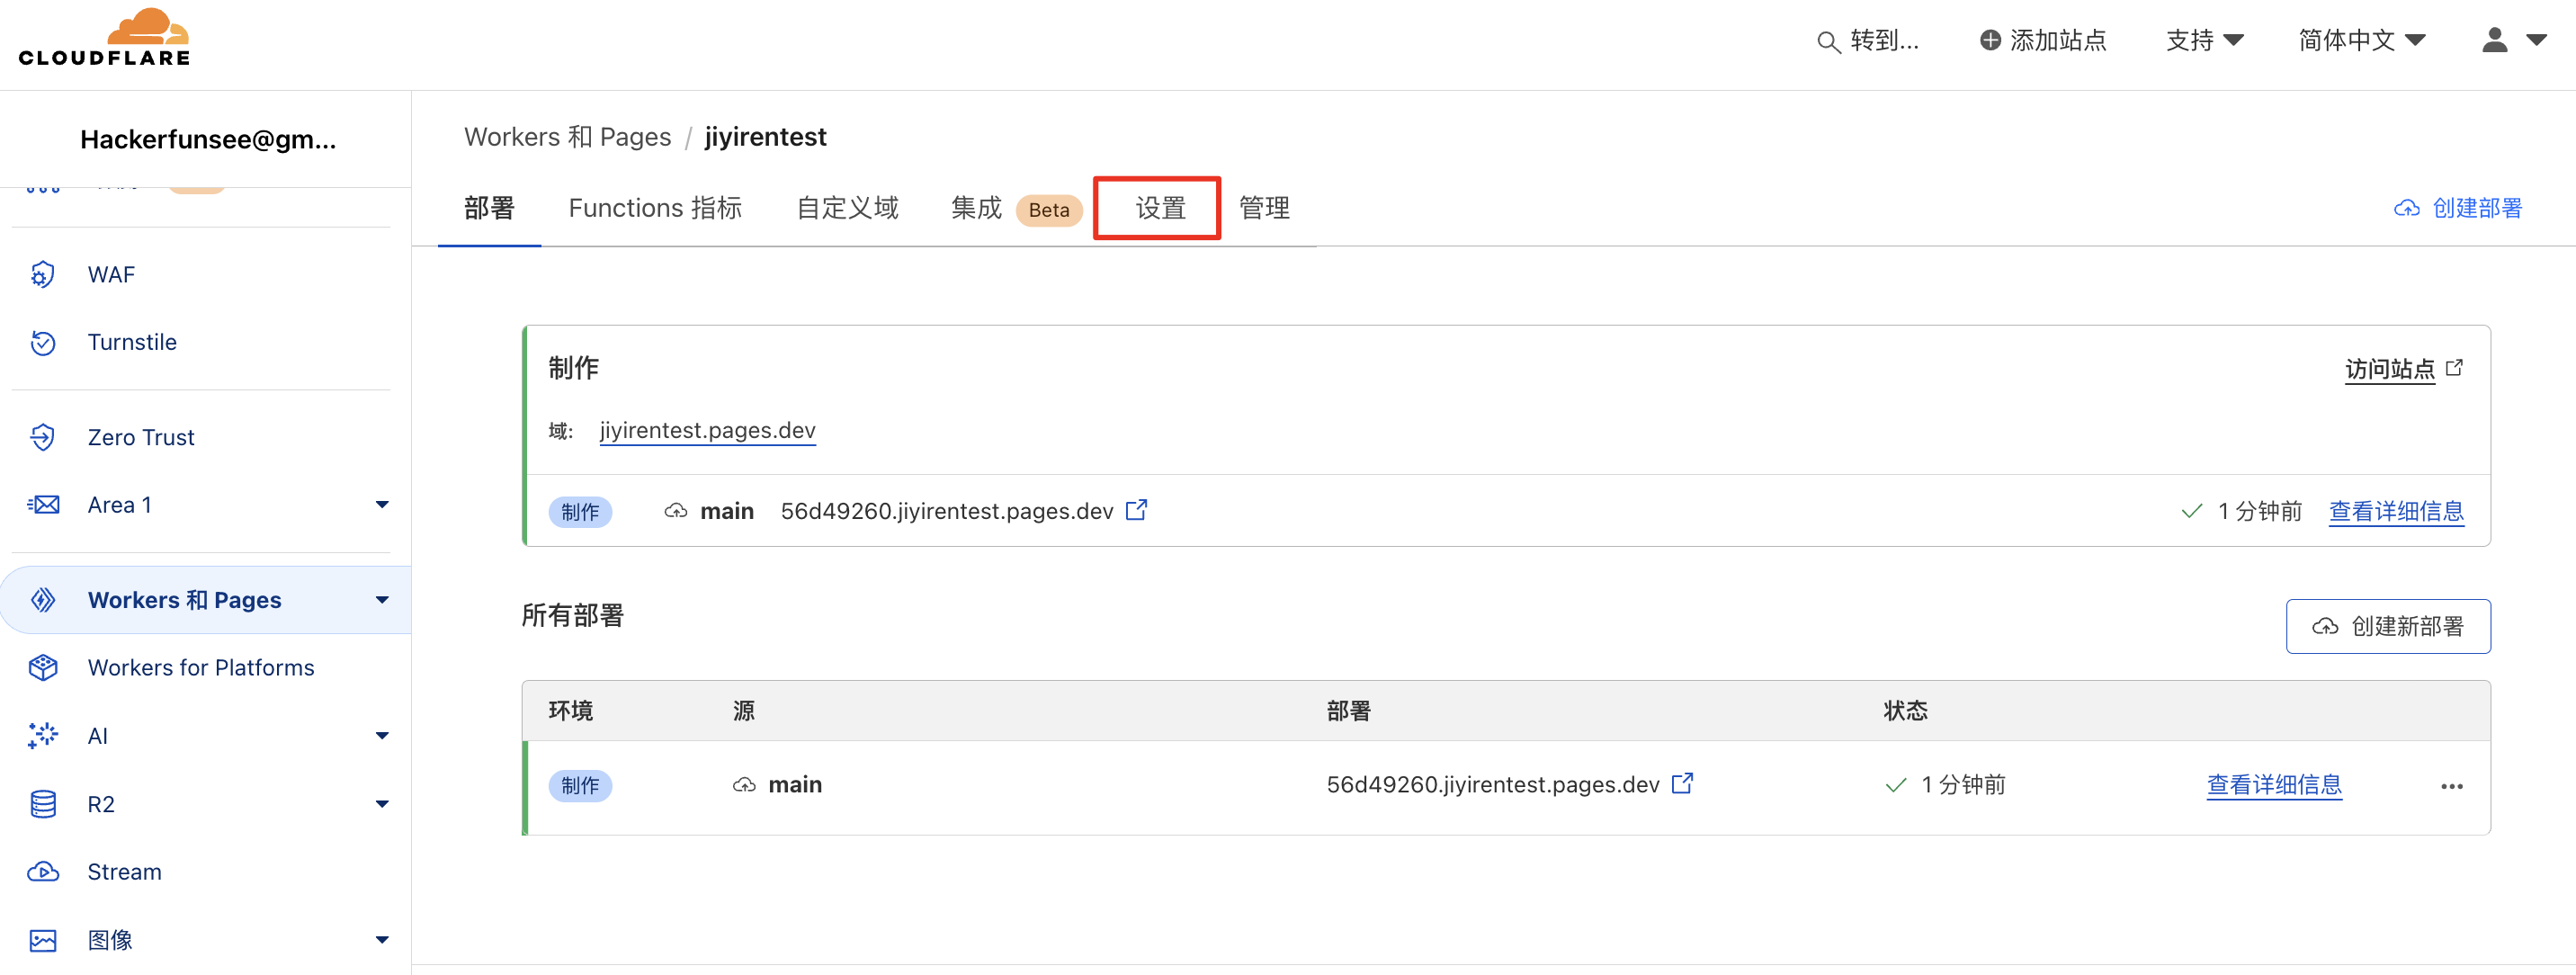
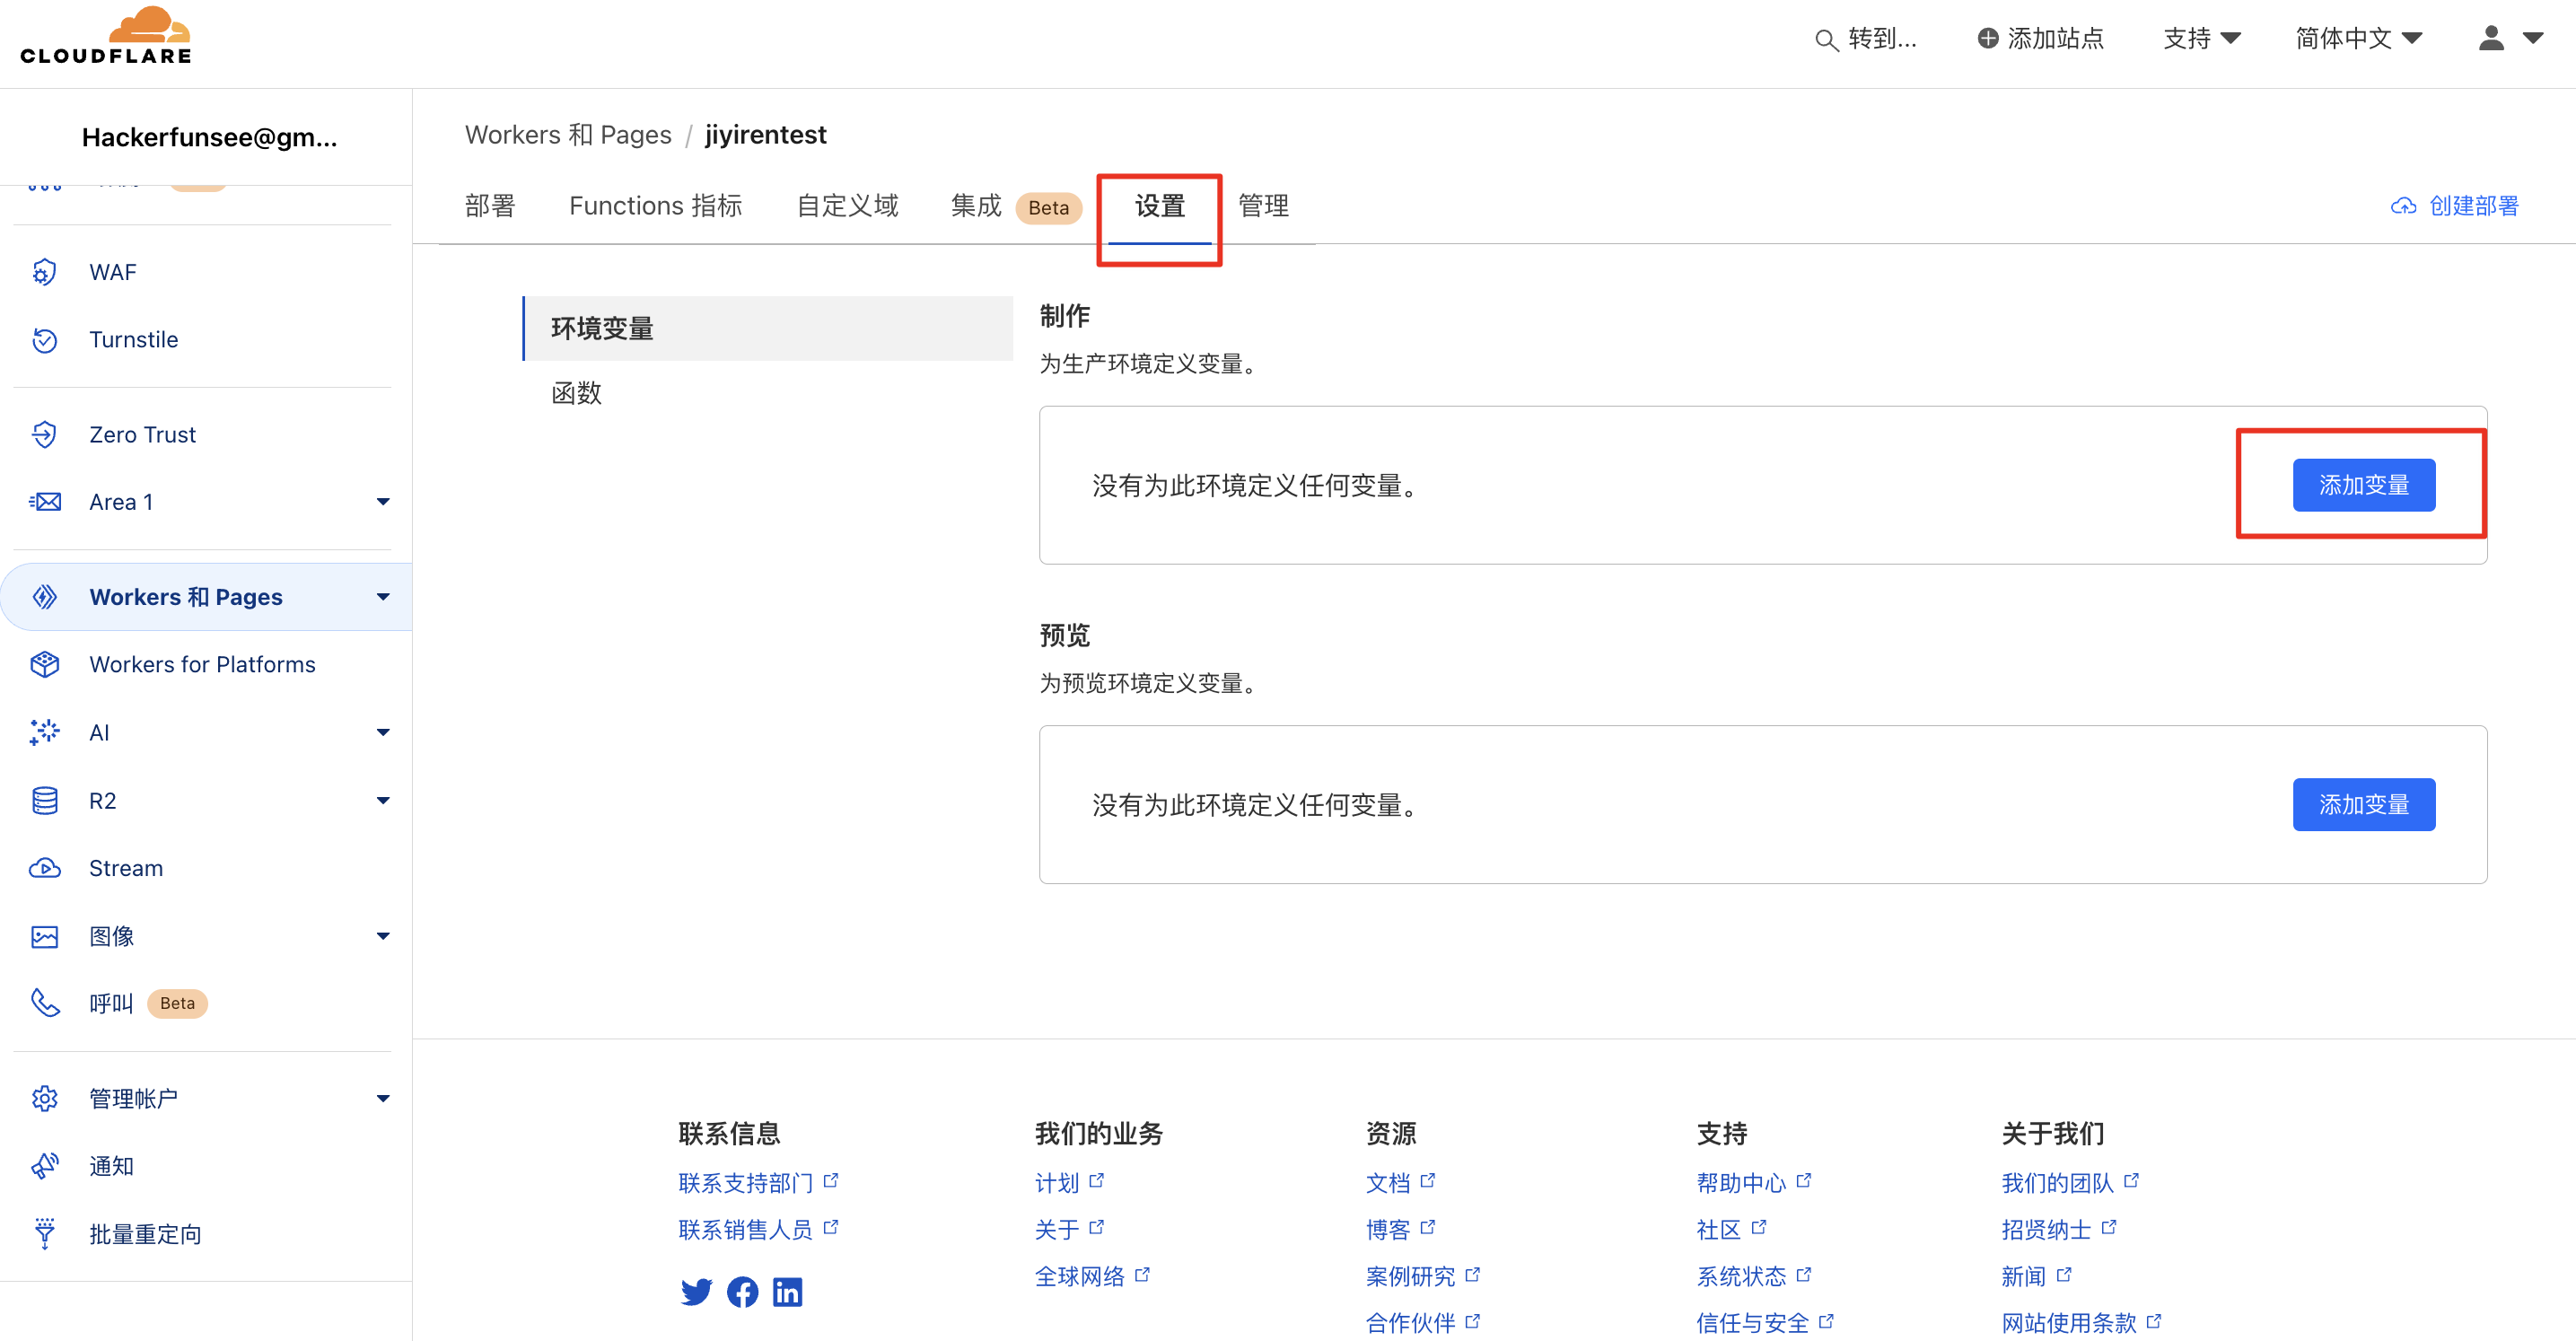
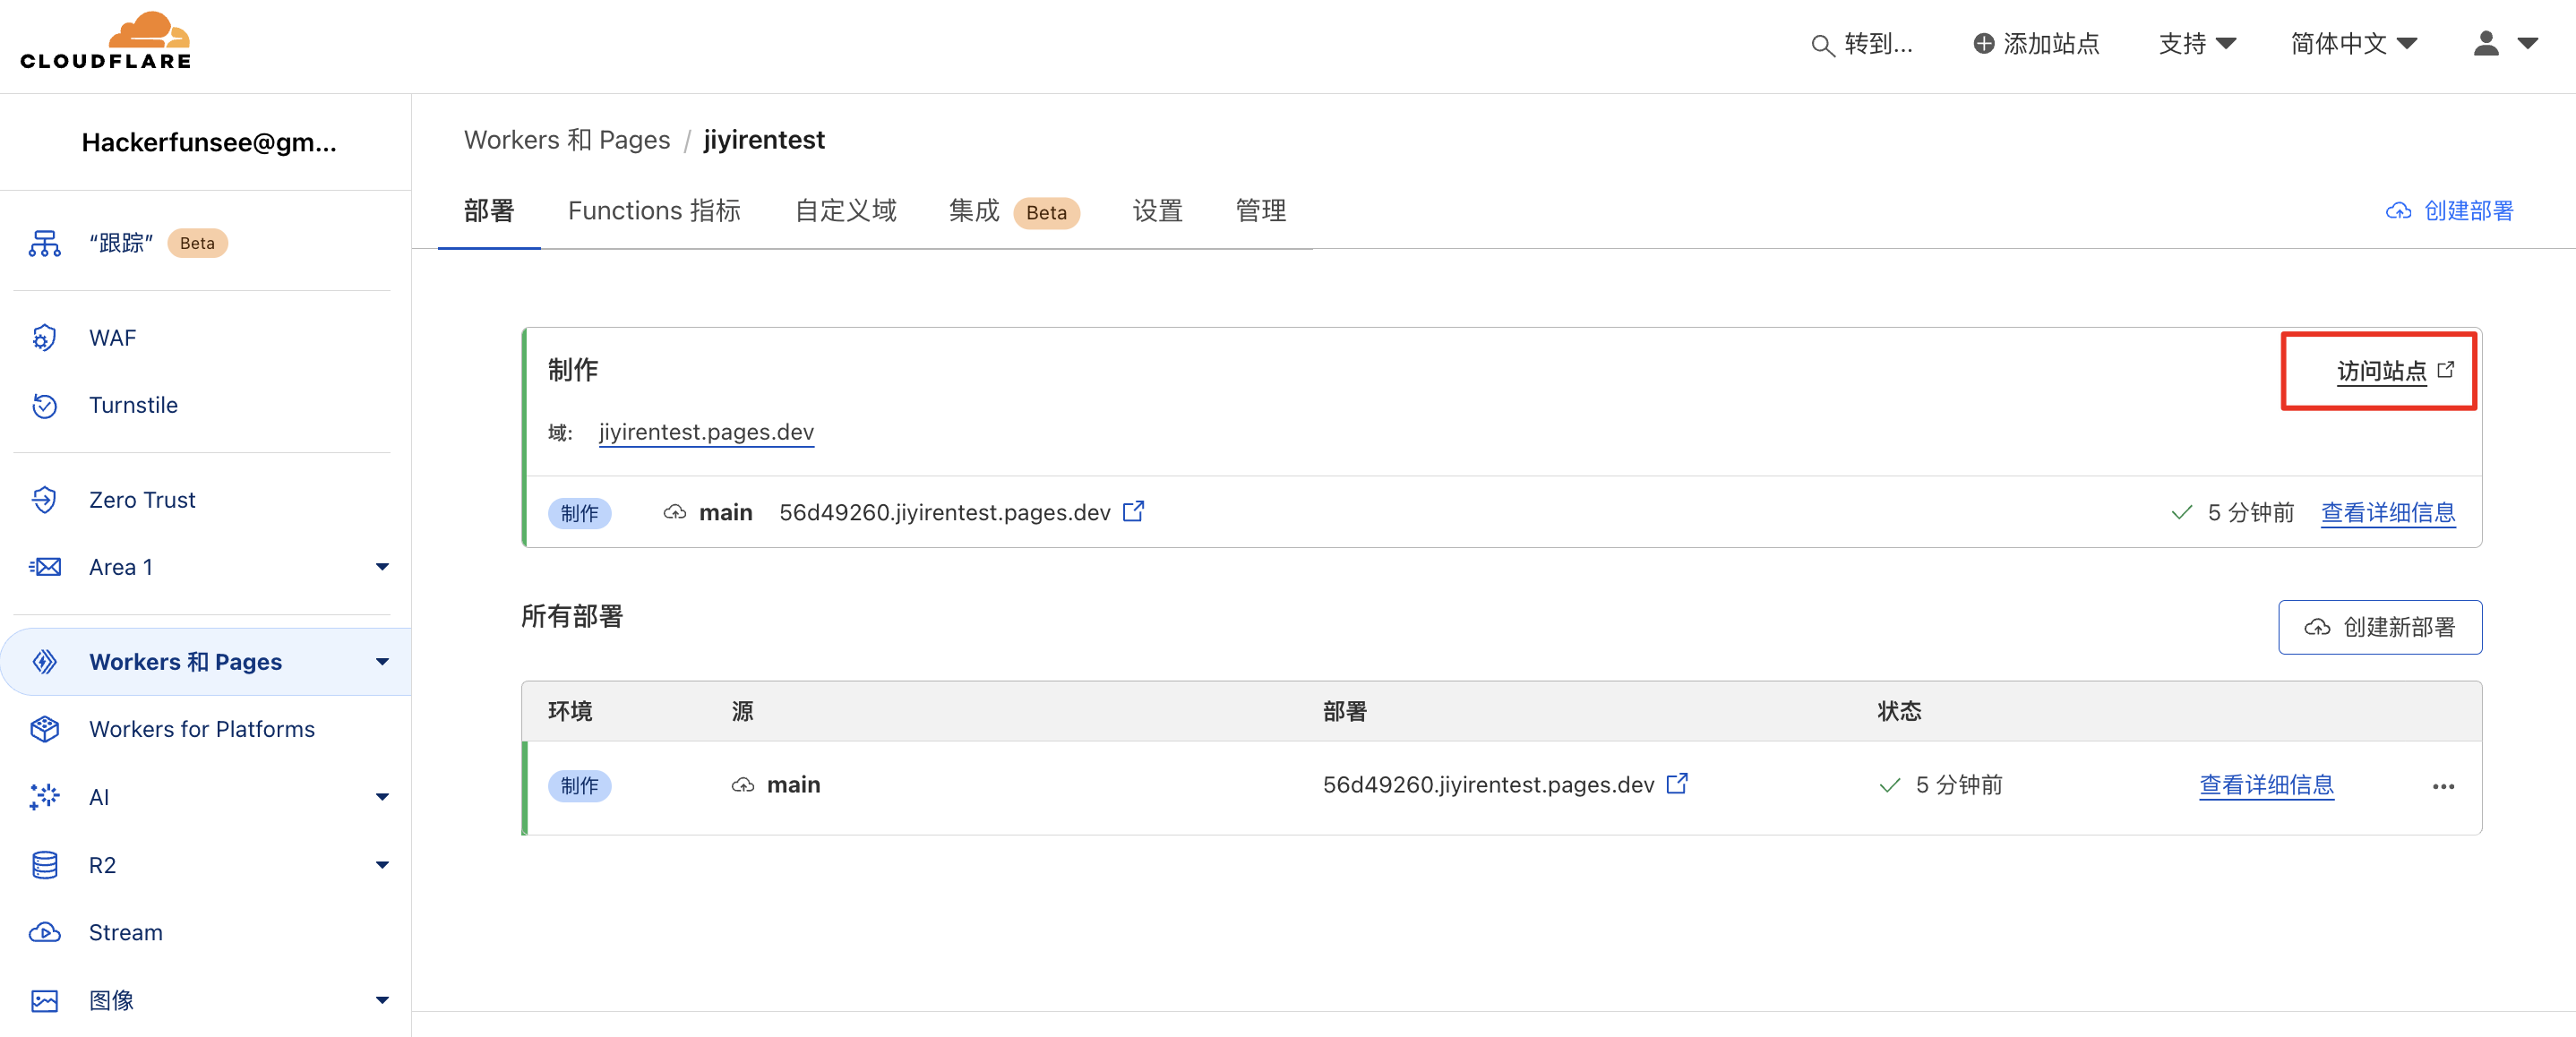
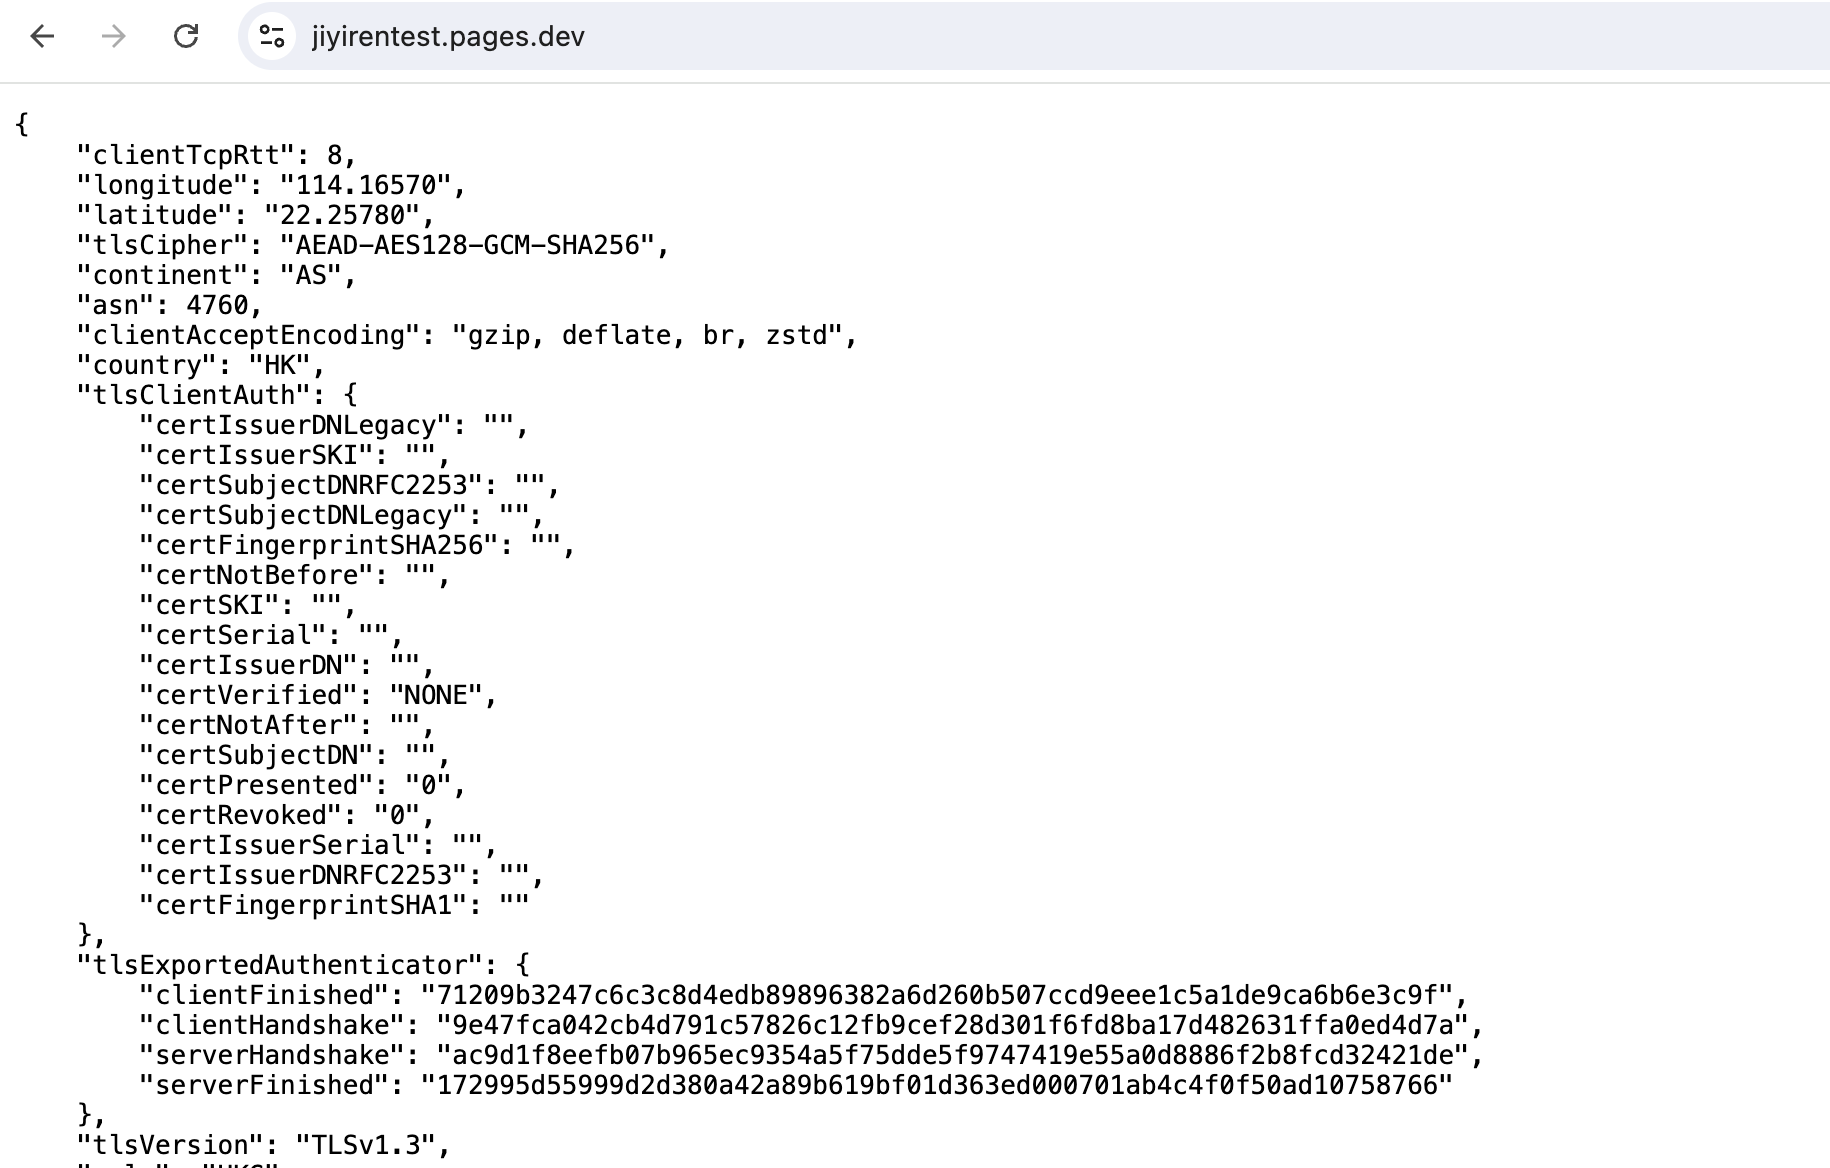
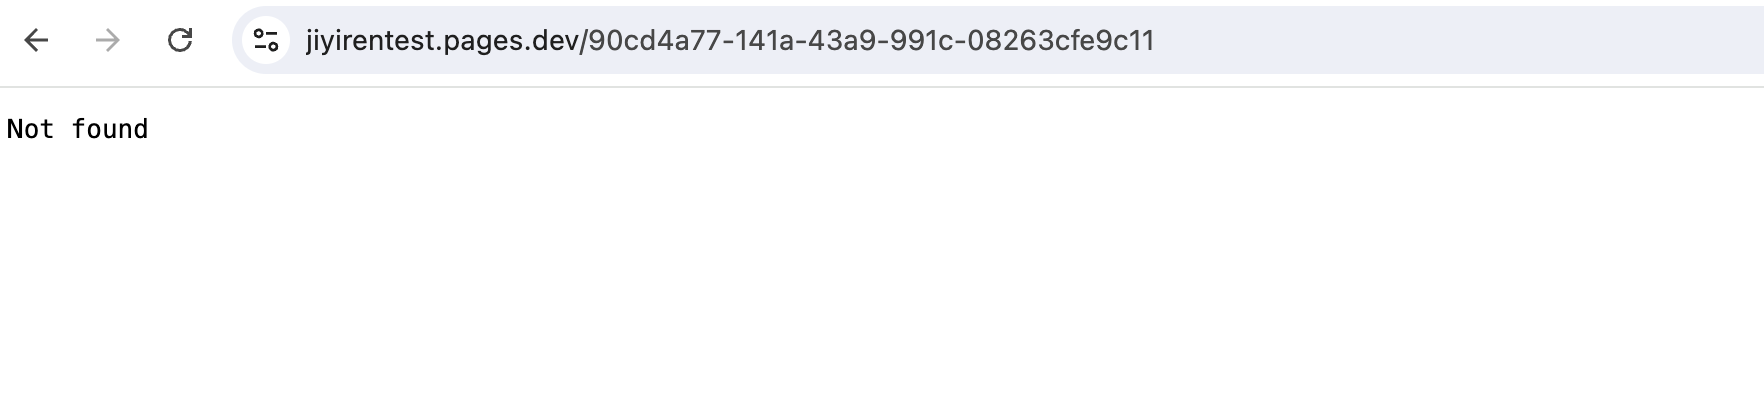
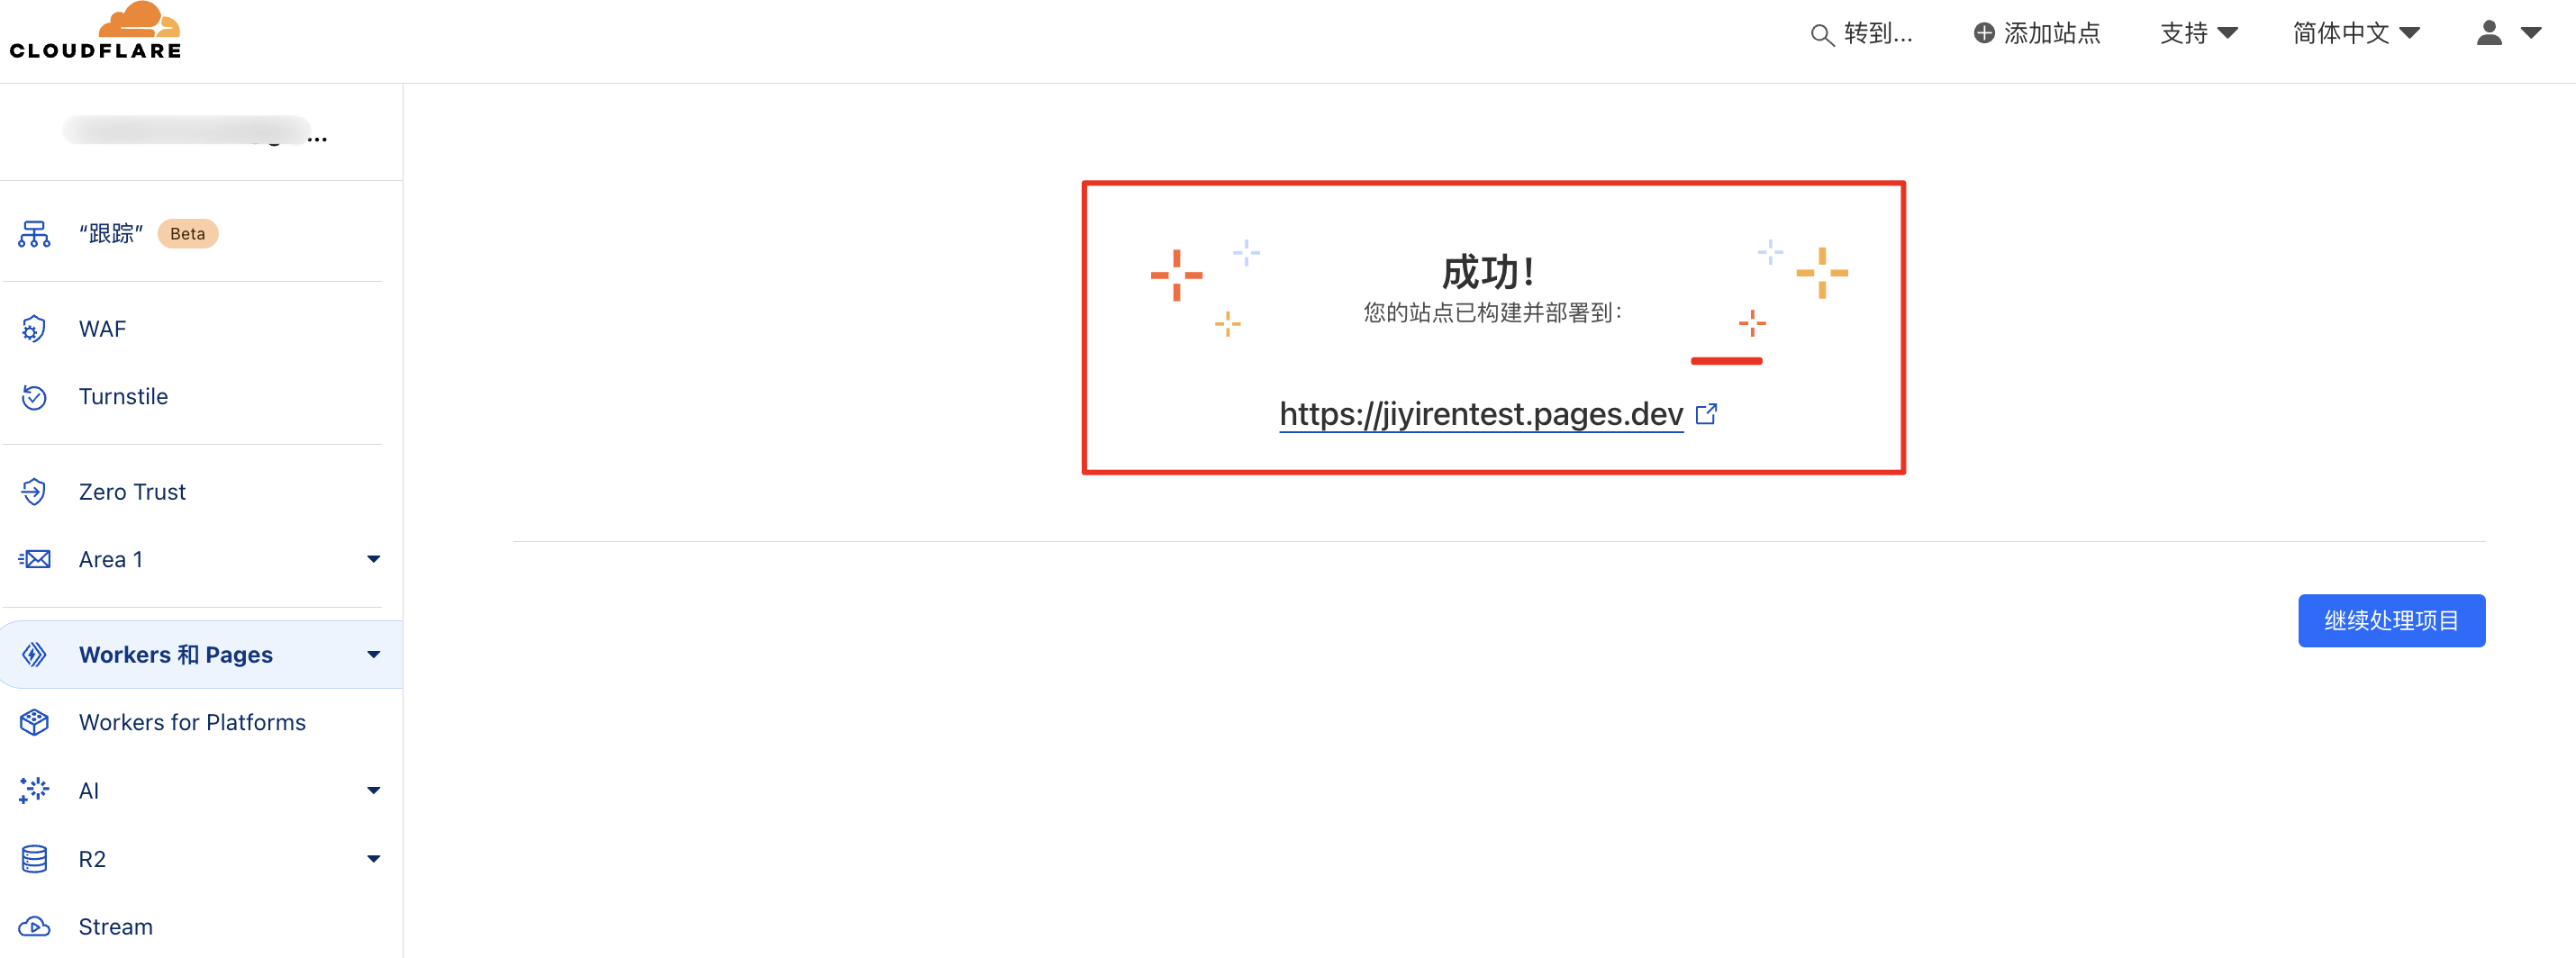
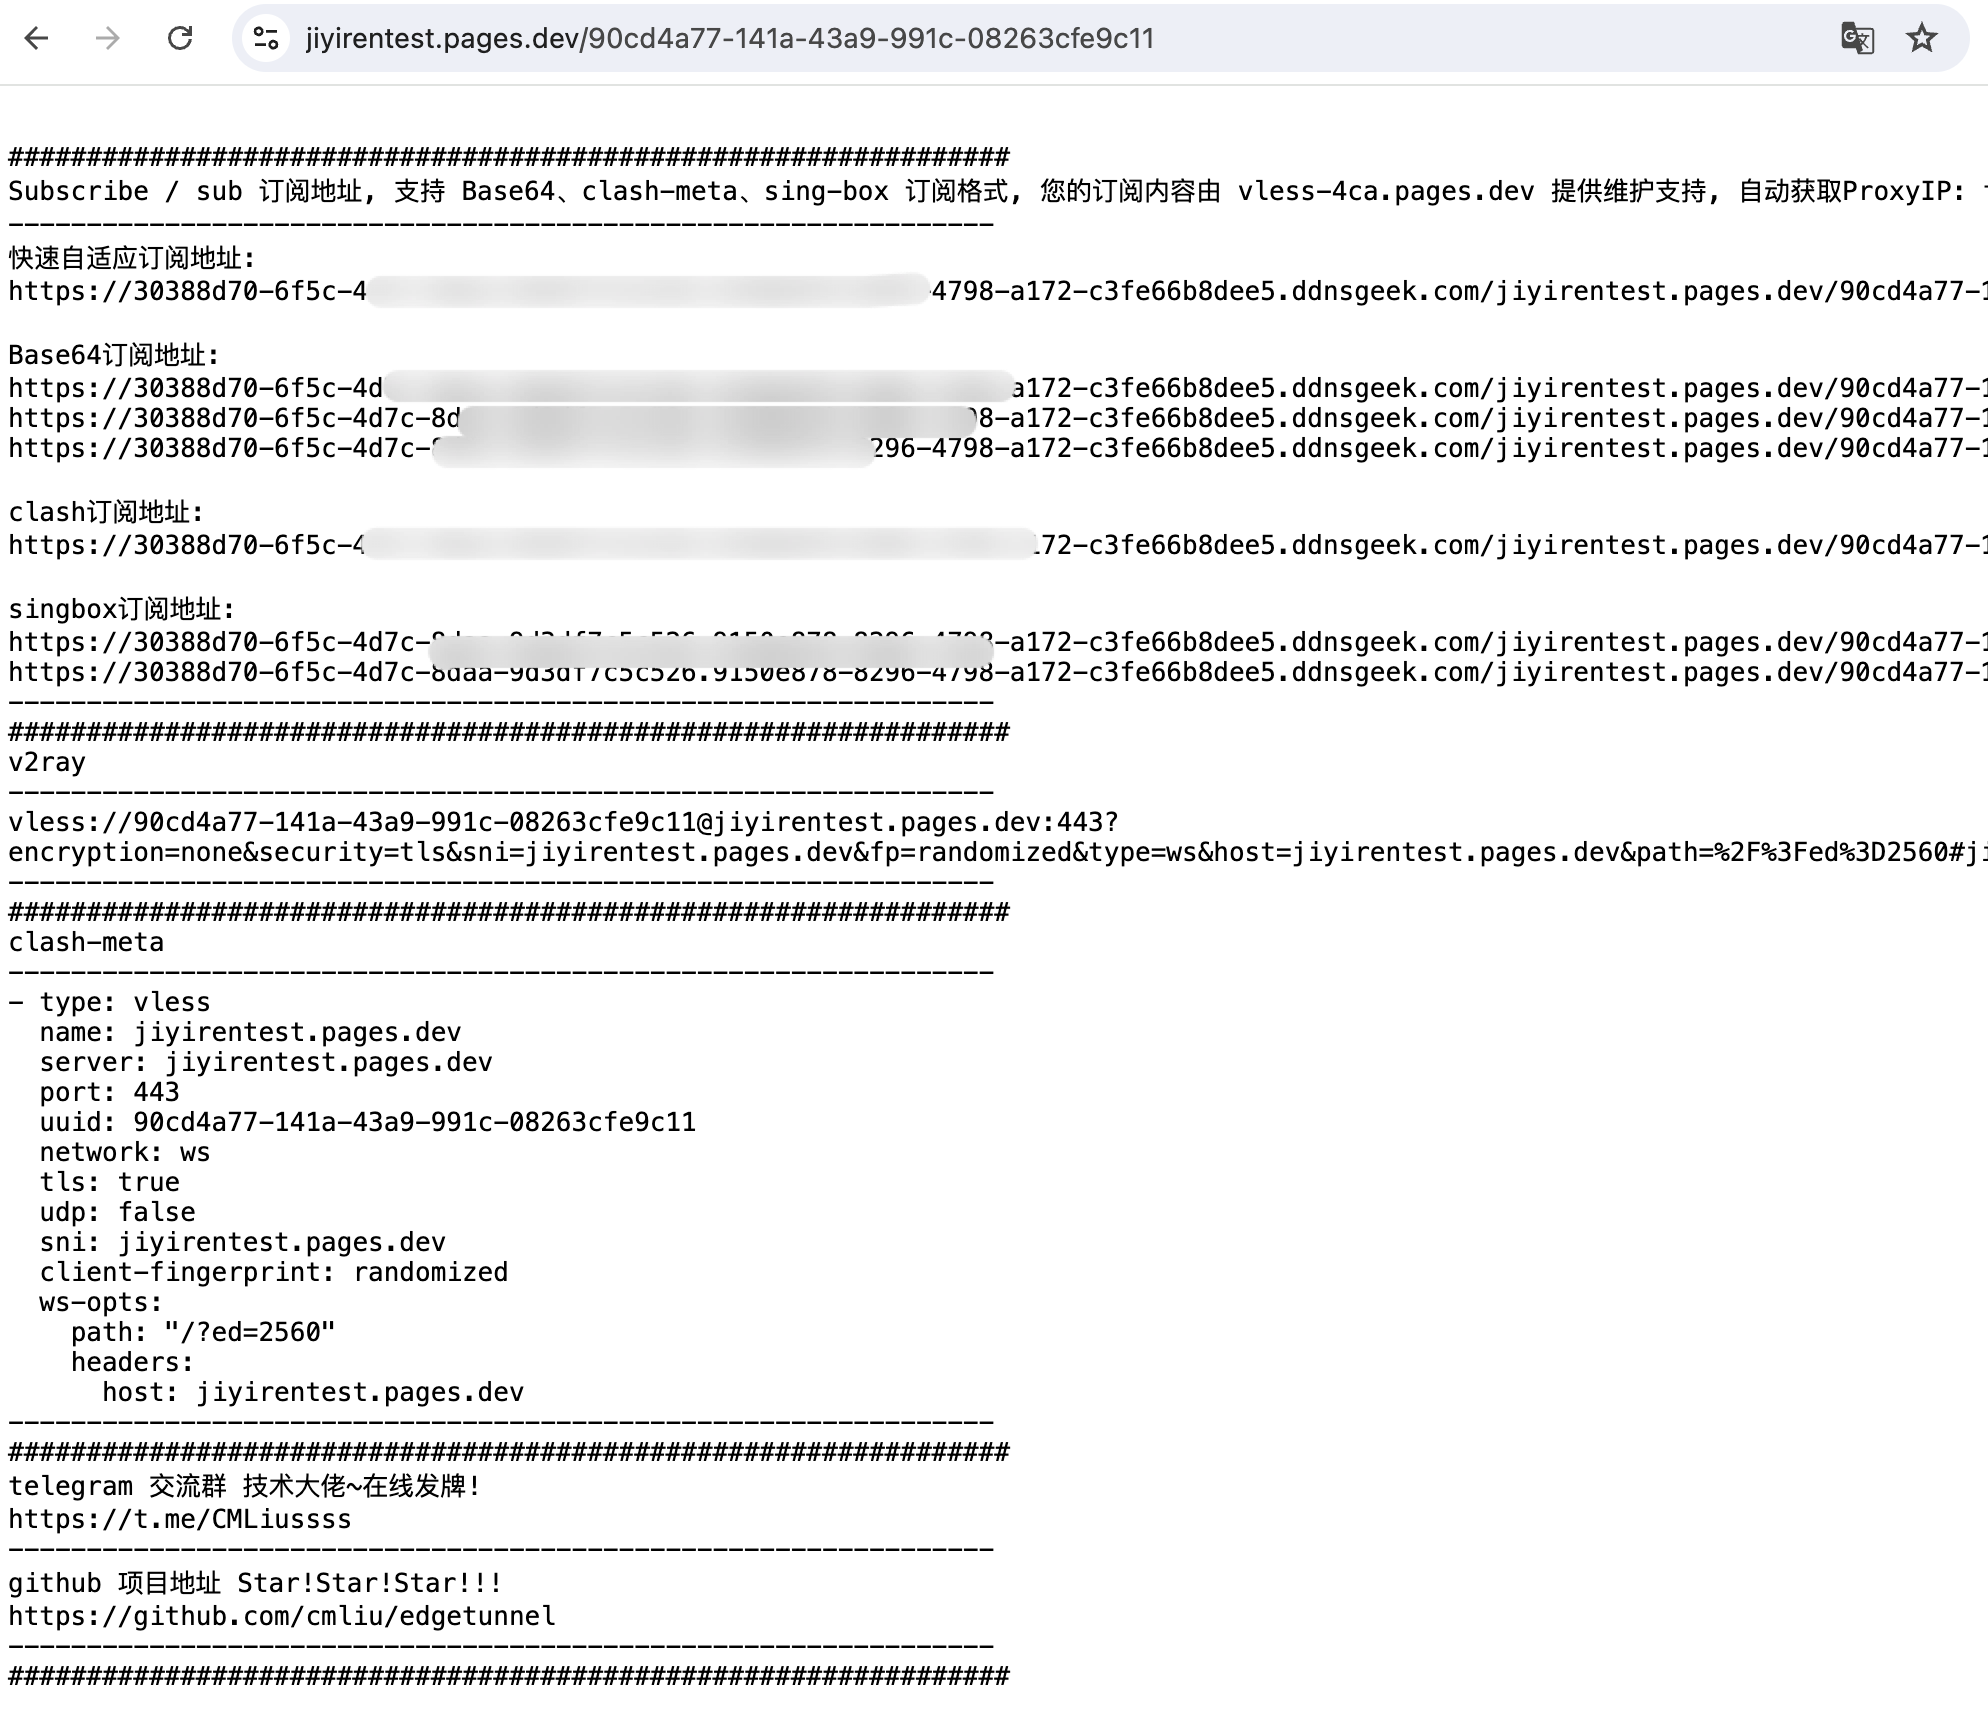
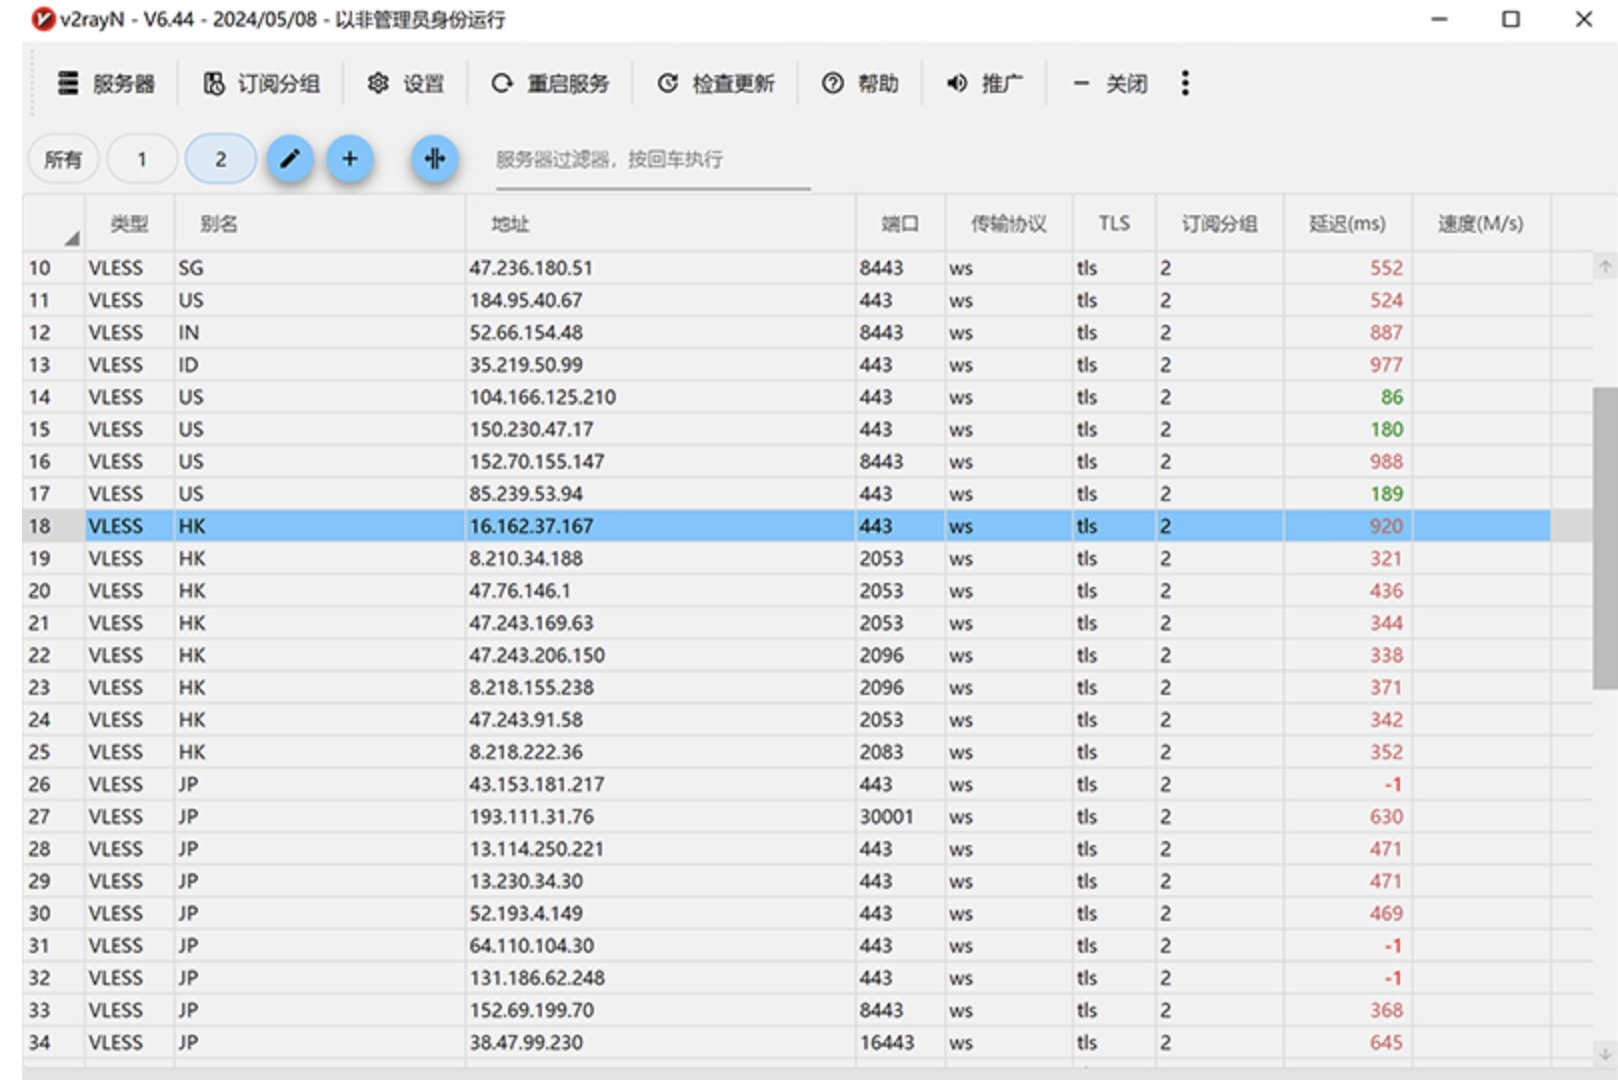
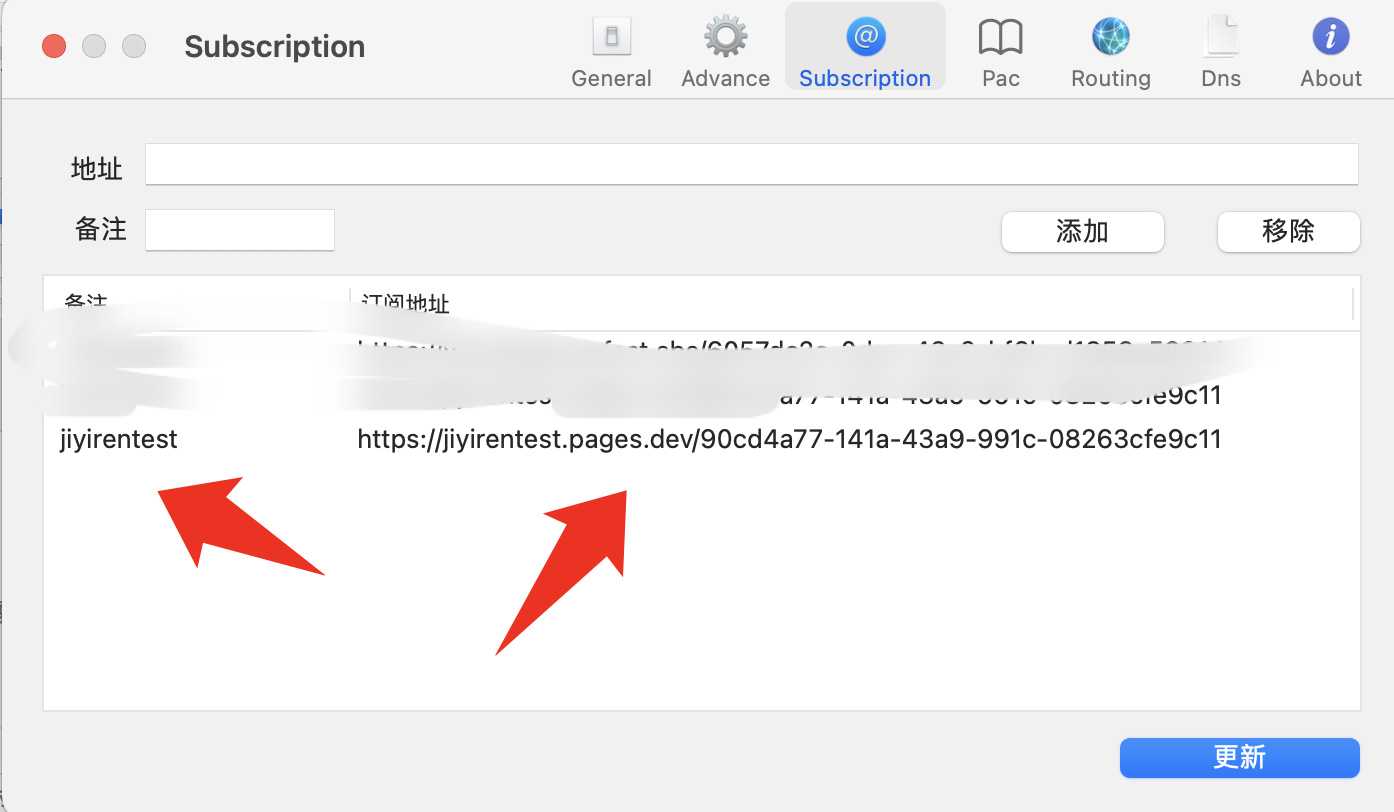
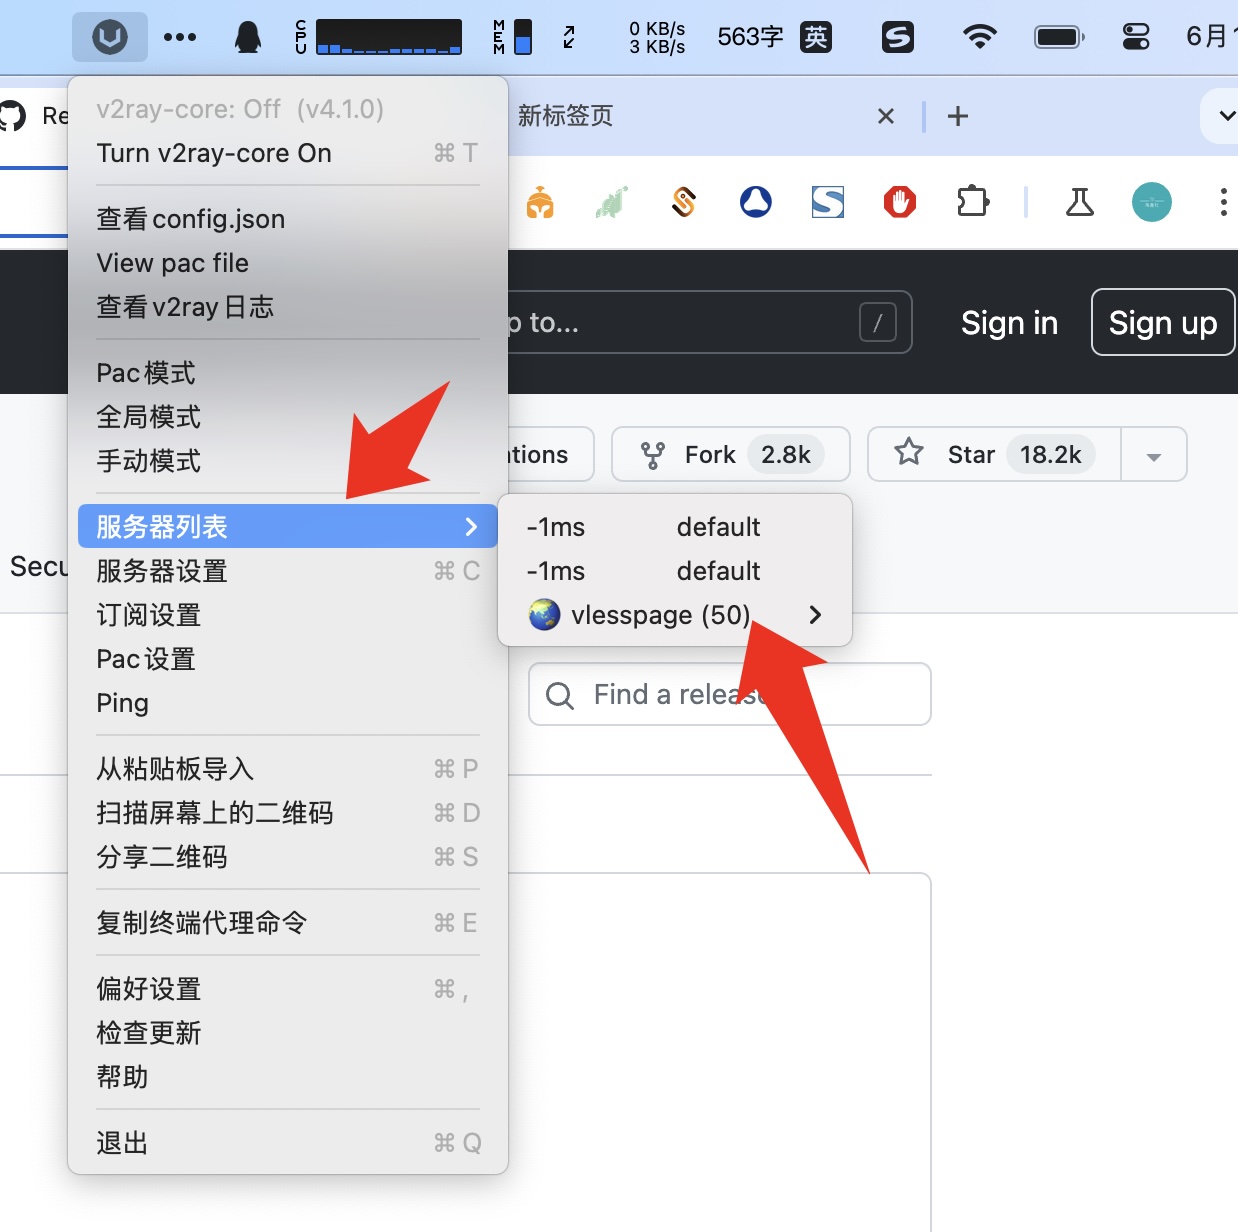
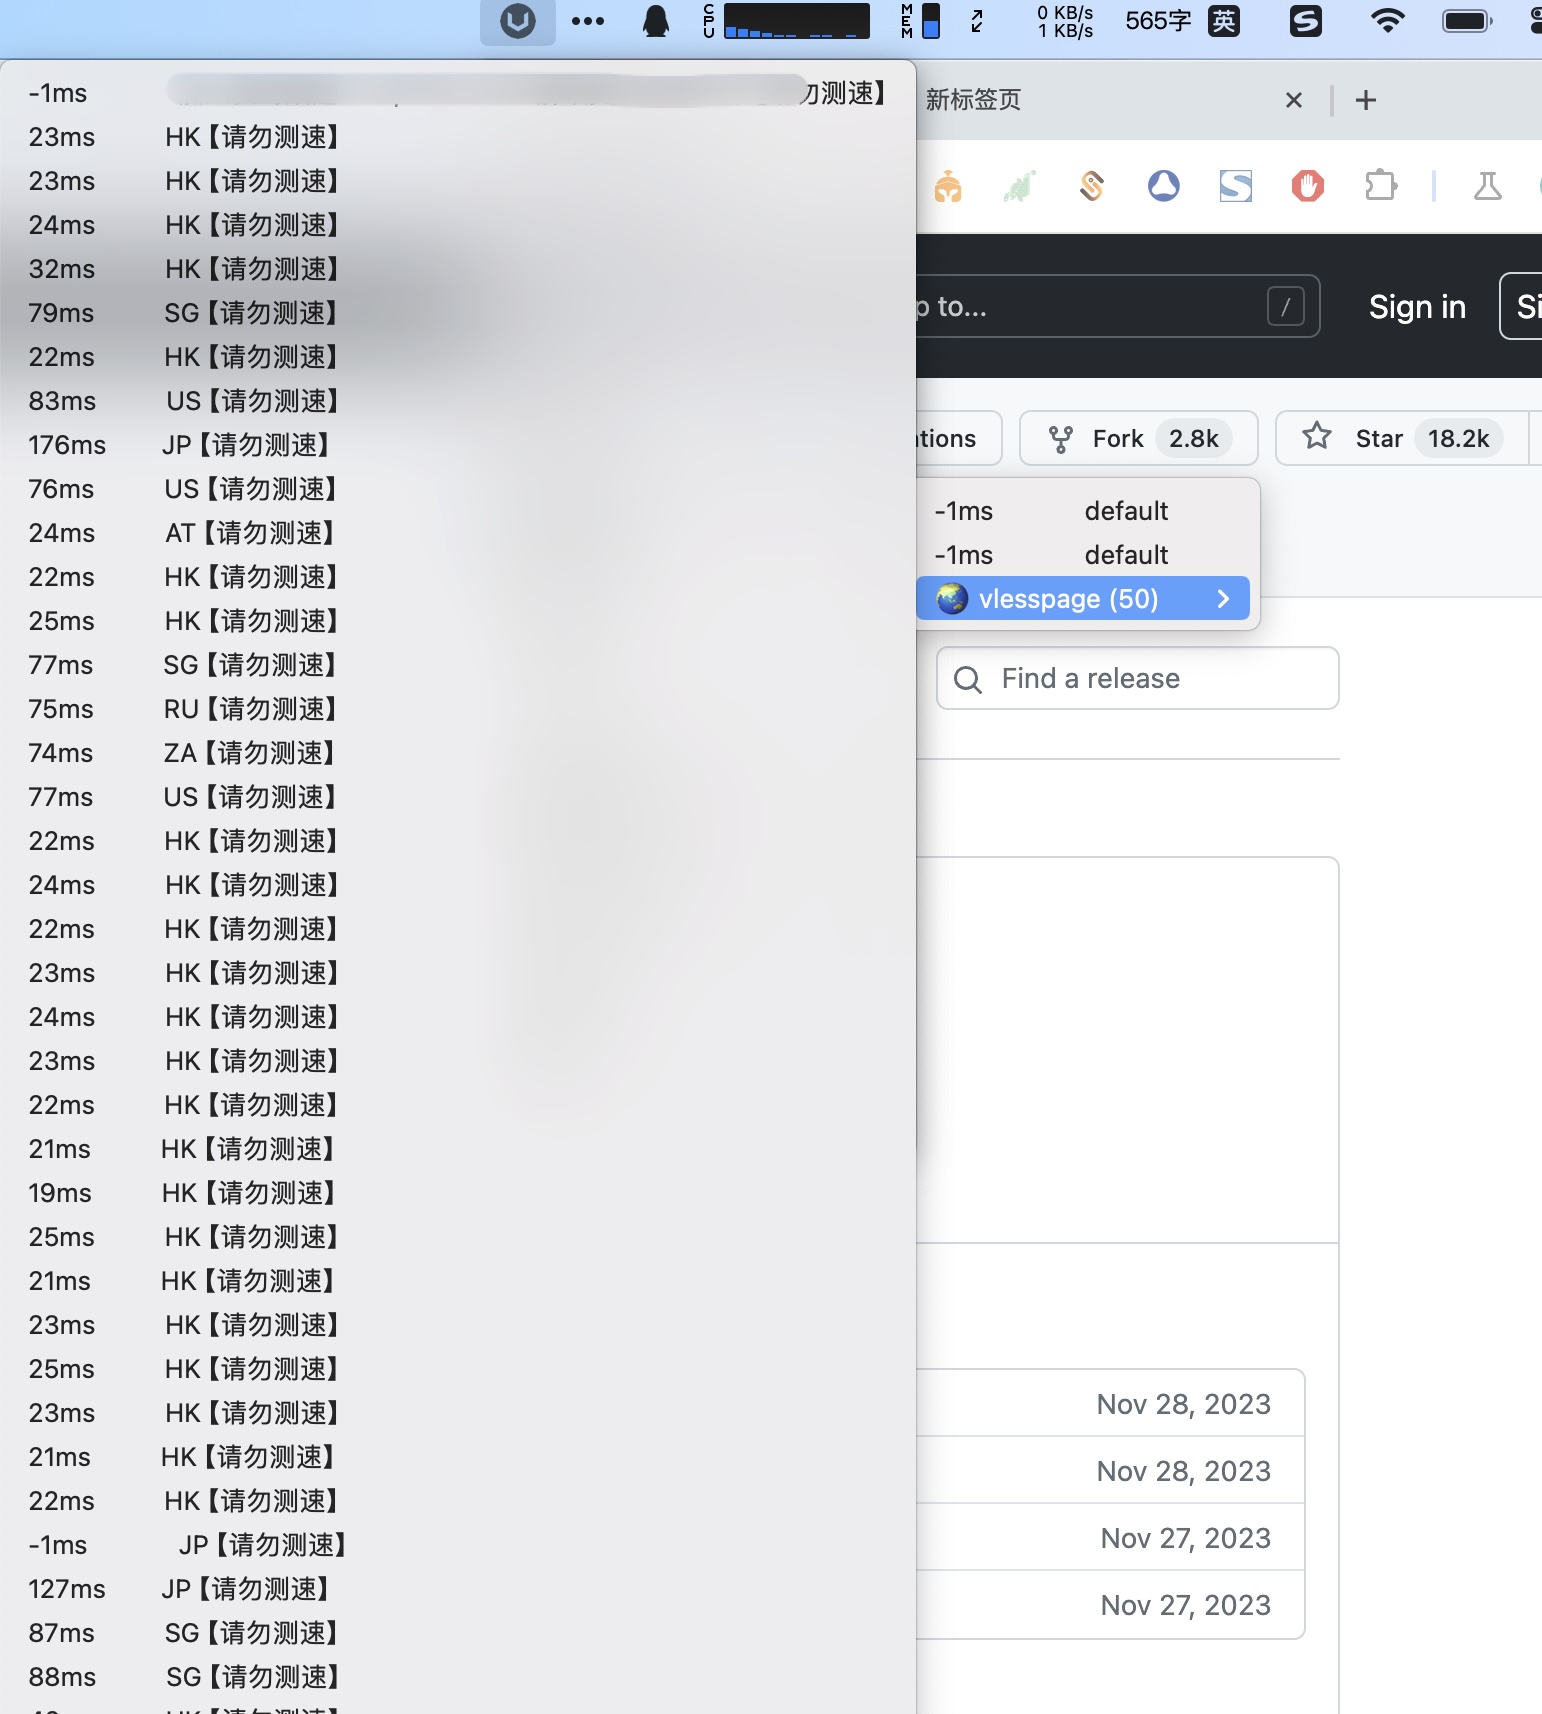
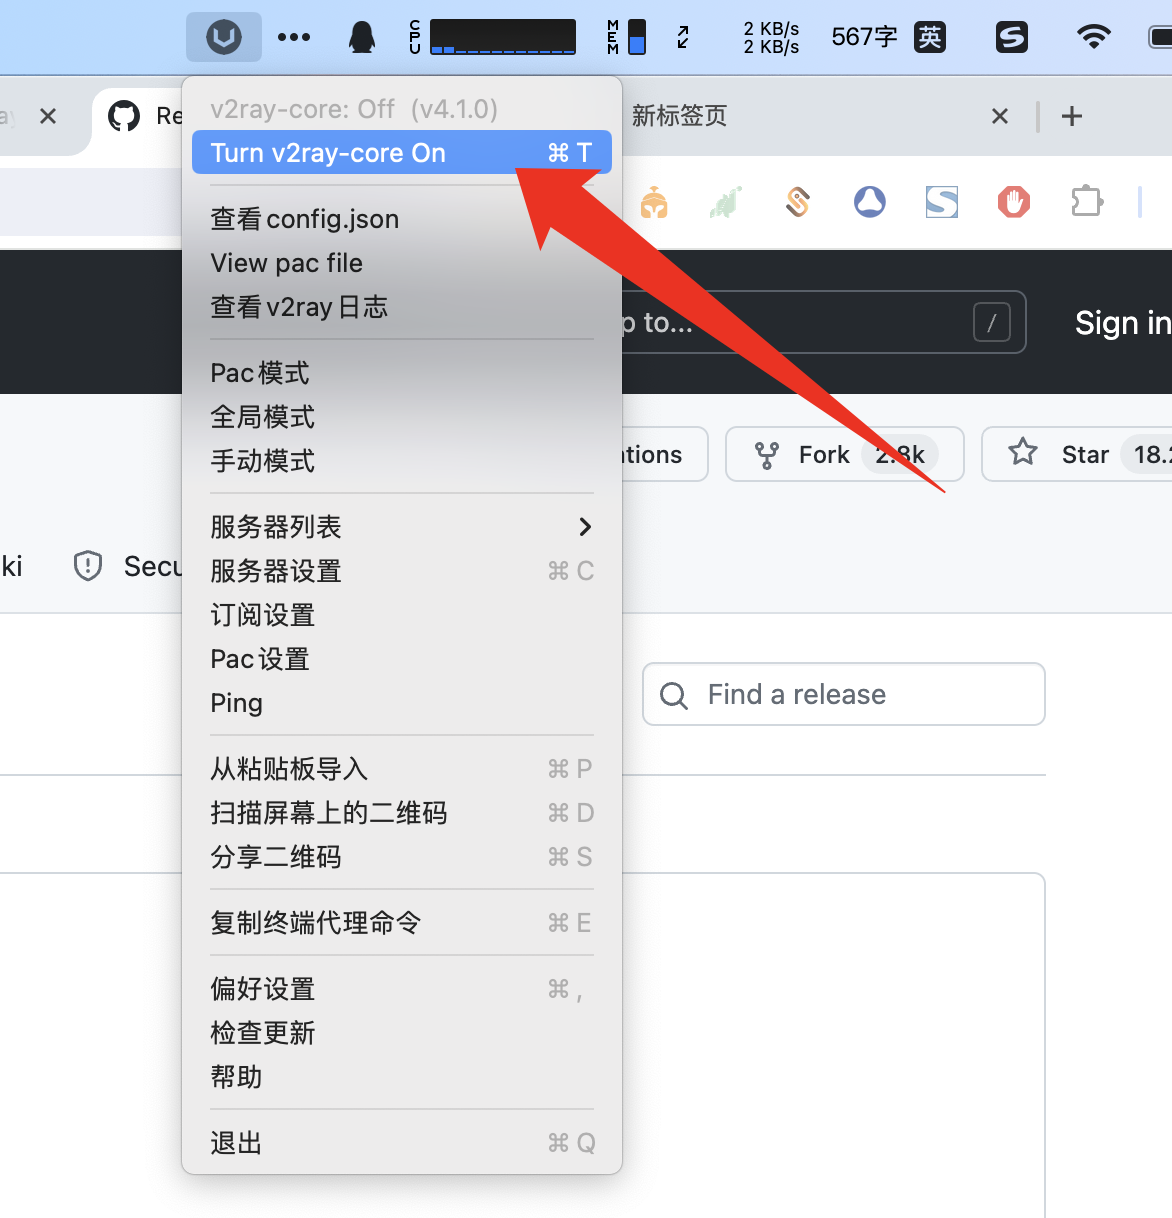
    <content type="html"><![CDATA[<p align="center" style="margin: 30px 0 35px;">本文不提供翻墙服务，只作为技术交流教程！</p><p><strong>2025.1.09号更新</strong>: <a href="/2025/01/09/fanqianghx/">最新稳定翻墙服务：高速代理翻墙，支持全球28多个国家，4K流媒体秒播，支持奈飞GPT等流媒体</a>。</p><p>今天给大家带来一种<strong>最新的免费翻墙教程</strong>，不需要自己花费一分钱，不需要购买服务器，也不需要购买域名，使用免费的 Cloudflare 就可以轻松搭建一个可以非常流畅访问 Youtube、ChatGPT、Netflix 平台的梯子。</p><p><img src="https://githubblog.s3.bitiful.net/blog/202411121700063.webp" alt></p><p>按下面的教程，只需要 5 分钟就能搭建一个免费翻墙服务：</p><a id="more"></a><h2 id="注册-Cloudflare"><a href="#注册-Cloudflare" class="headerlink" title="注册 Cloudflare"></a>注册 Cloudflare</h2><p>Cloudflare 地址为: <a href="https://dash.cloudflare.com/login" target="_blank" rel="noopener">https://dash.cloudflare.com/login</a>，输入自己的邮箱，然后填写自己设定的密码，就能注册了。</p><p><img src="https://githubblog.s3.bitiful.net/blog/202411121700055.webp" alt></p><p>注册完登录进去就行，进入界面如下，如果有提示要验证邮箱，就验证一下就行。在 Cloudflare 后台主页里，我们主要关注<strong>【Workers 和 Pages】</strong>这个菜单，如下图红框所示。</p><p><img src="https://githubblog.s3.bitiful.net/blog/202411121700311.webp" alt></p><h2 id="部署翻墙代理"><a href="#部署翻墙代理" class="headerlink" title="部署翻墙代理"></a>部署翻墙代理</h2><p>点击<strong>【Workers 和 Pages】</strong>菜单，我们可以看到如下界面，右侧是我之前创建的一个免费代理服务，右侧有一些免费额度，每天免费 10 万请求，妥妥的 OK 。我们也可以看到<strong>【创建】</strong>按钮。</p><p><img src="https://githubblog.s3.bitiful.net/blog/202411121701170.webp" alt></p><p>点击<strong>【创建】</strong>按钮就行，出现如下界面，我们选择 <strong>【Pages】</strong>菜单。</p><p><img src="https://githubblog.s3.bitiful.net/blog/202411121701017.webp" alt></p><p>点击<strong>【Pages】</strong>菜单后，可以看到如下界面，我们选择<strong>【上传资产】</strong>。</p><p><img src="https://githubblog.s3.bitiful.net/blog/202411121702683.webp" alt></p><p>点击<strong>【上传资产】</strong>后，出现如下界面，需要补充一下项目名，这个随便你自己填就行，我这里填了 <strong>jiyirentest</strong> ，这个名字需要都是英文，且最好个性化一点，因为会生成一个独特的域名，如果和别人重复的话就不行了。</p><p><img src="https://githubblog.s3.bitiful.net/blog/202411121702518.webp" alt></p><p>填完项目名称，保存之后，看到如下界面，选择从计算机上传，再点击<strong>【上传压缩文件】</strong>。</p><p><img src="https://githubblog.s3.bitiful.net/blog/202411121702948.webp" alt></p><p>上传 <strong>worker.zip</strong> 文件，这是一个代码包，下载地址为: <a href="https://raw.githubusercontent.com/cmliu/edgetunnel/main/worker.zip" target="_blank" rel="noopener">https://raw.githubusercontent.com/cmliu/edgetunnel/main/worker.zip</a> 。上传这个文件就行。最后选择部署站点，会出现如下提示，我们选择<strong>继续处理项目</strong>。</p><p><img src="https://githubblog.s3.bitiful.net/blog/202411121703857.webp" alt></p><p>点击继续处理项目之后，出现如下界面，我们点击<strong>【设置】</strong>菜单即可。</p><p><img src="https://githubblog.s3.bitiful.net/blog/202411121703906.webp" alt></p><p>点击设置之后，可以看到如下界面，我们点击<strong>【添加变量】</strong>。</p><p><img src="https://githubblog.s3.bitiful.net/blog/202411121703543.webp" alt></p><p>然后，出现如下界面， 变量名称里填写 uuid ， 值填写一个随机生成的值就行，我这里提供一个地址: <a href="https://1024tools.com/uuid" target="_blank" rel="noopener">https://1024tools.com/uuid</a> ，随便复制一个就行，然后填入值里。最后点击<strong>保存</strong>即可，不需要点击加密。</p><p><img src="https://githubblog.s3.bitiful.net/blog/202411121704487.webp" alt></p><p>然后，我们回到部署菜单界面，点击访问站点。</p><p><img src="https://githubblog.s3.bitiful.net/blog/202411121704789.webp" alt></p><p>我们就能看到如下界面，访问对应的域名可以看到有数据出现了。这表示你自己的翻墙域名搭建好了。这个域名的前部分名称就是你的项目名，是属于你的翻墙数据入口。</p><p><img src="https://githubblog.s3.bitiful.net/blog/202411121705308.webp" alt></p><p>然而，翻墙服务器还没有搭建完成，因为我们需要真实的代理 URL，上面完成的只是域项目名能访问而已。我们之前不是填了一个随机的 uuid 值嘛，将这个值填在域名之后，如下:</p><p><img src="https://githubblog.s3.bitiful.net/blog/202411121705903.webp" alt></p><p>我们可以看到这个是 Not Found，还没有翻墙入口，因此我们需要接着来完成流量转发部署。</p><p>仍然在部署菜单页面，点击右下角的【创建新部署】：</p><p><img src="https://githubblog.s3.bitiful.net/blog/202411121706602.webp" alt></p><p>出现如下界面，选择从计算机中选择，选择压缩包，仍然选择之前我们下载的 <strong>worker.zip</strong> 包，上传完之后保存即可。</p><p><img src="https://githubblog.s3.bitiful.net/blog/202411121706581.webp" alt></p><p>保存完之后出现如下，这才是真正将翻墙服务器彻底搭建完了。</p><p> <img src="https://githubblog.s3.bitiful.net/blog/202411121706254.webp" alt></p><p>此时再次访问域名+uuid 地址，如下，终于出现了流量代理的订阅地址了：</p><p><img src="https://githubblog.s3.bitiful.net/blog/202411121707953.webp" alt></p><p>我们可以看到页面上显示的订阅地址, 支持 Base64、clash-meta、sing-box 等订阅格式。实际上上面的服务最终使用的是 Vless 协议来利用 Cloudflare 全球服务器来作为翻墙服务器使用的。从而我们要使用这些订阅地址，就需要下载支持 Vless 协议的代理软件才行。这里小编分享两个:</p><ul><li>Windows 系统: <a href="https://github.com/2dust/v2rayN" target="_blank" rel="noopener">V2rayN</a></li><li>Mac 系统: <a href="https://github.com/yanue/V2rayU" target="_blank" rel="noopener">V2rayU</a></li></ul><h2 id="代理工具使用"><a href="#代理工具使用" class="headerlink" title="代理工具使用"></a>代理工具使用</h2><h3 id="下载"><a href="#下载" class="headerlink" title="下载"></a>下载</h3><p>Windows 系统的代理软件为  <strong>V2rayN</strong> :</p><ul><li>软件项目代码页(想看源码的看看): <a href="https://github.com/2dust/v2rayN" target="_blank" rel="noopener">https://github.com/2dust/v2rayN</a></li><li>软件版本下载页(想选择版本下载的看看): <a href="https://github.com/2dust/v2rayN/releases" target="_blank" rel="noopener">https://github.com/2dust/v2rayN/releases</a></li><li>软件直接下载(懒人直接点击下载):  <a href="https://github.com/2dust/v2rayN/releases/download/6.45/v2rayN-With-Core.zip" target="_blank" rel="noopener">v2rayN-With-Core.zip</a> </li></ul><p>下载软件打开就行。复制自适应的订阅地址导入就行：</p><p><img src="https://githubblog.s3.bitiful.net/blog/202411121708354.webp" alt></p><p>Mac 系统的代理软件为  <strong>V2rayU</strong> :</p><ul><li>软件项目代码页(想看源码的看看): <a href="https://github.com/yanue/V2rayU" target="_blank" rel="noopener">(https://github.com/yanue/V2rayU</a></li><li>软件版本下载页(想选择版本下载的看看): <a href="https://github.com/yanue/V2rayU/releases" target="_blank" rel="noopener">https://github.com/yanue/V2rayU/releases</a></li><li>软件直接下载(懒人直接点击下载): 苹果系统有两个版本自己根据自己系统选择。<ul><li>M1/M2/M3/M4 处理器软件  <a href="https://github.com/yanue/V2rayU/releases/download/v4.1.0/V2rayU-64.dmg" target="_blank" rel="noopener">V2rayU-64.dmg</a> </li><li>Intl 处理器系统软件: <a href="https://github.com/yanue/V2rayU/releases/download/v4.1.0/V2rayU-arm64.dmg" target="_blank" rel="noopener">V2rayU-arm64.dmg</a></li></ul></li></ul><h3 id="配置"><a href="#配置" class="headerlink" title="配置"></a>配置</h3><p>小编的是 Mac 电脑，我这里以 <strong>V2rayU</strong> 使用说明下。电脑安装完代理软件后，打开后，点击图标显示如下:</p><p><img src="https://githubblog.s3.bitiful.net/blog/202411121708525.webp" alt></p><p>点击【订阅设置】菜单，出现配置界面，点击订阅一栏，英文为 Subscription ，如下界面，加入刚刚的域名 URL，一定是带 uuid 的 URL 就行：</p><p><img src="https://githubblog.s3.bitiful.net/blog/202411121708763.webp" alt></p><p>然后选中添加的那项，点击更新即可。关闭页面，然后再点击<strong>【服务器列表】</strong>出现新的选项，我这里只是示例:</p><p><img src="https://githubblog.s3.bitiful.net/blog/202411121708104.webp" alt></p><p>鼠标放进新出现的 vlesspage 项，里面就是我们刚刚更新出来的所有翻墙服务器，选择一个延迟低的选中就行。</p><p><img src="https://githubblog.s3.bitiful.net/blog/202411121708614.webp" alt></p><p>最后，点击<strong>【Turn v2ray-core On】</strong>来开启软件，当然默认开启的手动模式。</p><p><img src="https://githubblog.s3.bitiful.net/blog/202411121708386.webp" alt></p><p>点击图标可以看到:</p><ul><li><strong>全局模式:</strong> 这个模式只要打开，那么我们电脑系统全局就都会走这个代理，直接打开浏览器就能访问翻墙的网站。</li><li><strong>手动模式</strong>: 这个模式是你需要配置专门的代理入口，走本地的 Socks5 协议的 1080 端口才能访问。</li></ul><p>开启软件默认是<strong>手动模式</strong>，如果自己会配置，则忽略，如果不会，那么你就选择<strong>全局模式</strong>就行。</p><p><img src="https://githubblog.s3.bitiful.net/blog/202411121708274.webp" alt></p><h2 id="访问测试"><a href="#访问测试" class="headerlink" title="访问测试"></a>访问测试</h2><p>打开 Youtube 网站:</p><p><img src="https://githubblog.s3.bitiful.net/blog/202411121709893.webp" alt></p><p>打开 ChatGPT 网站:</p><p><img src="https://githubblog.s3.bitiful.net/blog/202411121709131.webp" alt></p><p>打开 Netflix 网站:</p><p><img src="https://githubblog.s3.bitiful.net/blog/202411121709734.webp" alt></p><p>好了，今天就分享这个免费的翻墙服务器，速度也非常快。</p>]]></content>
    
    
    <summary type="html">&lt;p align=&quot;center&quot; style=&quot;margin: 30px 0 35px;&quot;&gt;本文不提供翻墙服务，只作为技术交流教程！&lt;/p&gt;


&lt;p&gt;&lt;strong&gt;2025.1.09号更新&lt;/strong&gt;: &lt;a href=&quot;/2025/01/09/fanqianghx/&quot;&gt;最新稳定翻墙服务：高速代理翻墙，支持全球28多个国家，4K流媒体秒播，支持奈飞GPT等流媒体&lt;/a&gt;。&lt;/p&gt;
&lt;p&gt;今天给大家带来一种&lt;strong&gt;最新的免费翻墙教程&lt;/strong&gt;，不需要自己花费一分钱，不需要购买服务器，也不需要购买域名，使用免费的 Cloudflare 就可以轻松搭建一个可以非常流畅访问 Youtube、ChatGPT、Netflix 平台的梯子。&lt;/p&gt;
&lt;p&gt;&lt;img src=&quot;https://githubblog.s3.bitiful.net/blog/202411121700063.webp&quot; alt&gt;&lt;/p&gt;
&lt;p&gt;按下面的教程，只需要 5 分钟就能搭建一个免费翻墙服务：&lt;/p&gt;</summary>


    <category term="翻墙" scheme="https://jiyiren.github.io/categories/翻墙/"/>
    
    <category term="梯子" scheme="https://jiyiren.github.io/categories/翻墙/梯子/"/>
    
    <category term="代理" scheme="https://jiyiren.github.io/categories/翻墙/梯子/代理/"/>
    
    
    <category term="ChatGPT" scheme="https://jiyiren.github.io/tags/ChatGPT/"/>
    
    <category term="梯子" scheme="https://jiyiren.github.io/tags/梯子/"/>
    
    <category term="代理" scheme="https://jiyiren.github.io/tags/代理/"/>
    
    <category term="翻墙" scheme="https://jiyiren.github.io/tags/翻墙/"/>
    
    <category term="Youtube" scheme="https://jiyiren.github.io/tags/Youtube/"/>
    
    <category term="Shadowsocks" scheme="https://jiyiren.github.io/tags/Shadowsocks/"/>
    
    <category term="Vless" scheme="https://jiyiren.github.io/tags/Vless/"/>
    
  </entry>
  
  <entry>
    <title>ChatGPT4、Midjourney 无信用卡开通教程</title>
    <link href="https://jiyiren.github.io/2023/11/27/ai_buy/"/>
    <id>https://jiyiren.github.io/2023/11/27/ai_buy/</id>
    <published>2023-11-27T01:07:25.000Z</published>
    <updated>2024-11-12T08:59:49.072Z</updated>
    
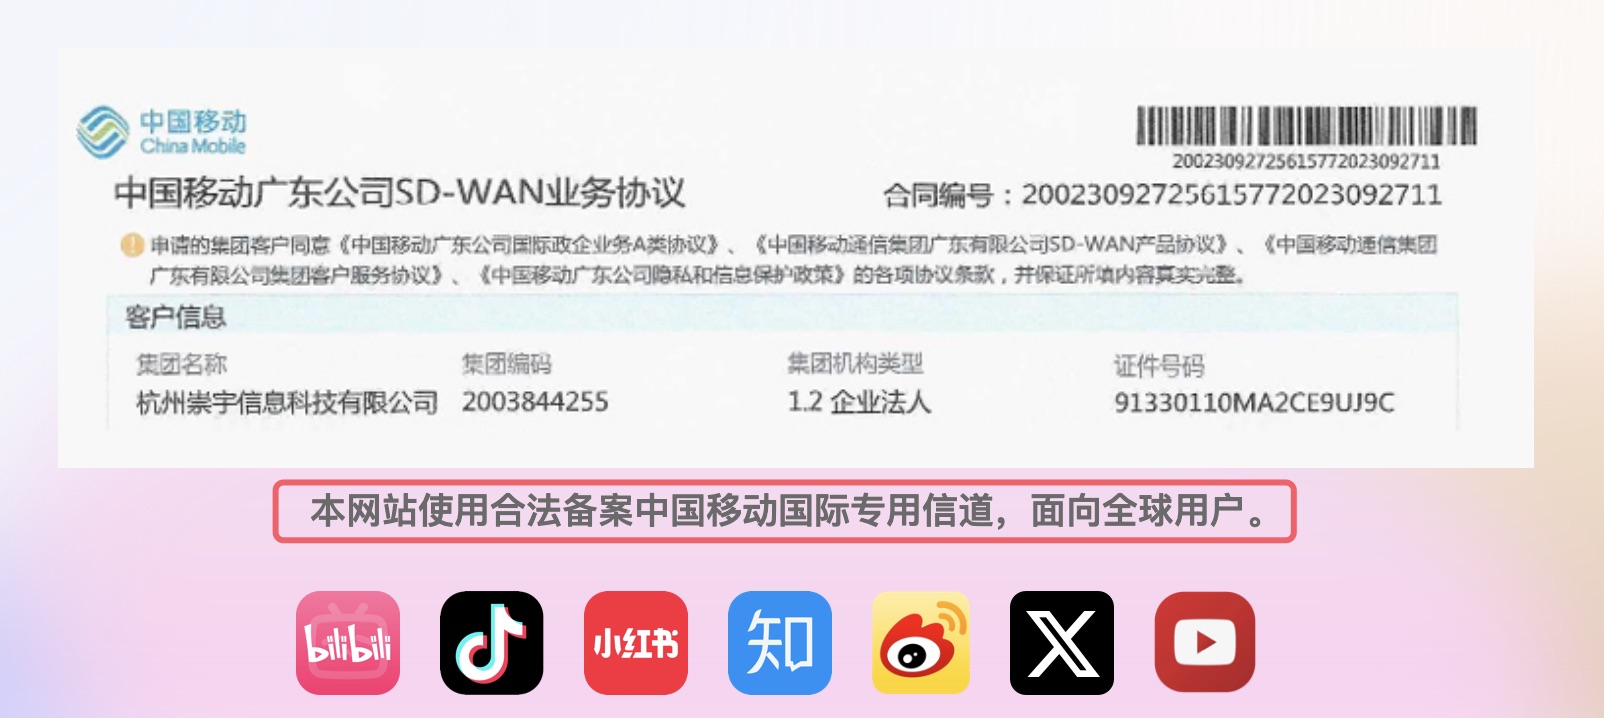
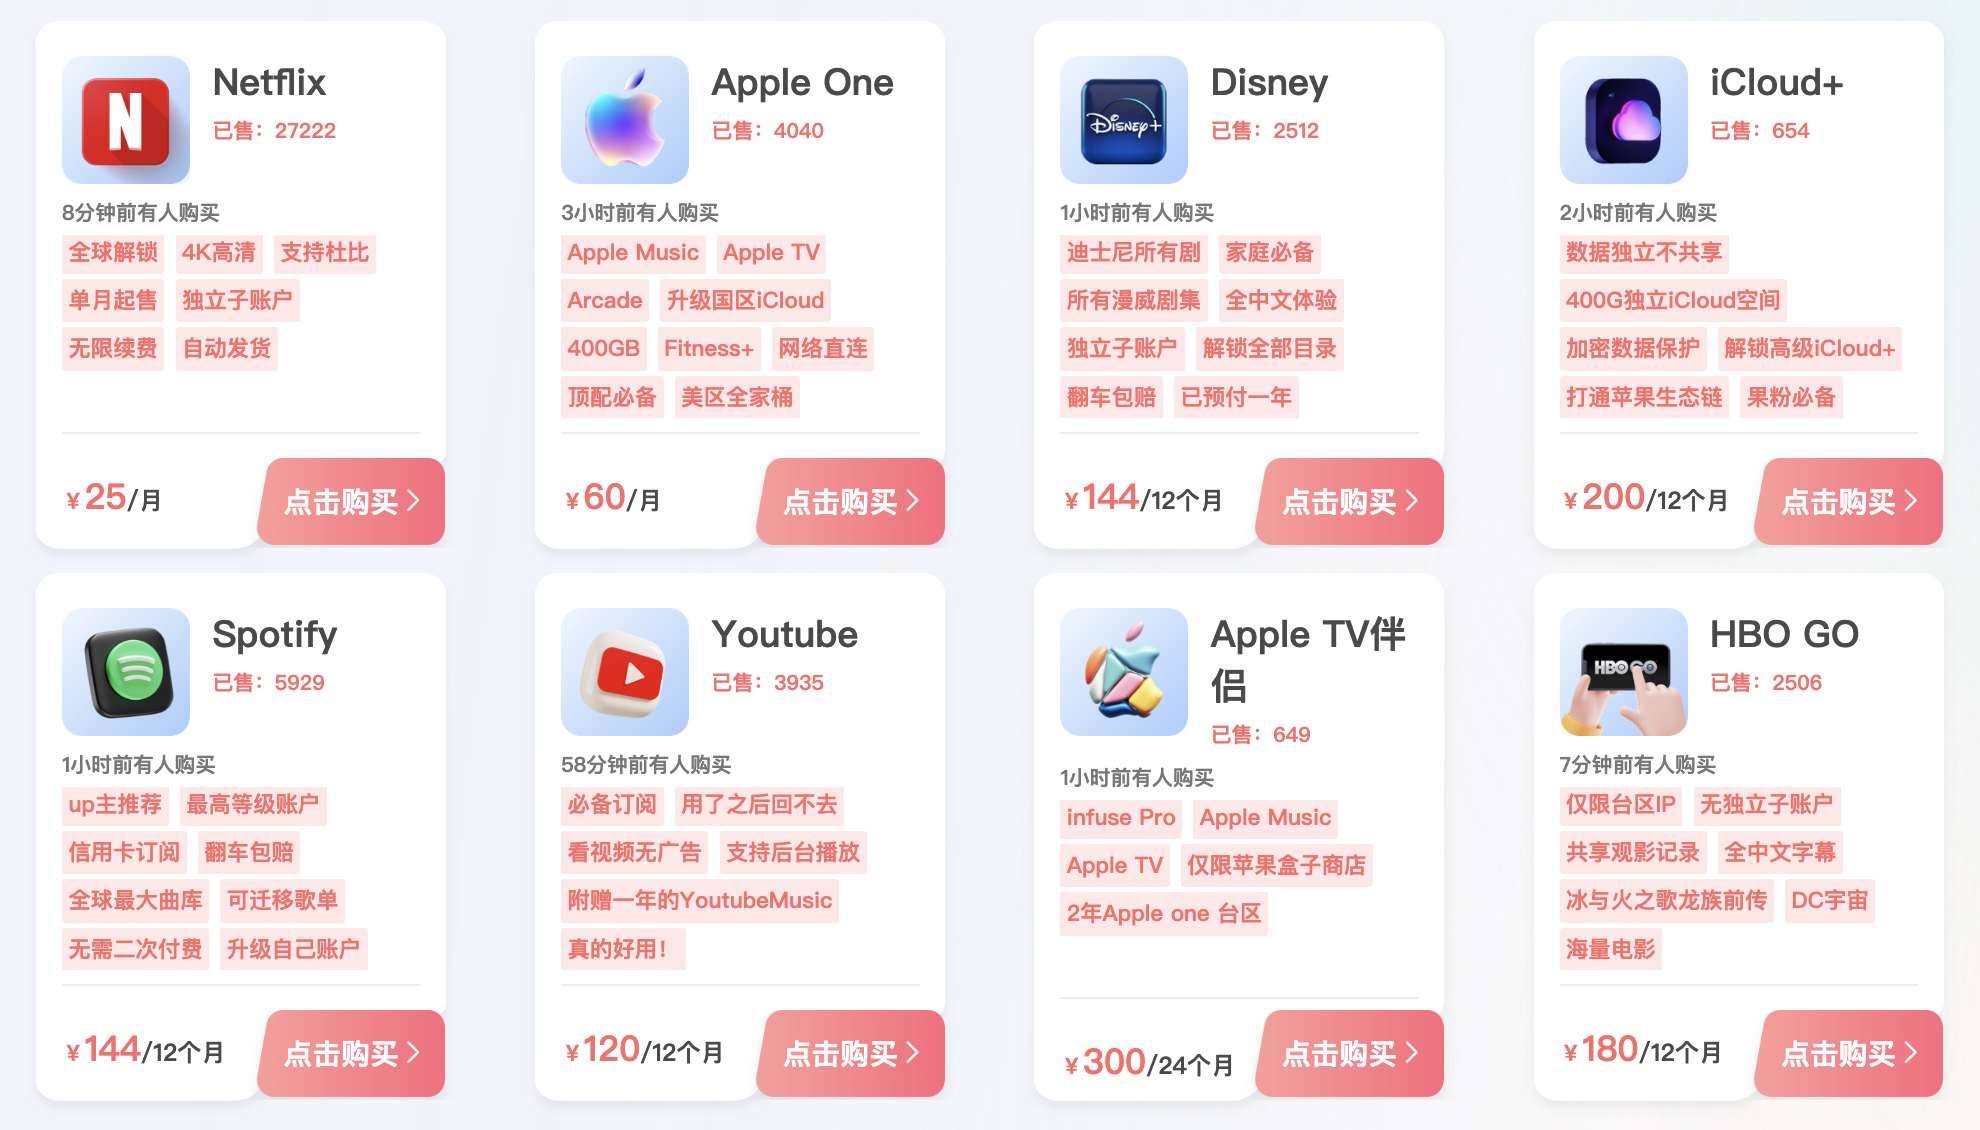
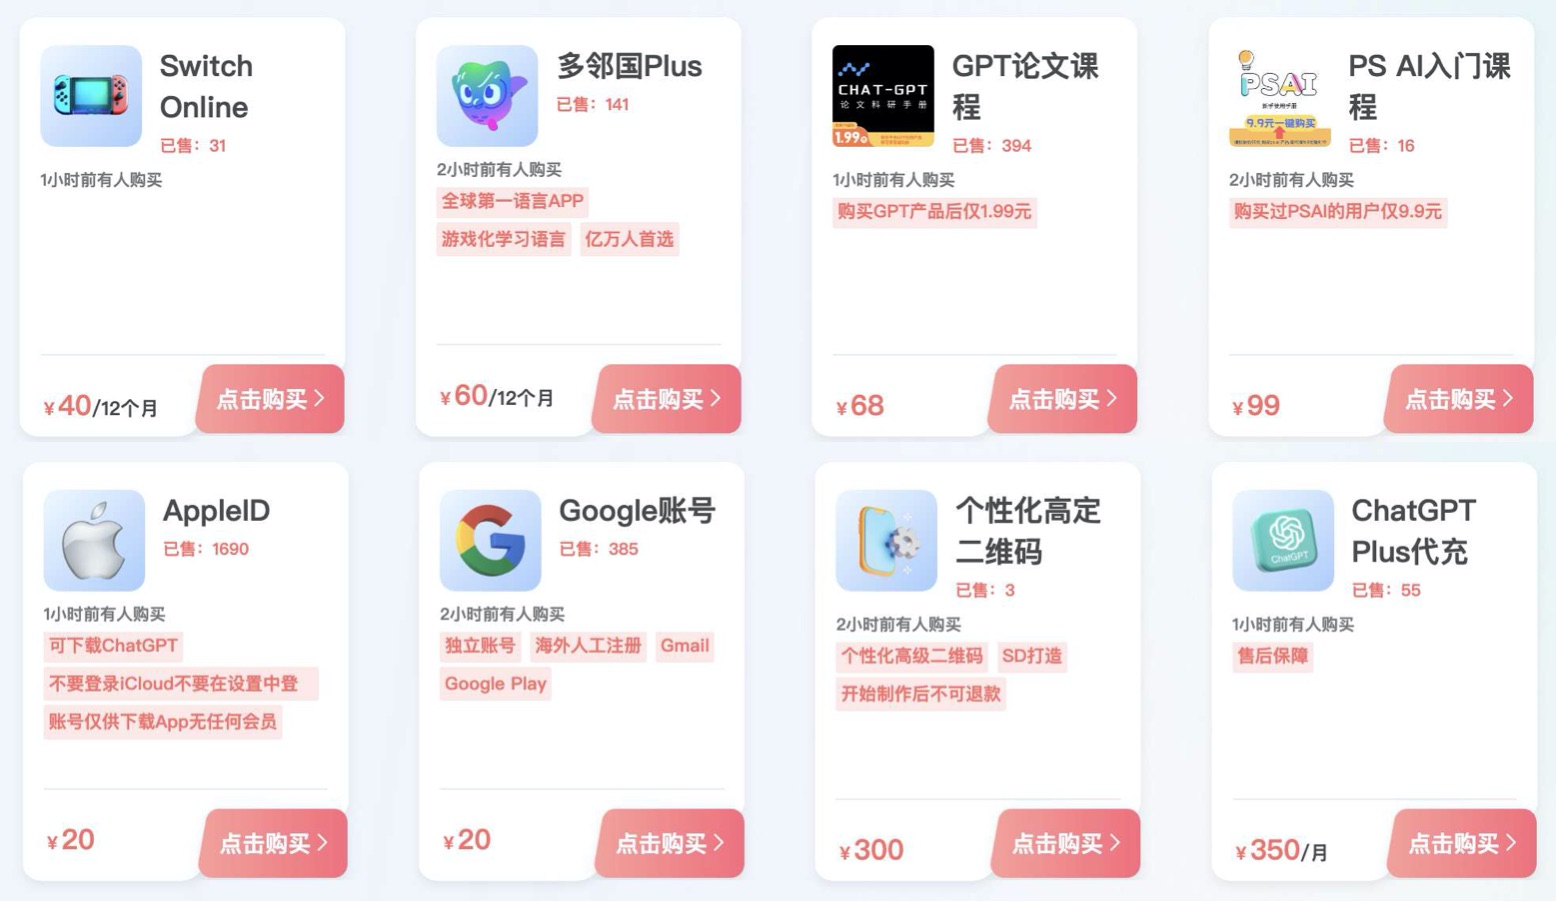
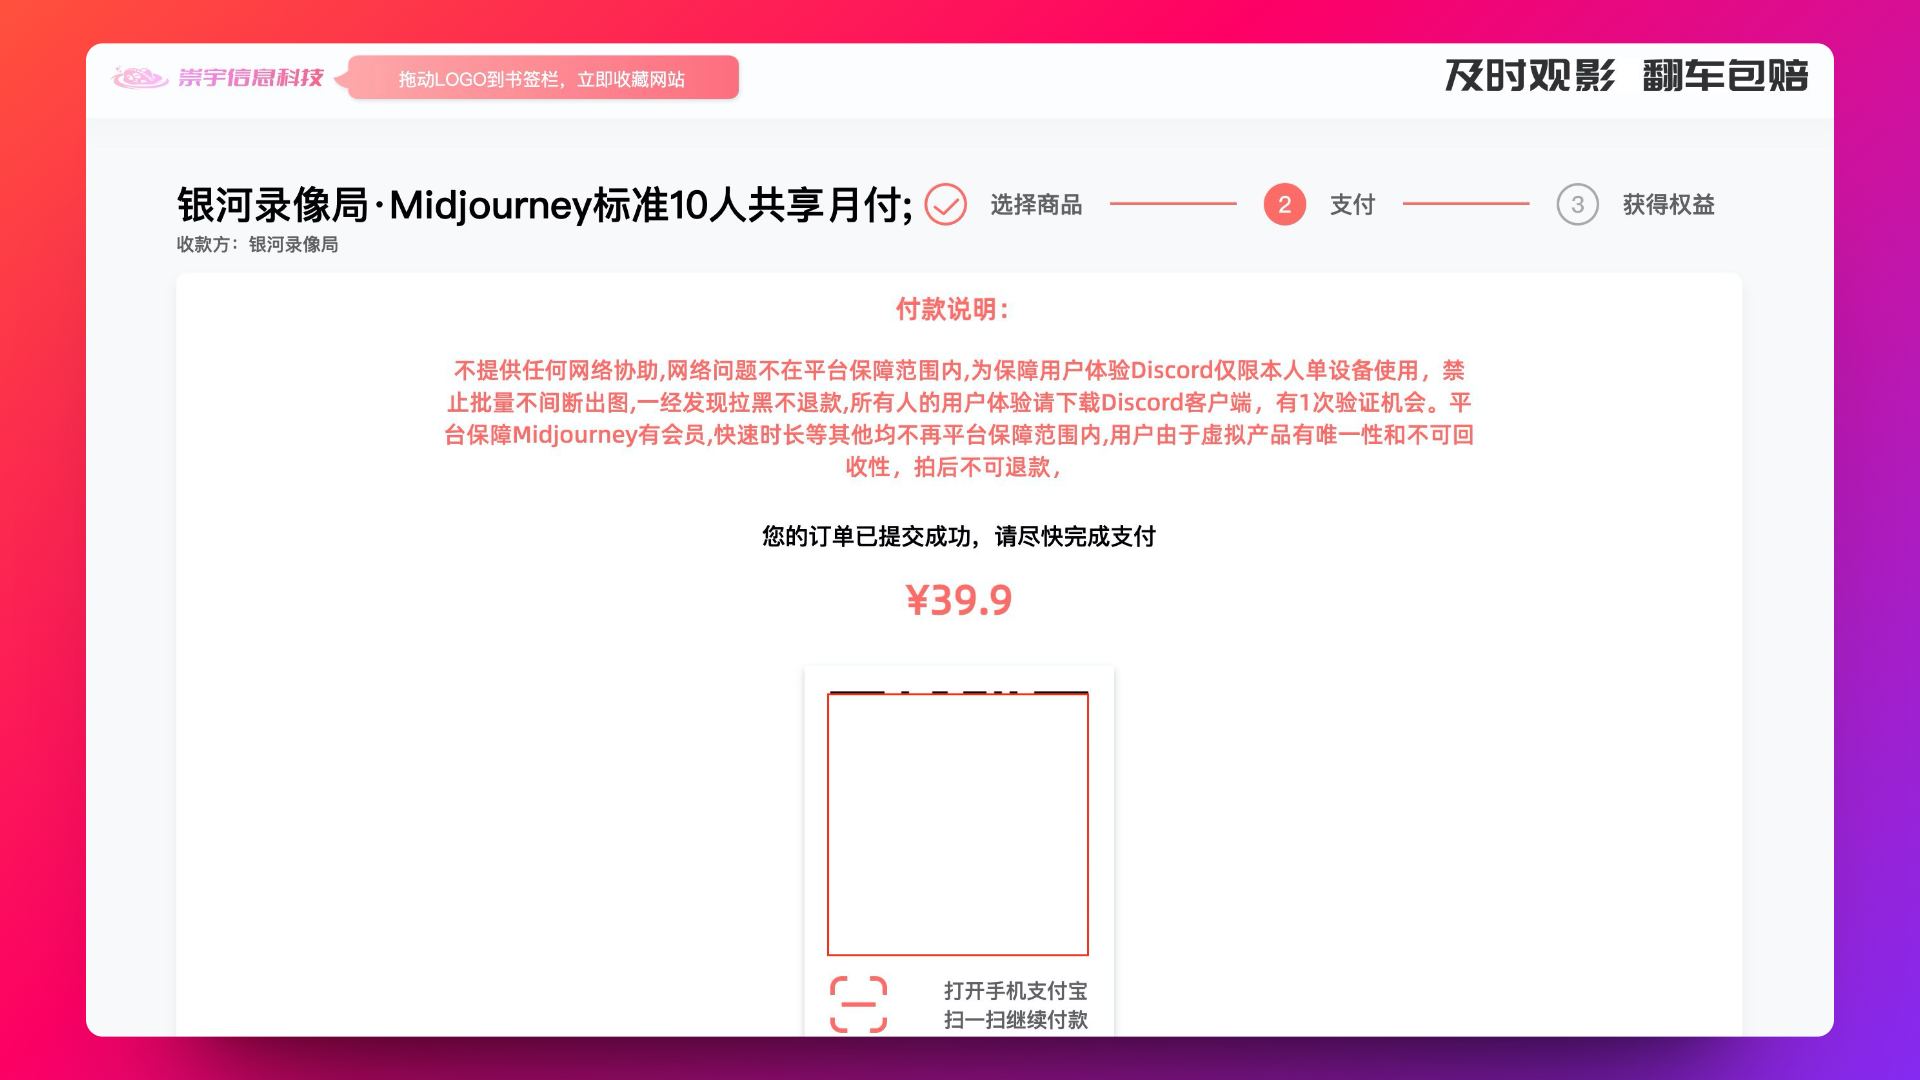
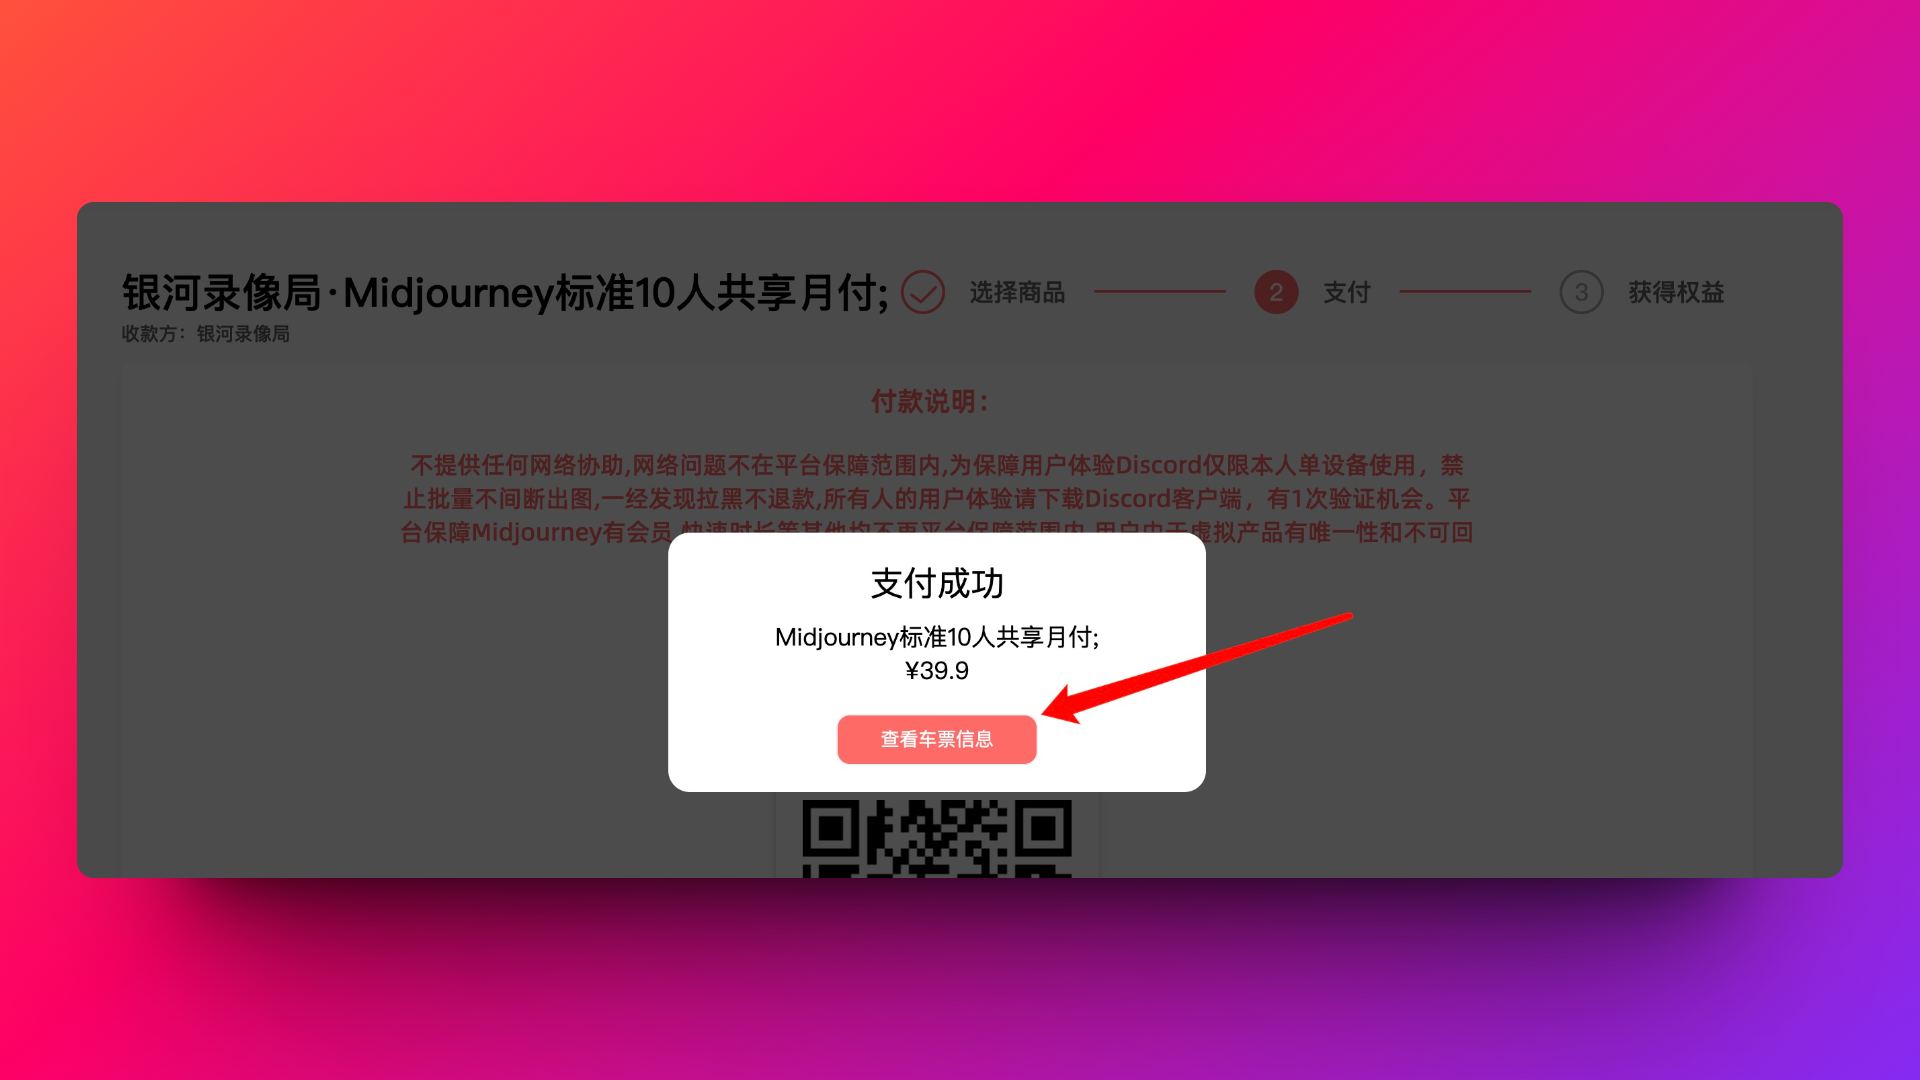
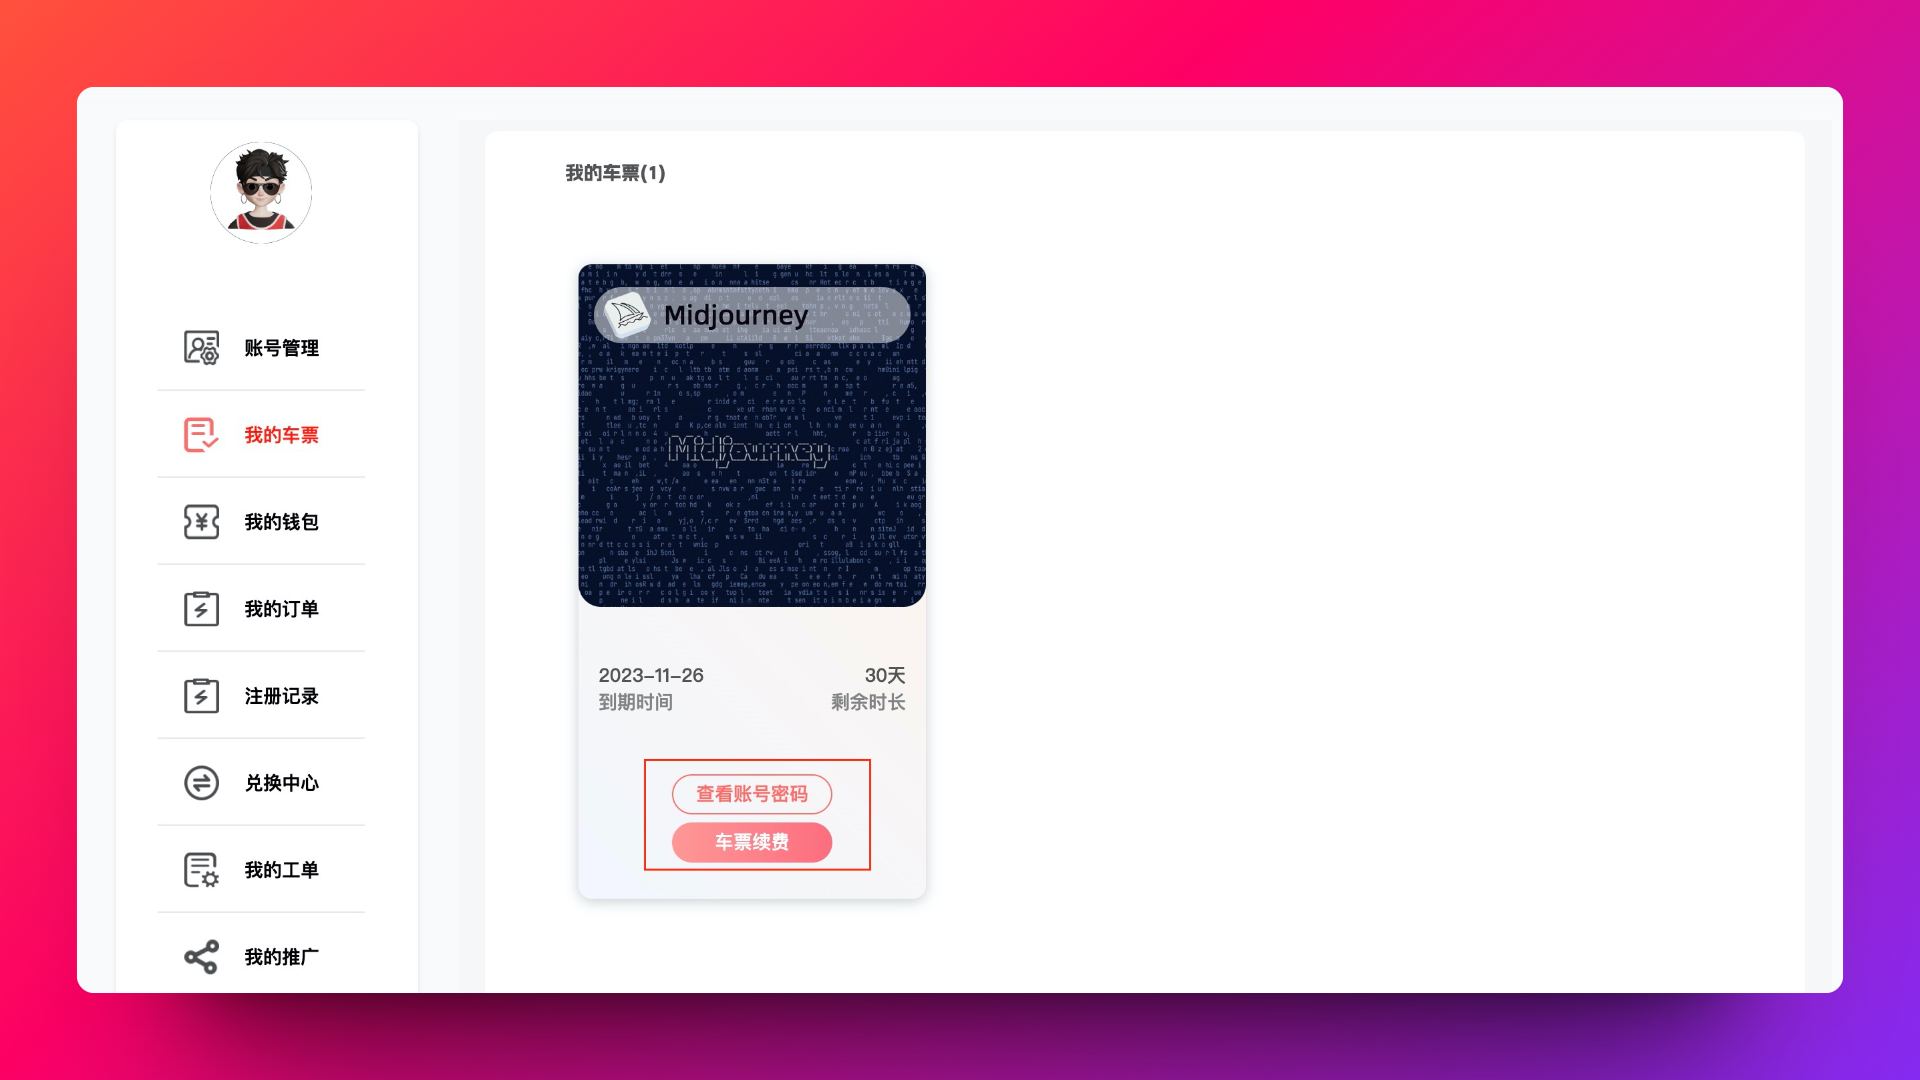
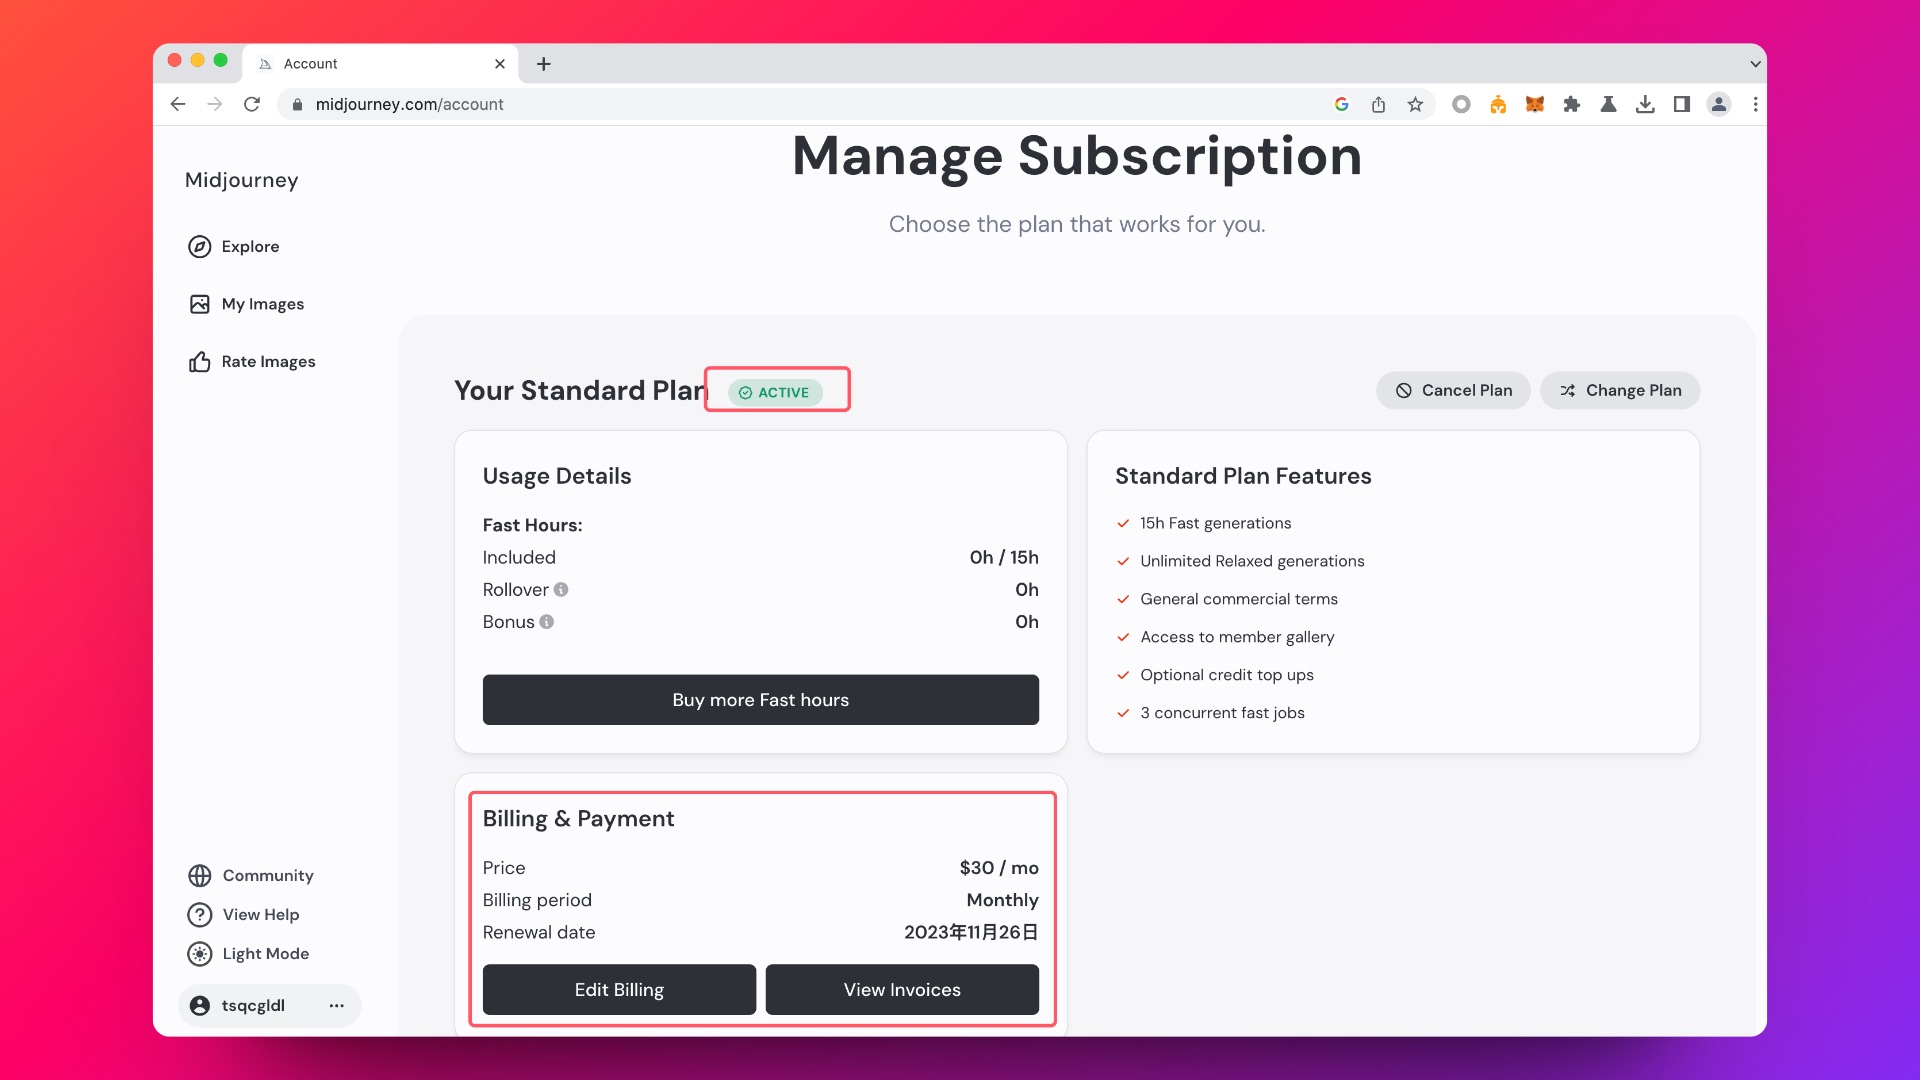
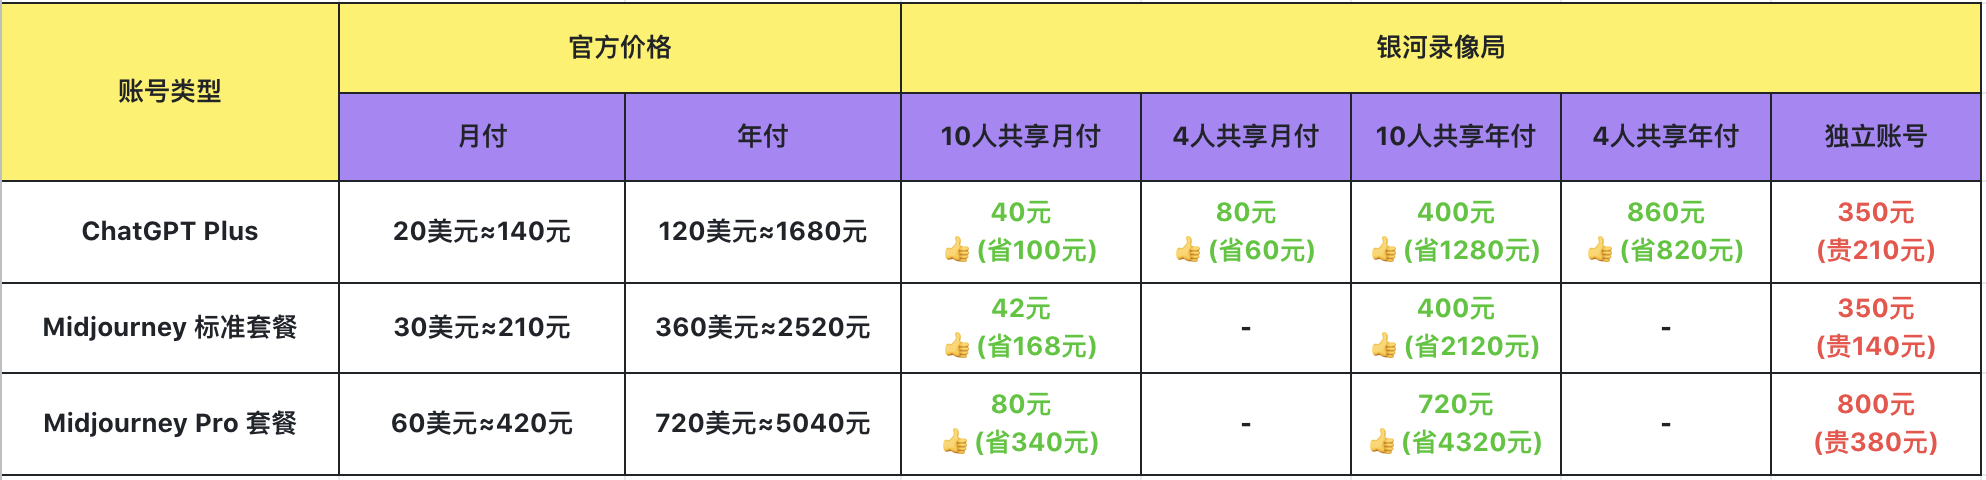
    <content type="html"><![CDATA[<p>今天给大家分享一个全网最全的 AI 和流媒体账号 丝滑购买方法：</p><ul><li>✅ 无需信用卡，不用担心自动扣费问题；</li><li>✅ 支持支付宝，即买即用，按月购买；</li><li>✅ 支持合租，支持独享；</li><li>✅ 支持 <strong>Netflix、Youtube、Disney、Spotify、iCloud、Apple One、HBO、Prime</strong> 等全部主流影视平台账号购买</li><li>✅ 支持 <strong>ChatGPT Plus、Midjourney、Poe、Notion、PS AI、Office 365、Adobe 全家桶、Runnway</strong> 等全网最流行 AI 账号购买。</li></ul><p>官方网站叫「<strong>银河录像局</strong>」，其官网如下:</p><p><a href="https://nf.video/0VeOc" target="_blank" rel="noopener">https://nf.video/0VeOc</a></p><p><img src="https://githubblog.s3.bitiful.net/blog/202411121657158.webp" alt></p><a id="more"></a><p>此网站在国内是已经备案的合法公司，拥有移动备案的国际专用信道，支持翻车必赔，网站有专门客服，有问题可随时咨询。</p><p><img src="https://githubblog.s3.bitiful.net/blog/202411121658472.webp" alt></p><h2 id="支持的账号种类"><a href="#支持的账号种类" class="headerlink" title="支持的账号种类"></a>支持的账号种类</h2><p>支持全网基本所有的 AI 产品、流媒体账号、游戏或学习账号以及 Google 账号购买服务：</p><p><strong>AI 账号:</strong></p><p><img src="https://githubblog.s3.bitiful.net/blog/202411121658700.webp" alt></p><p><strong>流媒体账号:</strong></p><p><img src="https://githubblog.s3.bitiful.net/blog/202411121658554.webp" alt></p><p><strong>游戏或学习账号:</strong></p><p><img src="https://githubblog.s3.bitiful.net/blog/202411121658575.webp" alt></p><h2 id="购买教程"><a href="#购买教程" class="headerlink" title="购买教程"></a>购买教程</h2><p>下面是我亲身购买一个 Midjourney 付费账号教程下：</p><p>①、打开要购买的服务，比如下面是 Midjourney 服务，选择了「标准10人共享月付」套餐，直接支持支付宝支付。</p><p><img src="https://githubblog.s3.bitiful.net/blog/202411121658343.webp" alt></p><p>②、点击支付后就出现如下界面，扫描二维码付款即可，也有付款说明，如果有支付问题可以联系官网客服：</p><p><img src="https://githubblog.s3.bitiful.net/blog/202411121659857.webp" alt></p><p>③、支付成功后，显示「查看车票信息」，车票就是账号和密码：</p><p><img src="https://githubblog.s3.bitiful.net/blog/202411121659910.webp" alt></p><p>④、进入个人中心「我的车票」也可以查看账号和密码，然后登录：</p><p><img src="https://githubblog.s3.bitiful.net/blog/202411121659620.webp" alt></p><p>⑤、我们登录下 Midjourney 查看下账号信息，确实是付费用户了：</p><p><img src="https://githubblog.s3.bitiful.net/blog/202411121659831.webp" alt></p><p>ChatGPT Plus 会员开通方法与上面一致，使用方法也是一样，开通完后大家就可以完整使用 ChatGPT4 了。</p><h2 id="价格说明"><a href="#价格说明" class="headerlink" title="价格说明"></a>价格说明</h2><p>下面是两个最流行的 AI 账号 ChatGPT Plus 和 Midjourney 账号套餐对比图，我们可以看出：</p><ul><li>银河录像局的<strong>共享账号非常省钱</strong>，独立账号则比官方的贵。</li><li>对于使用频率不高的账号，<strong>我建议买共享账号使用就行了</strong>，我就买共享的 Midjourney 账号，有空画个图就行。</li><li>对于想要独立使用的账号的，我建议自己办个信用卡支付比较好，否则银河录像局比较贵，不划算。</li></ul><p><img src="https://githubblog.s3.bitiful.net/blog/202411121659692.webp" alt></p><h2 id="总结"><a href="#总结" class="headerlink" title="总结"></a>总结</h2><p>银河录像局的好处就是给那些<strong>没有信用卡或者担心信用卡自动扣费的人一个比较好的选择</strong>，按月付，不买即可终结，也不用担心自己信用卡被禁用。</p><p>记住官网为: <a href="https://nf.video/0VeOc" target="_blank" rel="noopener">https://nf.video/0VeOc</a> 有兴趣的小伙伴可以买一个月尝试下。</p><h2 id="其他"><a href="#其他" class="headerlink" title="其他"></a>其他</h2><ul><li>海趣社导航入口: <a href="https://link3.cc/haiqushe" target="_blank" rel="noopener">https://link3.cc/haiqushe</a></li><li>豆瓣周榜资源地址: <a href="https://doubanweek.top/" target="_blank" rel="noopener">https://doubanweek.top/</a></li><li>在线观影网站合集: <a href="https://haiqushe.notion.site/0f0e937204924ad5b8c14b405ceb320b" target="_blank" rel="noopener">https://haiqushe.notion.site/0f0e937204924ad5b8c14b405ceb320b</a></li></ul>]]></content>
    
    
    <summary type="html">&lt;p&gt;今天给大家分享一个全网最全的 AI 和流媒体账号 丝滑购买方法：&lt;/p&gt;
&lt;ul&gt;
&lt;li&gt;✅ 无需信用卡，不用担心自动扣费问题；&lt;/li&gt;
&lt;li&gt;✅ 支持支付宝，即买即用，按月购买；&lt;/li&gt;
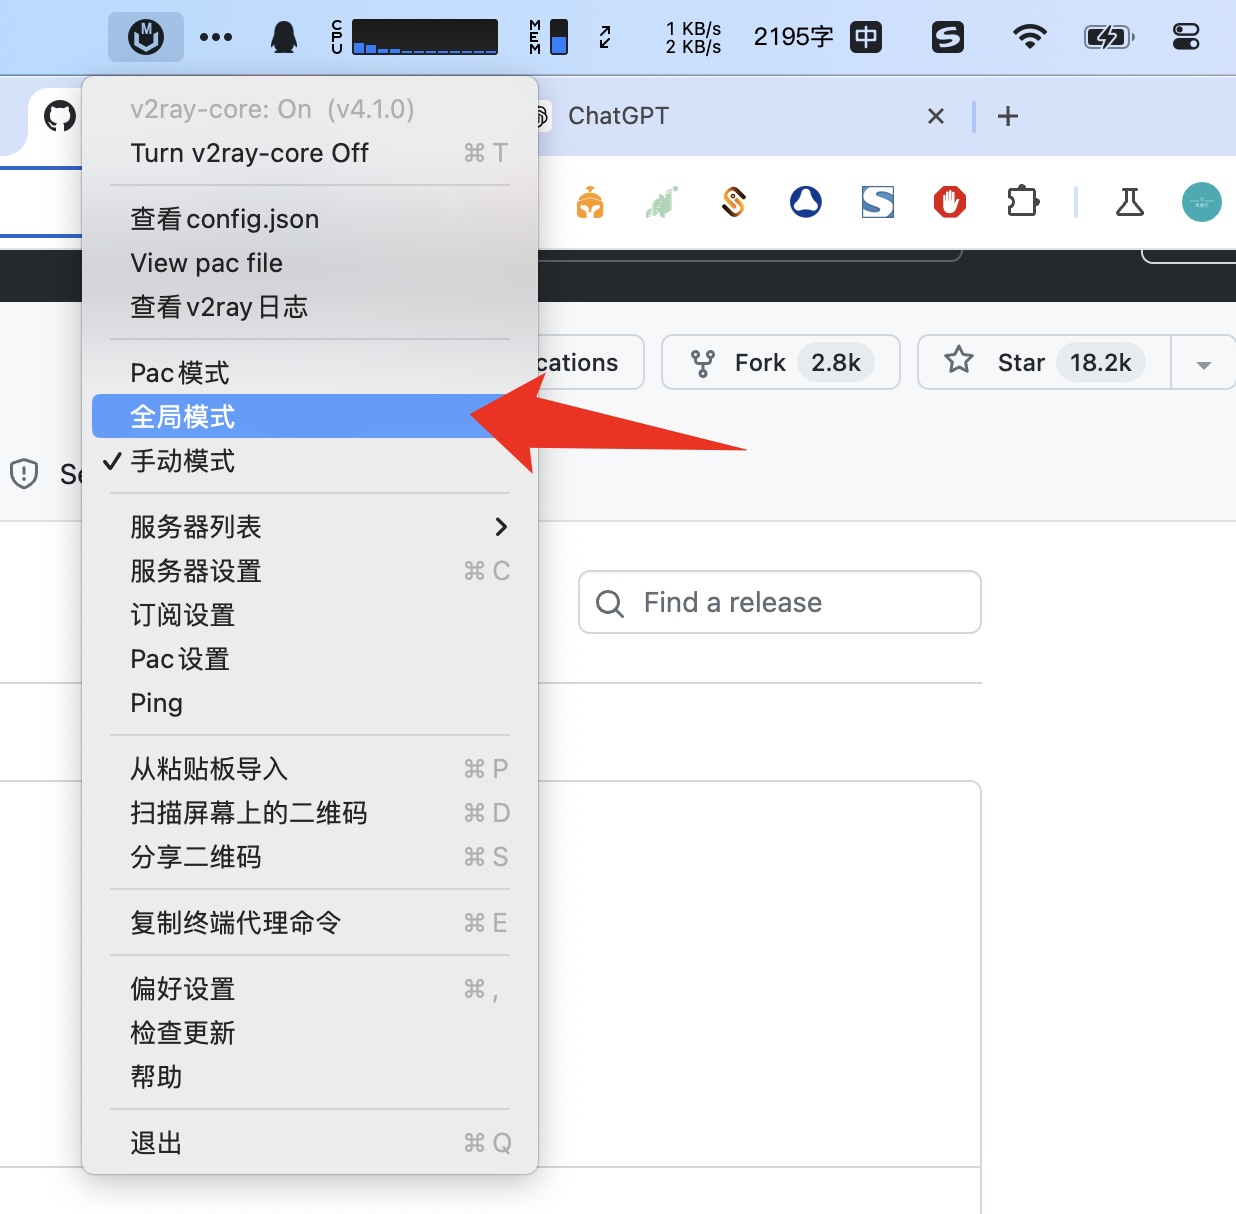
&lt;li&gt;✅ 支持合租，支持独享；&lt;/li&gt;
&lt;li&gt;✅ 支持 &lt;strong&gt;Netflix、Youtube、Disney、Spotify、iCloud、Apple One、HBO、Prime&lt;/strong&gt; 等全部主流影视平台账号购买&lt;/li&gt;
&lt;li&gt;✅ 支持 &lt;strong&gt;ChatGPT Plus、Midjourney、Poe、Notion、PS AI、Office 365、Adobe 全家桶、Runnway&lt;/strong&gt; 等全网最流行 AI 账号购买。&lt;/li&gt;
&lt;/ul&gt;
&lt;p&gt;官方网站叫「&lt;strong&gt;银河录像局&lt;/strong&gt;」，其官网如下:&lt;/p&gt;
&lt;p&gt;&lt;a href=&quot;https://nf.video/0VeOc&quot; target=&quot;_blank&quot; rel=&quot;noopener&quot;&gt;https://nf.video/0VeOc&lt;/a&gt;&lt;/p&gt;
&lt;p&gt;&lt;img src=&quot;https://githubblog.s3.bitiful.net/blog/202411121657158.webp&quot; alt&gt;&lt;/p&gt;</summary>


    <category term="AI" scheme="https://jiyiren.github.io/categories/AI/"/>
    
    
    <category term="账号" scheme="https://jiyiren.github.io/tags/账号/"/>
    
    <category term="ChatGPT" scheme="https://jiyiren.github.io/tags/ChatGPT/"/>
    
    <category term="Midjourney" scheme="https://jiyiren.github.io/tags/Midjourney/"/>
    
    <category term="奈飞" scheme="https://jiyiren.github.io/tags/奈飞/"/>
    
    <category term="Netflix" scheme="https://jiyiren.github.io/tags/Netflix/"/>
    
  </entry>
  
  <entry>
    <title>整理一些博客链接</title>
    <link href="https://jiyiren.github.io/2021/11/06/links_ok/"/>
    <id>https://jiyiren.github.io/2021/11/06/links_ok/</id>
    <published>2021-11-06T02:07:25.000Z</published>
    <updated>2021-11-06T09:06:19.517Z</updated>
    
    <content type="html"><![CDATA[<h2 id="个人博客"><a href="#个人博客" class="headerlink" title="个人博客"></a>个人博客</h2><ul><li><a href="http://www.ruanyifeng.com/blog/" target="_blank" rel="noopener">阮一峰</a>: 中国区 github followers 第一, 教程、新闻、想法很多;</li><li><a href="https://coolshell.cn/" target="_blank" rel="noopener">陈皓</a>: 网名 <em>左耳朵耗子</em>，元老级程序员专家，对技术理解比较深刻;</li><li><a href="http://www.yinwang.org/" target="_blank" rel="noopener">王垠</a>: 思想奇葩;</li><li><a href="https://yihui.org/" target="_blank" rel="noopener">谢益辉</a>: 有个性的一个人，R 语言高手;</li><li><a href="http://column.hongliangjie.com/about/" target="_blank" rel="noopener">洪亮劼</a>: 人工智能专家，LinkedIn 工程总监，学习学习算法从业者想法;</li><li><a href="https://haohailong.net/" target="_blank" rel="noopener">郝海龙</a>: 英文翻译专家，创立《林中来信》付费文章，作家。当时是被<a href="http://haohailong.github.io/mac-app-papers/" target="_blank" rel="noopener">【用 Papers for Mac 搞学术】</a> 文章吸引了的，原博客已删掉了此文章，链接里为作者的 github 博客;</li><li><a href="http://zhangtielei.com/about.html" target="_blank" rel="noopener">张铁蕾</a>: 阿里后端开发者，会写小说、诗词;</li><li><a href="https://liujiacai.net/about/" target="_blank" rel="noopener">刘家财</a>: 擅长 Emacs，独立做了 EmacsTalk 节目;</li><li><a href="http://yangyingming.com/about/" target="_blank" rel="noopener">杨英明</a>: 博客主题不错;</li><li><a href="https://diygod.me/about/" target="_blank" rel="noopener">DIYgod</a>: 开源 star 量多，博客主题很个性;</li><li><a href="https://88250.b3log.org/about" target="_blank" rel="noopener">丁亮</a>: 自主创业者，每年会出个人总结，感觉是很有想法的人;</li><li><a href="https://byvoid.com/zhs/about/" target="_blank" rel="noopener">郭家宝</a>: 谷歌员工，当时被其游记吸引了;</li><li><a href="https://www.cs.princeton.edu/~danqic/" target="_blank" rel="noopener">陈丹琦</a>: NLP 专家，获得 2021 Google AI 研究学者计划;</li><li><a href="https://pluskid.org/" target="_blank" rel="noopener">张驰原</a>: 谷歌大脑研究者;</li><li><a href="https://camarts.cn/" target="_blank" rel="noopener">翁天信</a>: 一个未上过学的自学者，摄影精美;</li><li><a href="https://bean-li.github.io/about/" target="_blank" rel="noopener">李彬</a>: Linux 后端工程师，从事存储行业;</li><li><a href="https://www.codedump.info/" target="_blank" rel="noopener">codedump</a>: Lua 高手，出过书;</li><li><a href="https://www.ixiqin.com/" target="_blank" rel="noopener">白宦成</a>: 网名 <em>西秦公子</em>，自由职业者;</li><li><a href="https://www.changhai.org/articles/introduction/personal_data.php" target="_blank" rel="noopener">卢昌海</a>: 物理学家、科普作家，发表作品无数 👍;</li><li><a href="https://github.com/1c7/chinese-independent-developer" target="_blank" rel="noopener">中国独立开发者合集</a>: 开源独立开发者合集;</li></ul><a id="more"></a><h2 id="独立开发者-项目"><a href="#独立开发者-项目" class="headerlink" title="独立开发者/项目"></a>独立开发者/项目</h2><ul><li><a href="https://blog.t9t.io/" target="_blank" rel="noopener">透明创业实验室</a>: 一位独立开发者 @timqian 坚持每周更新独立开发进度;</li><li><a href="https://www.ixiqin.com/aboutme/" target="_blank" rel="noopener">毒蘑菇</a>: 吴掌柜个人开发短文、名言、鸡汤网站;</li><li><a href="https://w2solo.com/" target="_blank" rel="noopener">W2Solo</a>: 独立开发者信息交流社区，人不是很多，但有自己不了解的信息;</li></ul><h2 id="博刊-日-周-月刊"><a href="#博刊-日-周-月刊" class="headerlink" title="博刊(日/周/月刊)"></a>博刊(日/周/月刊)</h2><ul><li>【周刊】<a href="http://www.ruanyifeng.com/blog/" target="_blank" rel="noopener">科技爱好者周刊</a>: 阮一峰创作，每周五发布;</li><li>【月刊】<a href="https://hellogithub.com/" target="_blank" rel="noopener">HelloGithub</a>: 有趣的开源项目合集;</li><li>【周刊】<a href="http://fex.baidu.com/" target="_blank" rel="noopener">FEX 前端</a>: 前端技术分享;</li><li>【周刊】<a href="https://github.com/ascoders/weekly" target="_blank" rel="noopener">Weekly 前端</a>: 前端精读文章合集;</li><li>【日/周报】<a href="https://openingsource.org/" target="_blank" rel="noopener">开源工厂</a>: 开源项目介绍合集;</li><li>【日报】<a href="https://wanqu.co/" target="_blank" rel="noopener">湾区日报</a>: 关注创业与技术;</li><li><a href="https://tech.meituan.com/" target="_blank" rel="noopener">美团技术团队</a>: 美团企业分享合集;</li><li><a href="https://tech.youzan.com/" target="_blank" rel="noopener">有赞技术团队</a>: 有赞企业分享合集;</li><li><a href="https://www.jiqizhixin.com/" target="_blank" rel="noopener">机器之心</a>: 人工智能新闻合集;</li><li><a href="https://github.com/phodal/growth-ebook" target="_blank" rel="noopener">全栈工程师增长指南</a>: 全栈工程师指南;</li><li><a href="https://github.com/stanzhai/be-a-professional-programmer" target="_blank" rel="noopener">专业程序员必看书籍指南</a>: 程序员书籍指南;</li><li><a href="https://github.com/niezhiyang/open_source_team" target="_blank" rel="noopener">大厂技术分享目录合集</a>: 大厂分享目录合集;</li></ul>]]></content>
    
    
    <summary type="html">&lt;h2 id=&quot;个人博客&quot;&gt;&lt;a href=&quot;#个人博客&quot; class=&quot;headerlink&quot; title=&quot;个人博客&quot;&gt;&lt;/a&gt;个人博客&lt;/h2&gt;&lt;ul&gt;
&lt;li&gt;&lt;a href=&quot;http://www.ruanyifeng.com/blog/&quot; target=&quot;_blank&quot; rel=&quot;noopener&quot;&gt;阮一峰&lt;/a&gt;: 中国区 github followers 第一, 教程、新闻、想法很多;&lt;/li&gt;
&lt;li&gt;&lt;a href=&quot;https://coolshell.cn/&quot; target=&quot;_blank&quot; rel=&quot;noopener&quot;&gt;陈皓&lt;/a&gt;: 网名 &lt;em&gt;左耳朵耗子&lt;/em&gt;，元老级程序员专家，对技术理解比较深刻;&lt;/li&gt;
&lt;li&gt;&lt;a href=&quot;http://www.yinwang.org/&quot; target=&quot;_blank&quot; rel=&quot;noopener&quot;&gt;王垠&lt;/a&gt;: 思想奇葩;&lt;/li&gt;
&lt;li&gt;&lt;a href=&quot;https://yihui.org/&quot; target=&quot;_blank&quot; rel=&quot;noopener&quot;&gt;谢益辉&lt;/a&gt;: 有个性的一个人，R 语言高手;&lt;/li&gt;
&lt;li&gt;&lt;a href=&quot;http://column.hongliangjie.com/about/&quot; target=&quot;_blank&quot; rel=&quot;noopener&quot;&gt;洪亮劼&lt;/a&gt;: 人工智能专家，LinkedIn 工程总监，学习学习算法从业者想法;&lt;/li&gt;
&lt;li&gt;&lt;a href=&quot;https://haohailong.net/&quot; target=&quot;_blank&quot; rel=&quot;noopener&quot;&gt;郝海龙&lt;/a&gt;: 英文翻译专家，创立《林中来信》付费文章，作家。当时是被&lt;a href=&quot;http://haohailong.github.io/mac-app-papers/&quot; target=&quot;_blank&quot; rel=&quot;noopener&quot;&gt;【用 Papers for Mac 搞学术】&lt;/a&gt; 文章吸引了的，原博客已删掉了此文章，链接里为作者的 github 博客;&lt;/li&gt;
&lt;li&gt;&lt;a href=&quot;http://zhangtielei.com/about.html&quot; target=&quot;_blank&quot; rel=&quot;noopener&quot;&gt;张铁蕾&lt;/a&gt;: 阿里后端开发者，会写小说、诗词;&lt;/li&gt;
&lt;li&gt;&lt;a href=&quot;https://liujiacai.net/about/&quot; target=&quot;_blank&quot; rel=&quot;noopener&quot;&gt;刘家财&lt;/a&gt;: 擅长 Emacs，独立做了 EmacsTalk 节目;&lt;/li&gt;
&lt;li&gt;&lt;a href=&quot;http://yangyingming.com/about/&quot; target=&quot;_blank&quot; rel=&quot;noopener&quot;&gt;杨英明&lt;/a&gt;: 博客主题不错;&lt;/li&gt;
&lt;li&gt;&lt;a href=&quot;https://diygod.me/about/&quot; target=&quot;_blank&quot; rel=&quot;noopener&quot;&gt;DIYgod&lt;/a&gt;: 开源 star 量多，博客主题很个性;&lt;/li&gt;
&lt;li&gt;&lt;a href=&quot;https://88250.b3log.org/about&quot; target=&quot;_blank&quot; rel=&quot;noopener&quot;&gt;丁亮&lt;/a&gt;: 自主创业者，每年会出个人总结，感觉是很有想法的人;&lt;/li&gt;
&lt;li&gt;&lt;a href=&quot;https://byvoid.com/zhs/about/&quot; target=&quot;_blank&quot; rel=&quot;noopener&quot;&gt;郭家宝&lt;/a&gt;: 谷歌员工，当时被其游记吸引了;&lt;/li&gt;
&lt;li&gt;&lt;a href=&quot;https://www.cs.princeton.edu/~danqic/&quot; target=&quot;_blank&quot; rel=&quot;noopener&quot;&gt;陈丹琦&lt;/a&gt;: NLP 专家，获得 2021 Google AI 研究学者计划;&lt;/li&gt;
&lt;li&gt;&lt;a href=&quot;https://pluskid.org/&quot; target=&quot;_blank&quot; rel=&quot;noopener&quot;&gt;张驰原&lt;/a&gt;: 谷歌大脑研究者;&lt;/li&gt;
&lt;li&gt;&lt;a href=&quot;https://camarts.cn/&quot; target=&quot;_blank&quot; rel=&quot;noopener&quot;&gt;翁天信&lt;/a&gt;: 一个未上过学的自学者，摄影精美;&lt;/li&gt;
&lt;li&gt;&lt;a href=&quot;https://bean-li.github.io/about/&quot; target=&quot;_blank&quot; rel=&quot;noopener&quot;&gt;李彬&lt;/a&gt;: Linux 后端工程师，从事存储行业;&lt;/li&gt;
&lt;li&gt;&lt;a href=&quot;https://www.codedump.info/&quot; target=&quot;_blank&quot; rel=&quot;noopener&quot;&gt;codedump&lt;/a&gt;: Lua 高手，出过书;&lt;/li&gt;
&lt;li&gt;&lt;a href=&quot;https://www.ixiqin.com/&quot; target=&quot;_blank&quot; rel=&quot;noopener&quot;&gt;白宦成&lt;/a&gt;: 网名 &lt;em&gt;西秦公子&lt;/em&gt;，自由职业者;&lt;/li&gt;
&lt;li&gt;&lt;a href=&quot;https://www.changhai.org/articles/introduction/personal_data.php&quot; target=&quot;_blank&quot; rel=&quot;noopener&quot;&gt;卢昌海&lt;/a&gt;: 物理学家、科普作家，发表作品无数 👍;&lt;/li&gt;
&lt;li&gt;&lt;a href=&quot;https://github.com/1c7/chinese-independent-developer&quot; target=&quot;_blank&quot; rel=&quot;noopener&quot;&gt;中国独立开发者合集&lt;/a&gt;: 开源独立开发者合集;&lt;/li&gt;
&lt;/ul&gt;</summary>


    <category term="博客" scheme="https://jiyiren.github.io/categories/博客/"/>
    
    
    <category term="blog" scheme="https://jiyiren.github.io/tags/blog/"/>
    
  </entry>
  
  <entry>
    <title>LaTeX 介绍和使用</title>
    <link href="https://jiyiren.github.io/2020/08/22/latex_use/"/>
    <id>https://jiyiren.github.io/2020/08/22/latex_use/</id>
    <published>2020-08-22T02:07:25.000Z</published>
    <updated>2024-11-12T09:23:43.035Z</updated>
    
    <content type="html"><![CDATA[<p>最近在整理自己的收藏夹和知识集合，总感觉很多文档放本地或者印象笔记、有道笔记不是很好，遇到问题本能总是先 Google，不曾想过有时候自己已经花大量时间整理了，并且可能会出现在本地多个文档中整理了同一知识点，或者在不同笔记里都有记录相关问题，导致相关信息杂乱。因此，我规划从现在起将自己收藏的东西整理出来，全部放博客中，便于查找和统一更新。今天先更新 LaTeX 整理记录。</p><h2 id="简介"><a href="#简介" class="headerlink" title="简介"></a>简介</h2><p>1 . 七十年代末，<em>Donald E. Knuth（高德纳</em>） 在看到其多卷巨著 <em>“The Art of Computer Programming”</em> 第二卷的校样时，对由计算机排版的校样的低质量感到无法忍受。因此决定自己来开发一个高质量的计算机排版系统，这样就有了 <strong>TeX</strong> 。</p><p>2 . <strong>TeX</strong> 的第一版于 1978 年面世，<strong>TeX</strong> 的源程序是用 <code>Pascal</code> 写成的，原因是 Knuth 希望 <strong>TeX</strong> 尽可能方便地移植到其它的操作系统中去。当时 <code>Pascal</code> 是最适合于这一要求的编程语言。这也使得 <strong>TeX</strong> 现在已经在几乎所有的计算机系统中得到实现。</p><p>3 . <strong>TeX</strong> 的另一个重要的特征就是它的输出是与 <strong>设备无关</strong> 的。<strong>TeX</strong> 的输出文件称为 <strong>DVI</strong> 文件，即是 <em>“Device Independent”</em> 。一旦 <strong>TeX</strong> 处理了你的文件，你所得到的 <strong>DVI</strong> 文件就可以被送到任何输出设备如打印机，屏幕等并且总会得到相同的结果，而这与这些输出设备的限制没有任何关系。这说明 <strong>DVI</strong> 文件中所有的元素，从页面设置到文本中字符的位置都被固定，不能更改。</p><p><img src="https://githubblog.s3.bitiful.net/blog/202411121722846.webp" alt></p><p>4 . <strong>TeX</strong> 现在已经被它的开发者 Knuth 所 “冰封”(frozen)，基本不再开发了。但新的变种版本不断出现，</p><ul><li><strong>LaTeX</strong>: 1984 年，由 Lamport 开发, 适合论文书籍, 对 TeX 推广贡献巨大，由于其标准的格式控制，latex 逐渐成为主流的 TeX 文档排版命令。LaTeX 时代开启。</li><li><strong>PDFTeX</strong> : 1997 年，由 H.T. Thanh 开发，完全兼容标准的 <strong>TeX</strong> ，但能够给出 PDF 输出。它也可以输出标准的 DVI 。</li><li><strong>XeTeX</strong> : 2005年，Jonathan Kew 在 <em>e-TeX</em> 基础上添加 <strong>Unicode</strong> 支持，并且连接 Mac OS X 的各种技术。<strong>XeTeX</strong> 在2005/6年陆续发布了它的 Windows 和 Linux 版本，最终集成在 <strong>TeXLive 2007</strong> 当中，标志着它被广泛地认可。在 <strong>XeTeX</strong> 中，使用多国语言，变得非常轻松。</li><li><strong>LuaTeX</strong> : 2007年，是 Aleph 与 <strong>PDFTeX</strong> 项目的继任者，主要由 Taco Hoekwater 开发，是 Lua 脚本语言和 TeX 的结合。</li></ul><a id="more"></a><p>5 . <strong>LaTex 发型版本</strong>：</p><ul><li><strong><a href="https://tug.org/texlive/" target="_blank" rel="noopener">TeXLive</a></strong> : <strong>【官方】</strong>是由国际 TeX 用户组织 <strong>TUG</strong> 开发的 TeX 系统，支持不同的操作系统平台。其 Windows 版本又称 fpTeX ， Unix/Linux 版本即著名的 teTeX, Mac 版本为 <strong><a href="https://tug.org/mactex" target="_blank" rel="noopener">MacTeX</a></strong>。ISO 镜像下载地址：<a href="http://mirrors.ibiblio.org/CTAN/systems/texlive/Images/" target="_blank" rel="noopener">点我</a></li><li><strong><a href="http://www.miktex.org" target="_blank" rel="noopener">MiKTeX</a></strong> : 原来是 Windows 系统平台上的一个发行版本，之后也扩展支持到 Linux 和 MacOS 了。其本身集成了一个编辑器  <strong>TeXworks</strong>。</li><li><strong><a href="http://www.ctex.org/HomePage" target="_blank" rel="noopener">CTex</a></strong> : 这个很多人谈论到中文 LaTeX 的时候会提到，但是 <strong>CTeX</strong> 发行版是民间为早期 LaTeX 不支持中文而基于 MiKTeX 开发的支持中文版本。其本身就是 <strong>MiKTeX</strong>。但现在 Unicode 支持的 XeTeX 和其他 TeX 已经趋于成熟，<strong>因此，现在不推荐再用 CTeX 版本了</strong>。</li><li><strong>CTeX 宏集</strong> : 这里要提一下 <strong>CTeX 宏集</strong>，这个宏集与 CTeX 发行版本/套装 是完全不一样的东西，CTeX 宏集是 <strong>Chinese Support TeX</strong>，是为支持中文的 TeX 库，这个是在用到中文时必须要用的库，因此，千万不要混淆这两者。现今所说的 CTeX 一般都是指这个 CTeX 宏集。</li></ul><h2 id="发行版本"><a href="#发行版本" class="headerlink" title="发行版本"></a>发行版本</h2><p>发行版本就是 LaTeX 多种标准实现类型。主要是分为 <strong>TeXLive</strong> 和 <strong>MiKTeX</strong>，其他版本都是基于这两个主流版本衍生而来的。这两大发行版本都是全平台支持的。MacTeX 实际上就是 TeXLive 的 MacOS 系统上的实现，因此这里归类其为 TeXLive。相关说明如下：</p><ul><li><strong>TeXLive</strong>: <a href="https://tug.org/texlive" target="_blank" rel="noopener">https://tug.org/texlive</a>,<strong>【官方】</strong>发行，自带 <strong>TeXShop</strong>;</li><li><strong>MacTeX</strong>: <a href="https://tug.org/mactex" target="_blank" rel="noopener">https://tug.org/mactex</a>, 实际上属于TeXLive，因为支持 MacOS 较迟，因此给了新名称，自带 <strong>TeXShop</strong>;</li><li><strong>MiKTeX</strong>: <a href="http://www.miktex.org" target="_blank" rel="noopener">http://www.miktex.org</a>, 自带 <strong>TeXWorks</strong>;</li><li><del><strong>CTeX</strong>: <a href="http://www.ctex.org/HomePage" target="_blank" rel="noopener">http://www.ctex.org/HomePage</a>，XeTeX 出现之前民间中文支持的版本，基于 MiKTeX，不再维护</del>。目前中文文档用 <strong>XeTeX + CTeX</strong> 宏包即可支持了。</li></ul><p>如果需要安装的话，大家看官网实际上都能找到地址的，为方便这里列下不同发行版本的不同平台下载地址:</p><ul><li><p><strong>TeXLive</strong></p><ul><li>Windows: <a href="https://tug.org/texlive/windows.html" target="_blank" rel="noopener">https://tug.org/texlive/windows.html</a></li><li>MacOS: <a href="https://tug.org/mactex/" target="_blank" rel="noopener">https://tug.org/mactex/</a></li><li>Linux: <a href="https://www.tug.org/texlive/quickinstall.html" target="_blank" rel="noopener">https://www.tug.org/texlive/quickinstall.html</a></li></ul></li><li><p><strong>MiKTeX</strong>, 这个资源简单，同一个页面选择不同系统即可</p><ul><li>Windows: <a href="https://miktex.org/download" target="_blank" rel="noopener">https://miktex.org/download</a></li><li>MacOS: <a href="https://miktex.org/download" target="_blank" rel="noopener">https://miktex.org/download</a></li><li>Linux: <a href="https://miktex.org/download" target="_blank" rel="noopener">https://miktex.org/download</a>  </li></ul></li></ul><h2 id="编辑器"><a href="#编辑器" class="headerlink" title="编辑器"></a>编辑器</h2><p>LaTeX 实际上和 Java 语言一样，都是需要先配置环境，然后选择一款自己喜欢的编辑器或 IDE 进行编写“代码”。当然所有文本编辑器都可以编写 LaTeX 或者 Java 等其他语言“代码”。这里的 IDE 指集成了一些语言本地化的功能，比如编译、特殊符号等等。</p><p>LaTeX 的发行版中会自带一款编辑器，用 TexLive 的话，MacOS 上会有个叫 TexShop 的编辑器，而 Windows 上则会是一个叫 TexWorker 的编辑器，这些是都可以胜任编写工作的。另外，也有第三的 LaTeX 编辑器，下面我整理出所有编辑器说明，我个人用的也推荐程度也放上了，这是个人喜好，大家根据自己的偏好选择。</p><ul><li><strong>TeXMaker</strong>: <a href="http://www.xm1math.net/texmaker/" target="_blank" rel="noopener">http://www.xm1math.net/texmaker/</a> , 全平台，免费，强烈推荐👍👍👍；</li><li><strong>TeXStudio</strong>: <a href="http://texstudio.sourceforge.net/" target="_blank" rel="noopener">http://texstudio.sourceforge.net/</a> , 全平台，免费，推荐👍👍；</li><li><strong>WinEdit</strong>: <a href="http://www.winedt.com/index.html" target="_blank" rel="noopener">http://www.winedt.com/index.html</a> , 只支持 Windows，收费，自己选👍👍🍚；</li><li><strong>TeXWorks</strong>: <a href="http://www.tug.org/texworks/" target="_blank" rel="noopener">http://www.tug.org/texworks/</a> ，<strong>MiKTeX</strong> 自带编辑器，免费👍；</li><li><strong>TeXShop</strong>: <a href="https://pages.uoregon.edu/koch/texshop/" target="_blank" rel="noopener">https://pages.uoregon.edu/koch/texshop/</a> ，<strong>TeXLive</strong> 自带编辑器，免费👍；</li></ul><p>我个人推荐前两个，因为第三个收费且不跨平台，之所以写上第三个，主要是因为网络上很多博客或用户都推荐用第三个，这个我使用时也感觉不错，但每次我使用都得到 Windows 上使用，比较麻烦。当然，如果你使用 Windows 且有钱，WinEdt 确实使用体验和功能都是比较好的。</p><h2 id="安装"><a href="#安装" class="headerlink" title="安装"></a>安装</h2><ul><li><strong>Windows / MacOS</strong>: 建议安装 <strong><a href="https://tug.org/texlive" target="_blank" rel="noopener">TeXLive</a></strong>，根据自己的系统选择对应的安装包。Mac 系统对应 <strong><a href="https://tug.org/mactex" target="_blank" rel="noopener">MacTeX</a></strong>。</li><li><p><strong>MacOS</strong>: 安装后会自动将命令加入到环境变量, 并自带 <strong>TeXShop</strong> 编辑器。</p>  <div class="highlight-wrap"autocomplete="off" autocorrect="off" autocapitalize="off" spellcheck="false" contenteditable="true"data-rel="BASH"><figure class="iseeu highlight /bash"><table><tr><td class="gutter"><pre><span class="line">1</span><br><span class="line">2</span><br></pre></td><td class="code"><pre><span class="line">$ <span class="built_in">which</span> latex</span><br><span class="line">/Library/TeX/texbin/latex</span><br></pre></td></tr></table></figure></div></li><li><p><strong>MacOS</strong>: TeXShop 是 MacTeX 自带的编辑器，我个人倾向于再安装一个编辑器 <strong><a href="http://www.xm1math.net/texmaker/" target="_blank" rel="noopener">TeXMaker</a></strong>，其内置较多可视化符号，可点击插入，简单便捷。</p></li><li><strong>Windows</strong>: 推荐 <strong><a href="http://www.xm1math.net/texmaker/" target="_blank" rel="noopener">TeXMaker</a></strong> 和 <strong><a href="http://www.winedt.com/index.html" target="_blank" rel="noopener">WinEdt</a></strong> , 专门针对 TeX 开发, 提供许多便捷功能, 有助于提高排版效率</li><li><p><strong>编译推荐</strong>: 用 <code>pdflatex</code> ( <strong>英文文档</strong> ) 或 <code>xelatex</code> ( <strong>中文文档</strong> ) 编译, 生成相应的 pdf 文件。</p><p><img src="https://githubblog.s3.bitiful.net/blog/202411121723680.webp" alt></p></li></ul><h2 id="使用"><a href="#使用" class="headerlink" title="使用"></a>使用</h2><h3 id="基础框架"><a href="#基础框架" class="headerlink" title="基础框架"></a>基础框架</h3><p>1 . <strong>基本结构</strong></p><div class="highlight-wrap"autocomplete="off" autocorrect="off" autocapitalize="off" spellcheck="false" contenteditable="true"data-rel="PLAIN"><figure class="iseeu highlight /plain"><table><tr><td class="gutter"><pre><span class="line">1</span><br><span class="line">2</span><br><span class="line">3</span><br><span class="line">4</span><br><span class="line">5</span><br><span class="line">6</span><br></pre></td><td class="code"><pre><span class="line">\documentclass[a4paper]&#123;article&#125; % 指定文档类型</span><br><span class="line">% 导言区: 全局设置, 宏包调用等</span><br><span class="line">\begin&#123;document&#125;</span><br><span class="line">% 正文部分</span><br><span class="line">Hi, this is my first \LaTeX&#123;&#125; file.</span><br><span class="line">\end&#123;document&#125; % 结束</span><br></pre></td></tr></table></figure></div><ul><li>LaTeX 源文件：<strong>正文 + 命令 + 注解</strong>。</li><li><strong>排版命令</strong>（简称：<strong>命令</strong>）：<strong>反斜杠</strong> 开头的字符串。</li><li><strong>注解符号</strong>：百分号 %</li><li><strong>文档类型</strong>：<code>\documentclass{...}</code>(论文、书籍、幻灯片、海报)</li><li><strong>环境</strong>：<code>\beigin{...}</code> 开头，<code>\end{...}</code> 结尾。</li><li>附：<code>\documentclass[]{}</code> 就是引用模板，默认提供 article 等模板。</li></ul><p>2 . <strong>排版命令</strong></p><ul><li><p>方括号中的是<strong>可选</strong>的 (称为选项), 花括号中的参数是<strong>必需</strong>的</p>  <div class="highlight-wrap"autocomplete="off" autocorrect="off" autocapitalize="off" spellcheck="false" contenteditable="true"data-rel="PLAIN"><figure class="iseeu highlight /plain"><table><tr><td class="gutter"><pre><span class="line">1</span><br><span class="line">2</span><br><span class="line">3</span><br><span class="line">4</span><br><span class="line">5</span><br></pre></td><td class="code"><pre><span class="line">\command</span><br><span class="line">\command[option]&#123;arguments&#125;</span><br><span class="line">% 一些常用命令：</span><br><span class="line">\documentcalss, \title, \author, \date, \usepackage </span><br><span class="line">\begin&#123;环境名&#125;, \end&#123;环境名&#125; % 组成一个环境</span><br></pre></td></tr></table></figure></div></li><li><p>定义新命令</p>  <div class="highlight-wrap"autocomplete="off" autocorrect="off" autocapitalize="off" spellcheck="false" contenteditable="true"data-rel="PLAIN"><figure class="iseeu highlight /plain"><table><tr><td class="gutter"><pre><span class="line">1</span><br><span class="line">2</span><br><span class="line">3</span><br><span class="line">4</span><br></pre></td><td class="code"><pre><span class="line">\newcommand&#123;新命令&#125;&#123;命令内容&#125;</span><br><span class="line">\renewcommand&#123;已有命令&#125;&#123;命令内容&#125;</span><br><span class="line">% 举例</span><br><span class="line">\newcommand&#123;\eps&#125;&#123;\varepsilon&#125; % $\eps$ → ε</span><br></pre></td></tr></table></figure></div></li><li><p>文档类型：<code>\documentclass[选项]{文档类}</code></p><ul><li>位于源文件的最前面, 用于指定文档的整体结构和布局, 必须且只能选一种 <ul><li>常用 <strong>文档类</strong>: article, book, beamer, ctexart, ctexbook, ctexbeamer</li><li>常用 <strong>选项</strong>:</li></ul><ul><li><em>10pt(缺省值), 11pt, 12pt → 指定基本字体的大小</em></li><li><em>letterpaper(缺省值), a4paper, a5paper, … → 指定纸张的大小</em></li><li><em>单双面选项: oneside, twoside, openright, openany</em></li><li><em>数学公式: leqno (公式编号在左边), fleqn (靠左显示行间公式)</em></li></ul></li><li>导言区: \documentclass 和 \begin{document} 之间的区域<ul><li>导言区用于放置 全局控制命令, 如: 调用宏包, 设置页面大小, …</li><li>放在导言区的命令对整个文档都起作用</li></ul></li></ul></li></ul><p>3 . <strong>中文排版</strong></p><ul><li><strong>CTEX</strong> 宏集中提供了三个中文文档类: <strong>texart, ctexbook, ctexbeamer</strong></li><li><p>用 <code>xelatex</code> 编译! 用 xelatex 编译! 用 xelatex 编译! </p>  <div class="highlight-wrap"autocomplete="off" autocorrect="off" autocapitalize="off" spellcheck="false" contenteditable="true"data-rel="PLAIN"><figure class="iseeu highlight /plain"><table><tr><td class="gutter"><pre><span class="line">1</span><br><span class="line">2</span><br><span class="line">3</span><br><span class="line">4</span><br><span class="line">5</span><br><span class="line">6</span><br><span class="line">7</span><br><span class="line">8</span><br><span class="line">9</span><br><span class="line">10</span><br></pre></td><td class="code"><pre><span class="line">\documentclass[12pt,a4paper]&#123;ctexart&#125; </span><br><span class="line">\usepackage&#123;amsmath&#125;  % AMS 数学公式 宏包 </span><br><span class="line">\usepackage&#123;amssymb&#125;  % AMS 数学符号 宏包 </span><br><span class="line">\usepackage&#123;amsfonts&#125; % AMS 数学字体 宏包 </span><br><span class="line">\usepackage&#123;graphicx&#125; % 插图 宏包 </span><br><span class="line">\usepackage&#123;xcolor&#125;   % 彩色 宏包</span><br><span class="line">\begin&#123;document&#125; </span><br><span class="line">欧拉公式是</span><br><span class="line">$$ e^&#123;ix&#125; = \cos(x) + i\sin(x).$$</span><br><span class="line">\end&#123;document&#125;</span><br></pre></td></tr></table></figure></div></li></ul><h3 id="常用包和命令"><a href="#常用包和命令" class="headerlink" title="常用包和命令"></a>常用包和命令</h3><p>1 . 代码和注释：</p><div class="highlight-wrap"autocomplete="off" autocorrect="off" autocapitalize="off" spellcheck="false" contenteditable="true"data-rel="PLAIN"><figure class="iseeu highlight /plain"><table><tr><td class="gutter"><pre><span class="line">1</span><br><span class="line">2</span><br><span class="line">3</span><br><span class="line">4</span><br><span class="line">5</span><br><span class="line">6</span><br><span class="line">7</span><br><span class="line">8</span><br><span class="line">9</span><br><span class="line">10</span><br><span class="line">11</span><br><span class="line">12</span><br><span class="line">13</span><br><span class="line">14</span><br><span class="line">15</span><br><span class="line">16</span><br><span class="line">17</span><br><span class="line">18</span><br><span class="line">19</span><br><span class="line">20</span><br><span class="line">21</span><br><span class="line">22</span><br><span class="line">23</span><br><span class="line">24</span><br><span class="line">25</span><br><span class="line">26</span><br><span class="line">27</span><br><span class="line">28</span><br><span class="line">29</span><br><span class="line">30</span><br><span class="line">31</span><br><span class="line">32</span><br><span class="line">33</span><br><span class="line">34</span><br><span class="line">35</span><br><span class="line">36</span><br><span class="line">37</span><br><span class="line">38</span><br><span class="line">39</span><br><span class="line">40</span><br><span class="line">41</span><br><span class="line">42</span><br><span class="line">43</span><br><span class="line">44</span><br><span class="line">45</span><br><span class="line">46</span><br><span class="line">47</span><br><span class="line">48</span><br><span class="line">49</span><br><span class="line">50</span><br><span class="line">51</span><br><span class="line">52</span><br><span class="line">53</span><br><span class="line">54</span><br><span class="line">55</span><br><span class="line">56</span><br><span class="line">57</span><br><span class="line">58</span><br><span class="line">59</span><br><span class="line">60</span><br><span class="line">61</span><br><span class="line">62</span><br><span class="line">63</span><br><span class="line">64</span><br><span class="line">65</span><br><span class="line">66</span><br><span class="line">67</span><br><span class="line">68</span><br><span class="line">69</span><br><span class="line">70</span><br><span class="line">71</span><br><span class="line">72</span><br><span class="line">73</span><br><span class="line">74</span><br><span class="line">75</span><br><span class="line">76</span><br></pre></td><td class="code"><pre><span class="line">% 页面布局：页面宽度, 页面高度, 页眉高度, 页脚高度，各种边距等等</span><br><span class="line">% \usepackage[a4paper,scale=0.8,hcentering,bindingoffset=8mm]&#123;geometry&#125; % A4纸大小，缩放80%，设置奇数页右边留空多一点</span><br><span class="line">\usepackage&#123;geometry&#125; % 页面布局 宏包</span><br><span class="line">% 定制页眉页脚: \pagestyle, \thispagestyle</span><br><span class="line">\usepackage&#123;francyhdr&#125; % 页眉页脚高级定制 宏包 </span><br><span class="line">%</span><br><span class="line">\usepackage&#123;amsmath&#125; % AMS 数学公式 宏包 </span><br><span class="line">\usepackage&#123;amssymb&#125; % AMS 数学符号 宏包 </span><br><span class="line">\usepackage&#123;amsfonts&#125; % AMS 数学字体 宏包</span><br><span class="line">\usepackage&#123;amsthm, bm&#125; % 数学</span><br><span class="line">%</span><br><span class="line">\usepackage&#123;algorithm&#125; % 算法</span><br><span class="line">\usepackage&#123;algpseudocode&#125; % 伪代码</span><br><span class="line">\usepackage&#123;listings&#125; % 各种语言的代码块</span><br><span class="line">%</span><br><span class="line">\usepackage&#123;graphicx&#125;   % 插图 宏包 </span><br><span class="line">\usepackage&#123;subfigure&#125;  % 使用子图像或者子表格 宏包</span><br><span class="line">\usepackage&#123;subcaption&#125; % 图片描述</span><br><span class="line">%</span><br><span class="line">\usepackage&#123;courier&#125;    % 字体</span><br><span class="line">\usepackage&#123;fontspec&#125;   % 字体</span><br><span class="line">%</span><br><span class="line">\usepackage&#123;titlesec&#125; % 章节定制 宏包</span><br><span class="line">\usepackage&#123;titletoc&#125; % 目录定制 宏包</span><br><span class="line">\usepackage&#123;cite&#125;     % 引用  宏包</span><br><span class="line">\usepackage&#123;natbib&#125;   % 参考文件定制 宏包</span><br><span class="line">\usepackage&#123;longtable, diagbox, colortbl, booktabs&#125; % 表格定制 宏包</span><br><span class="line">%</span><br><span class="line">\usepackage&#123;list&#125;     % 无序列表定制 宏包</span><br><span class="line">\usepackage&#123;enumitem&#125; % 有序列表定制 宏包</span><br><span class="line">%</span><br><span class="line">\usepackage[选项列表]&#123;hyperref&#125; % 超链接 宏包</span><br><span class="line">\usepackage&#123;xcolor&#125;   % 彩色 宏包</span><br><span class="line">%</span><br><span class="line">% ====================== 常用命令 =================</span><br><span class="line">%%%%%%%%%% 标题部分： 标题, 作者, 日期, 脚注等命令 %%%%%%%%%%</span><br><span class="line">\title&#123;标题&#125;  % 标题</span><br><span class="line">\author&#123;作者&#125; % 作者</span><br><span class="line">\date&#123;日期&#125;   % 日期</span><br><span class="line">% \date&#123;&#125; % 留空则不输出日期，不填则自动加上默认日期，所以要不显示日期需要这句命令</span><br><span class="line">\thanks&#123;...&#125; % 脚注，这个必须放在上面命令的&#123;&#125;内</span><br><span class="line">\maketitle   % 必不可少，生成标题命令，以上命令只是声明，这句才可生成</span><br><span class="line">%%%%%%%%%%%%% 摘要 %%%%%%%%%%%%</span><br><span class="line">\begin&#123;abstract&#125; % 开始，book 类型没有摘要</span><br><span class="line">%... ...</span><br><span class="line">\end&#123;abstract&#125;   % 结束</span><br><span class="line">%%%%%%%%%%%%% 目录 %%%%%%%%%%%%%</span><br><span class="line">\tableofcontents % 生成目录</span><br><span class="line">% \setcounter&#123;tocdepth&#125;&#123;层次号&#125; % 设置目录中生成的章节层次</span><br><span class="line">%%%%%%%%%%% 章节命令 %%%%%%%%%%%</span><br><span class="line">\part % 篇</span><br><span class="line">\chapter % 章 : article 中没有 chapter，在 book 中有 </span><br><span class="line">\section, \subsection, \subsubsection % 节</span><br><span class="line">\paragraph, \subparagraph % 段落</span><br><span class="line">%%%%%%%%%% 参考文献 %%%%%%%%%%%</span><br><span class="line">\begin&#123;thebibliography&#125;&#123;编号样本&#125; </span><br><span class="line">\bibitem[编号]&#123;标签&#125; 文献条目 </span><br><span class="line">\bibitem[编号]&#123;标签&#125; 文献条目</span><br><span class="line">\end&#123;thebibliography&#125;</span><br><span class="line">%%%%%%%%%% 表格命令 %%%%%%%%%%%</span><br><span class="line">\begin&#123;tabular&#125;[竖向位置]&#123;列格式&#125; </span><br><span class="line">%first line \\</span><br><span class="line">%last line \\</span><br><span class="line">\end&#123;tabular&#125;</span><br><span class="line">%%%%%%%%%% 编号命令 %%%%%%%%%%</span><br><span class="line">% 无序编号</span><br><span class="line">\begin&#123;itemize&#125; </span><br><span class="line">\item[标签] 条目内容</span><br><span class="line">\end&#123;itemize&#125;</span><br><span class="line">% 有序编号</span><br><span class="line">\begin&#123;enumerate&#125; </span><br><span class="line">\item[标签] 条目内容</span><br><span class="line">\end&#123;enumerate&#125;</span><br><span class="line">%%%%%%%% 脚注 %%%%%%%%%</span><br><span class="line"> \footnote&#123;脚注文本&#125; % 自动编号脚注，紧接在需要标注的文字之后</span><br><span class="line"> \footnote[标记]&#123;脚注文本&#125; % 手工指定脚注标记</span><br></pre></td></tr></table></figure></div><p>2 . <strong>特殊说明</strong> </p><ul><li><em>短标题: 用于显示在目录和页眉中, 缺省与标题相同</em></li><li><p><em>带星号的章节命令: 不参与自动编号</em></p>  <div class="highlight-wrap"autocomplete="off" autocorrect="off" autocapitalize="off" spellcheck="false" contenteditable="true"data-rel="PLAIN"><figure class="iseeu highlight /plain"><table><tr><td class="gutter"><pre><span class="line">1</span><br><span class="line">2</span><br></pre></td><td class="code"><pre><span class="line">\章节命令[短标题]&#123;标题&#125; </span><br><span class="line">\章节命令*&#123;标题&#125;</span><br></pre></td></tr></table></figure></div></li><li><p>章节举例<br>  <img src="https://githubblog.s3.bitiful.net/blog/202411121723119.webp" alt> </p></li><li><p>文本对齐方式 (缺省为左对齐)</p><ul><li>左对齐: <code>\raggedright</code> 或使用 <code>flushleft</code> 环境 </li><li>右对齐: <code>\raggedleft</code> 或使用 <code>flushright</code> 环境 </li><li>文本居中: <code>\centering</code> 或使用 <code>center</code> 环境</li></ul></li><li><p>字体大小</p><ul><li><p>英文/中文都适用</p><p>   <img src="http://img.godjiyi.cn/jy_20190414152444.png" alt></p></li><li><p>中文字体: <code>ctex</code> 提供的命令和字号命令如下</p>   <div class="highlight-wrap"autocomplete="off" autocorrect="off" autocapitalize="off" spellcheck="false" contenteditable="true"data-rel="PLAIN"><figure class="iseeu highlight /plain"><table><tr><td class="gutter"><pre><span class="line">1</span><br></pre></td><td class="code"><pre><span class="line">\heiti, \songti, \fangsong, \kaishu, \lishu, \youyuan, \yahei</span><br></pre></td></tr></table></figure></div><p>  <img src="https://githubblog.s3.bitiful.net/blog/202411121723522.webp" alt></p></li></ul></li></ul><h3 id="超链接"><a href="#超链接" class="headerlink" title="超链接"></a>超链接</h3><p>1 . <code>\usepackage[选项列表]{hyperref}</code></p><ul><li>在有交叉引用的地方 (如目录, 书签, 参考文献, 公式等) 建立链接</li><li>提供对外部文件, 互联网网址, 邮件地址的链接</li><li>常用选项 (也可通过 <code>\hypersetup{选项列表}</code> 来设置) <ul><li><code>bookmarks</code> → 创建书签, 缺省为 true</li><li><code>CJKbookmarks</code> → 支持中日韩文字的书签</li><li><code>colorlinks</code> → 使用彩色显示链接, 缺省为红色方框</li><li><code>linkcolor</code> → 内部普通链接 (如页码) 的颜色, 缺省为 red </li><li><code>citecolor</code> → 文献引用链接的颜色, 缺省为 green</li><li><code>urlcolor</code> → URL 链接的颜色, 缺省为 magenta</li><li><code>breaklinks</code> → 允许在链接中断行, 缺省不允许</li></ul></li></ul><p>2 . 例子：</p><div class="highlight-wrap"autocomplete="off" autocorrect="off" autocapitalize="off" spellcheck="false" contenteditable="true"data-rel="PLAIN"><figure class="iseeu highlight /plain"><table><tr><td class="gutter"><pre><span class="line">1</span><br><span class="line">2</span><br><span class="line">3</span><br><span class="line">4</span><br><span class="line">5</span><br><span class="line">6</span><br><span class="line">7</span><br></pre></td><td class="code"><pre><span class="line">\usepackage&#123;hyperref&#125; </span><br><span class="line">\hypersetup&#123;CJKbookmarks=true,  % 支持中文书签</span><br><span class="line">            colorlinks=true,    % 使用彩色链接</span><br><span class="line">            citecolor=blue,     % 引用标记颜色</span><br><span class="line">            linkcolor=blue,     % 内部普通链接的颜色</span><br><span class="line">            urlcolor=blue,      % url 链接的颜色</span><br><span class="line">            breaklinks=true &#125;   % 允许在链接处换行</span><br></pre></td></tr></table></figure></div><p>3 . 创建网页链接: <code>\url</code> 和 <code>\href</code> </p><div class="highlight-wrap"autocomplete="off" autocorrect="off" autocapitalize="off" spellcheck="false" contenteditable="true"data-rel="PLAIN"><figure class="iseeu highlight /plain"><table><tr><td class="gutter"><pre><span class="line">1</span><br><span class="line">2</span><br></pre></td><td class="code"><pre><span class="line">\url&#123;网址&#125;</span><br><span class="line">\href&#123;网址&#125;&#123;文本&#125;</span><br></pre></td></tr></table></figure></div><ul><li><code>\url</code> → 生成 <strong>网址</strong> 的同时在页面上输出其内容</li><li><code>\href</code> → 生成 <strong>网址</strong> 的同时在页面上输出 <strong>文本</strong> 的内容</li></ul><h3 id="颜色"><a href="#颜色" class="headerlink" title="颜色"></a>颜色</h3><blockquote><p><a href="https://www.jianshu.com/p/d184caa2cf15" target="_blank" rel="noopener">https://www.jianshu.com/p/d184caa2cf15</a></p></blockquote><div class="highlight-wrap"autocomplete="off" autocorrect="off" autocapitalize="off" spellcheck="false" contenteditable="true"data-rel="PLAIN"><figure class="iseeu highlight /plain"><table><tr><td class="gutter"><pre><span class="line">1</span><br><span class="line">2</span><br><span class="line">3</span><br><span class="line">4</span><br><span class="line">5</span><br><span class="line">6</span><br><span class="line">7</span><br><span class="line">8</span><br><span class="line">9</span><br><span class="line">10</span><br><span class="line">11</span><br><span class="line">12</span><br><span class="line">13</span><br><span class="line">14</span><br><span class="line">15</span><br><span class="line">16</span><br><span class="line">17</span><br><span class="line">18</span><br><span class="line">19</span><br><span class="line">20</span><br><span class="line">21</span><br><span class="line">22</span><br><span class="line">23</span><br><span class="line">24</span><br><span class="line">25</span><br><span class="line">26</span><br><span class="line">27</span><br><span class="line">28</span><br></pre></td><td class="code"><pre><span class="line">\documentclass&#123;article&#125;</span><br><span class="line">\usepackage&#123;xeCJK&#125;</span><br><span class="line">\usepackage&#123;mathpazo&#125;</span><br><span class="line">\usepackage&#123;color,xcolor&#125;</span><br><span class="line">% predefined color---black, blue, brown, cyan, darkgray, gray, green, lightgray, lime, magenta, olive, orange, pink, purple, red, teal, violet, white, yellow.</span><br><span class="line"></span><br><span class="line">\definecolor&#123;light-gray&#125;&#123;gray&#125;&#123;0.95&#125;    % 1.灰度</span><br><span class="line">\definecolor&#123;orange&#125;&#123;rgb&#125;&#123;1,0.5,0&#125;      % 2.rgb</span><br><span class="line">\definecolor&#123;orange&#125;&#123;RGB&#125;&#123;255,127,0&#125;    % 3.RGB</span><br><span class="line">\definecolor&#123;orange&#125;&#123;HTML&#125;&#123;FF7F00&#125;      % 4.HTML</span><br><span class="line">\definecolor&#123;orange&#125;&#123;cmyk&#125;&#123;0,0.5,1,0&#125;   % 5.cmyk</span><br><span class="line"></span><br><span class="line">\begin&#123;document&#125;</span><br><span class="line">%\pagecolor&#123;yellow&#125;          %设置背景色为黄色</span><br><span class="line">\textcolor&#123;green&#125;&#123;绿色&#125;     %1.方法一</span><br><span class="line">&#123;\color&#123;orange&#125; 橙色&#125;       %2.方法二</span><br><span class="line"></span><br><span class="line">\colorbox&#123;red&#125;&#123;\color&#123;black&#125;红底黑字&#125;</span><br><span class="line">\fcolorbox&#123;red&#125;&#123;green&#125;&#123;红框绿背景&#125; %框色+背景色</span><br><span class="line"></span><br><span class="line">\color&#123;blue!20&#125;</span><br><span class="line">\color&#123;blue!20!black&#125;</span><br><span class="line">\color&#123;blue!20!black!30!green&#125;  %a mixture of (20*0.3) percent blue, ((100-20)*0.3) percent black and (100-30) percent green</span><br><span class="line"></span><br><span class="line">&#123;\color[rgb]&#123;1,0,0&#125; This text will appear red-colored&#125;          % 直接使用</span><br><span class="line">\textcolor[rgb]&#123;0,1,0&#125;&#123;This text will appear green-colored&#125;     % 直接使用</span><br><span class="line"></span><br><span class="line">\end&#123;document&#125;</span><br></pre></td></tr></table></figure></div><h2 id="相关资源"><a href="#相关资源" class="headerlink" title="相关资源"></a>相关资源</h2><ul><li><strong>LaTeX 工作室</strong> : <a href="http://www.latexstudio.net" target="_blank" rel="noopener">http://www.latexstudio.net</a> (模板、方法、教程)</li><li><strong>LaTeX 模板收集</strong> : <a href="http://www.latextemplates.co" target="_blank" rel="noopener">http://www.latextemplates.com</a> (各种模板)</li><li><strong>LaTeX 颜色定义</strong> : <a href="http://latexcolor.com" target="_blank" rel="noopener">http://latexcolor.com</a></li><li><strong>华东师大 LaTeX 官网</strong> : <a href="http://math.ecnu.edu.cn/~latex" target="_blank" rel="noopener">http://math.ecnu.edu.cn/~latex</a> (丰富教学资源)</li><li><strong>华东师大–潘建瑜</strong> : <a href="http://math.ecnu.edu.cn/~jypan/Teaching/Latex" target="_blank" rel="noopener">http://math.ecnu.edu.cn/~jypan/Teaching/Latex</a> (各种分享、教程、资料) 👍👍👍<ul><li>本文很多截图来源于 潘建瑜 PPT 中。 </li></ul></li><li><strong>武汉大学–黄正华</strong> : <a href="http://aff.whu.edu.cn/huangzh" target="_blank" rel="noopener">http://aff.whu.edu.cn/huangzh</a> (各种教学资料)</li><li><strong>[英] LaTeX 使用技巧</strong> : <a href="http://latex-cookbook.net" target="_blank" rel="noopener">http://latex-cookbook.net</a></li><li><strong>[英] TeX Users Group</strong> : <a href="http://www.tug.org" target="_blank" rel="noopener">http://www.tug.org</a></li><li><strong>[英] LaTeX Packages</strong> : <a href="https://www.ctan.org" target="_blank" rel="noopener">https://www.ctan.org</a></li></ul><h2 id="参考"><a href="#参考" class="headerlink" title="参考"></a>参考</h2><ul><li><a href="http://www.ctex.org/documents/shredder/tex_start.html" target="_blank" rel="noopener">http://www.ctex.org/documents/shredder/tex_start.html</a></li><li><a href="http://www.latexstudio.net/page/introduction-to-latex/" target="_blank" rel="noopener">http://www.latexstudio.net/page/introduction-to-latex/</a></li><li><a href="https://liam.page/texlive/" target="_blank" rel="noopener">https://liam.page/texlive/</a></li><li><a href="http://www.latexstudio.net/archives/51537.html" target="_blank" rel="noopener">http://www.latexstudio.net/archives/51537.html</a></li><li><a href="http://math.ecnu.edu.cn/~jypan/Teaching/Latex/" target="_blank" rel="noopener">http://math.ecnu.edu.cn/~jypan/Teaching/Latex/</a></li></ul>]]></content>
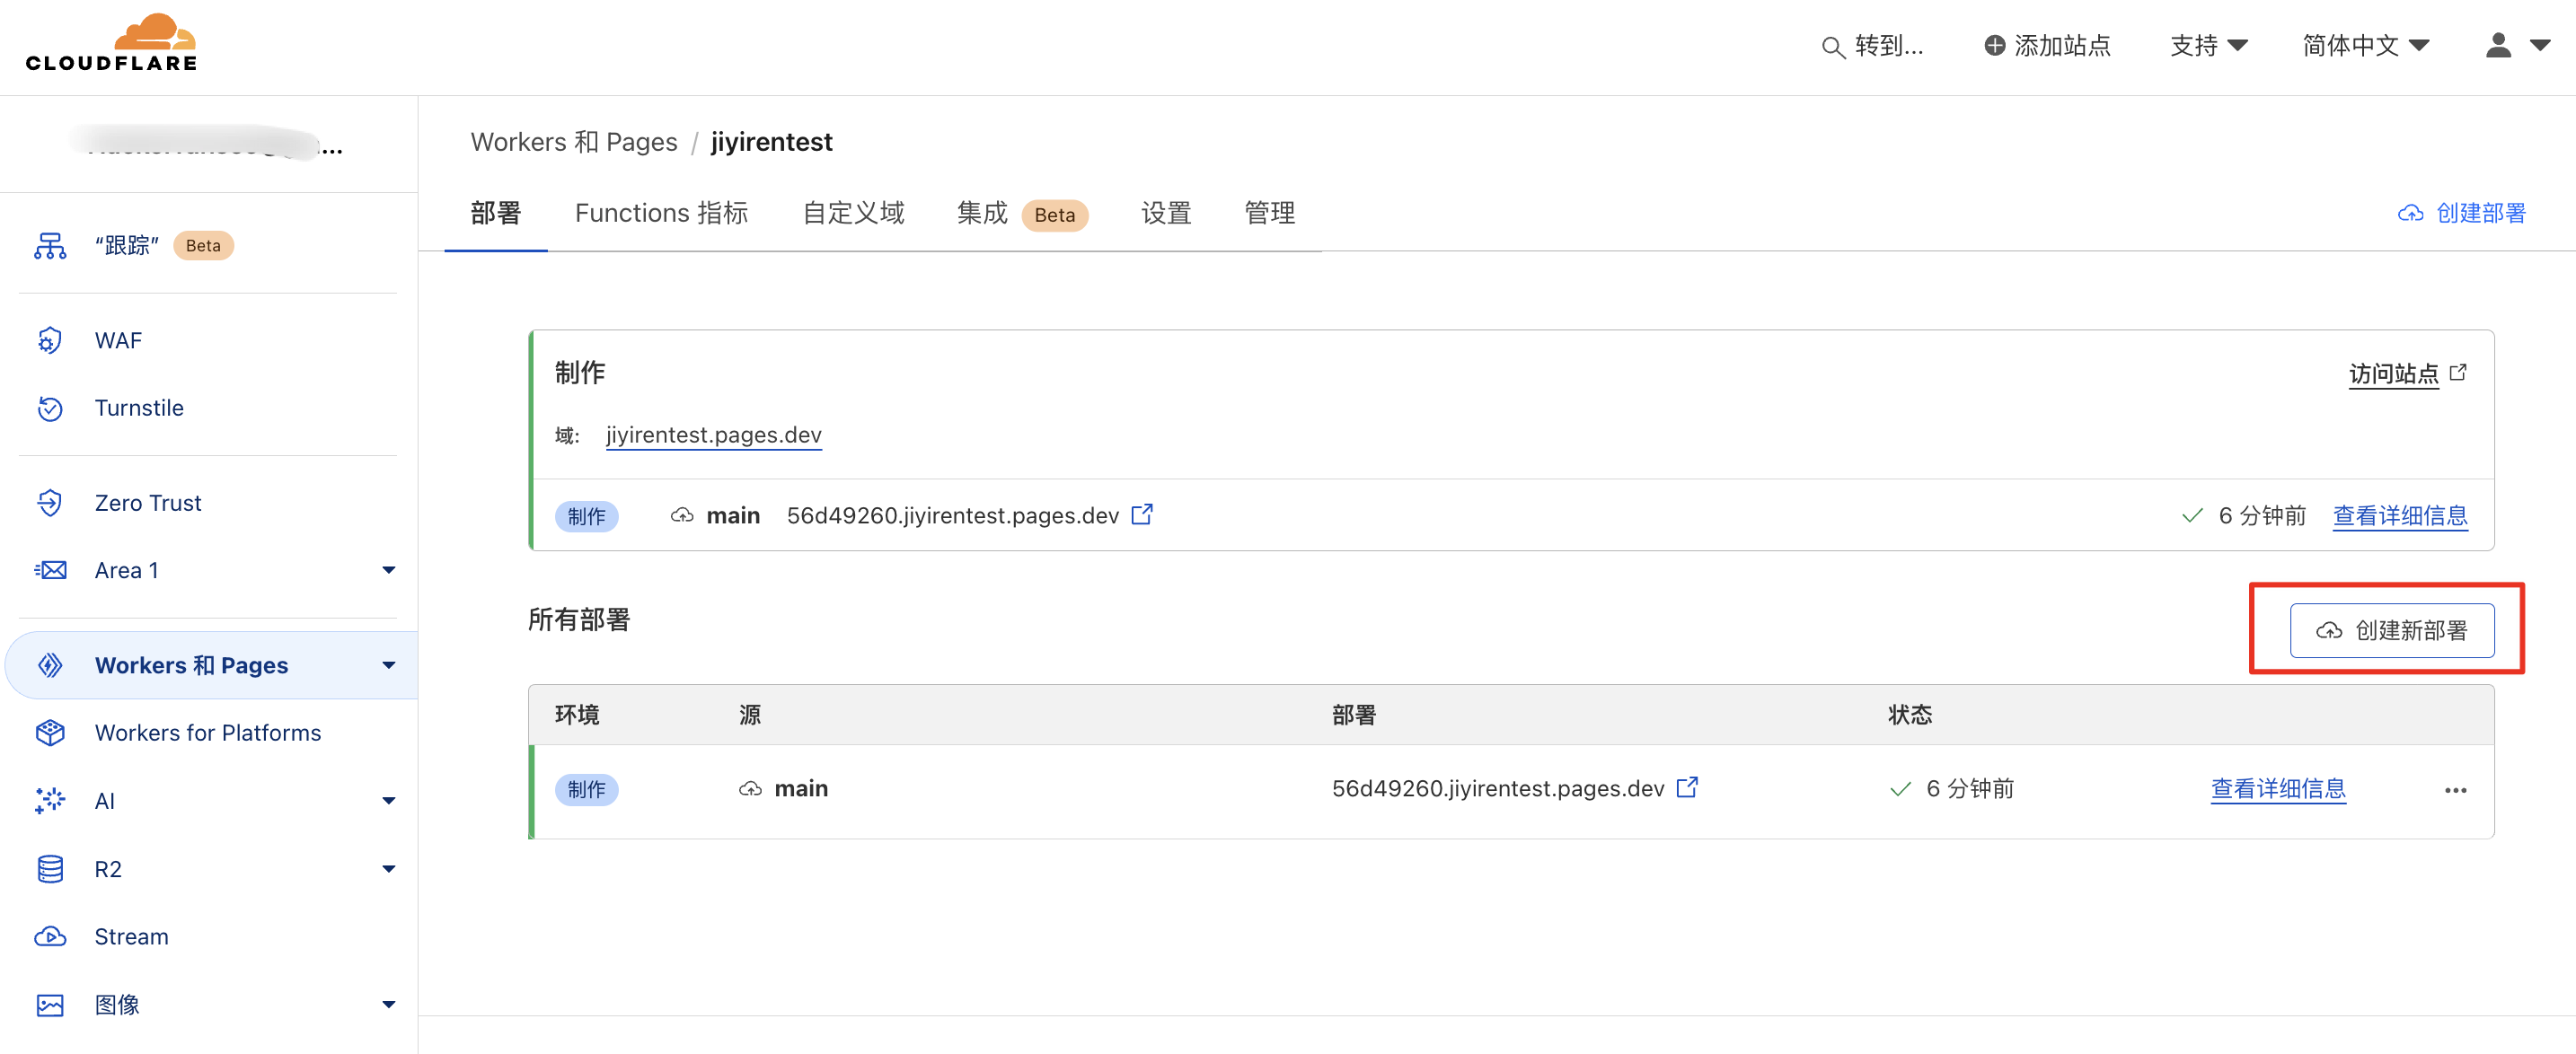
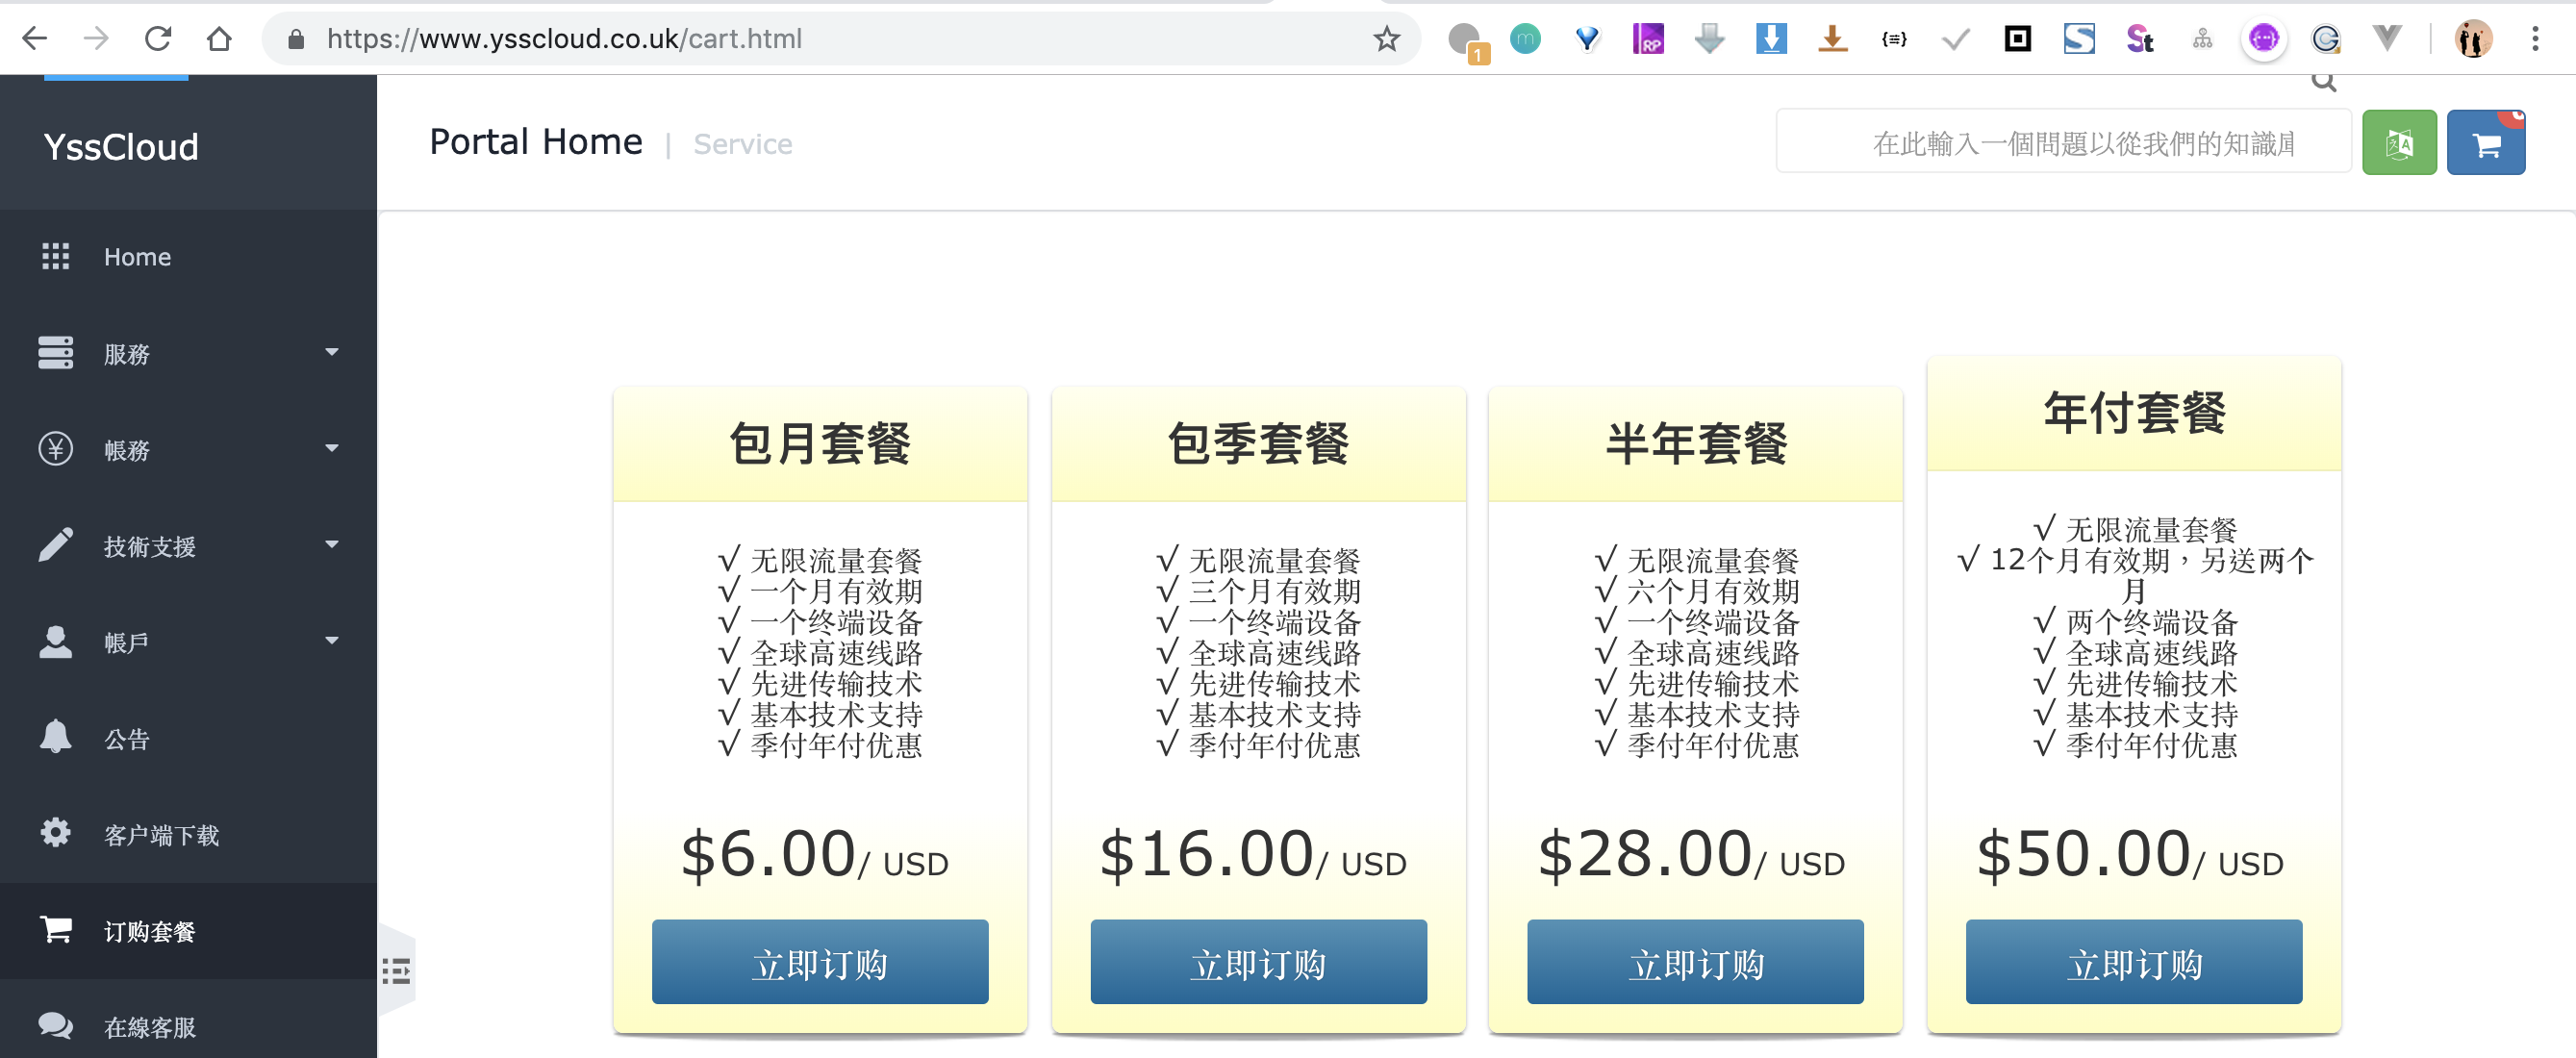
    
    
    <summary type="html">&lt;p&gt;最近在整理自己的收藏夹和知识集合，总感觉很多文档放本地或者印象笔记、有道笔记不是很好，遇到问题本能总是先 Google，不曾想过有时候自己已经花大量时间整理了，并且可能会出现在本地多个文档中整理了同一知识点，或者在不同笔记里都有记录相关问题，导致相关信息杂乱。因此，我规划从现在起将自己收藏的东西整理出来，全部放博客中，便于查找和统一更新。今天先更新 LaTeX 整理记录。&lt;/p&gt;
&lt;h2 id=&quot;简介&quot;&gt;&lt;a href=&quot;#简介&quot; class=&quot;headerlink&quot; title=&quot;简介&quot;&gt;&lt;/a&gt;简介&lt;/h2&gt;&lt;p&gt;1 . 七十年代末，&lt;em&gt;Donald E. Knuth（高德纳&lt;/em&gt;） 在看到其多卷巨著 &lt;em&gt;“The Art of Computer Programming”&lt;/em&gt; 第二卷的校样时，对由计算机排版的校样的低质量感到无法忍受。因此决定自己来开发一个高质量的计算机排版系统，这样就有了 &lt;strong&gt;TeX&lt;/strong&gt; 。&lt;/p&gt;
&lt;p&gt;2 . &lt;strong&gt;TeX&lt;/strong&gt; 的第一版于 1978 年面世，&lt;strong&gt;TeX&lt;/strong&gt; 的源程序是用 &lt;code&gt;Pascal&lt;/code&gt; 写成的，原因是 Knuth 希望 &lt;strong&gt;TeX&lt;/strong&gt; 尽可能方便地移植到其它的操作系统中去。当时 &lt;code&gt;Pascal&lt;/code&gt; 是最适合于这一要求的编程语言。这也使得 &lt;strong&gt;TeX&lt;/strong&gt; 现在已经在几乎所有的计算机系统中得到实现。&lt;/p&gt;
&lt;p&gt;3 . &lt;strong&gt;TeX&lt;/strong&gt; 的另一个重要的特征就是它的输出是与 &lt;strong&gt;设备无关&lt;/strong&gt; 的。&lt;strong&gt;TeX&lt;/strong&gt; 的输出文件称为 &lt;strong&gt;DVI&lt;/strong&gt; 文件，即是 &lt;em&gt;“Device Independent”&lt;/em&gt; 。一旦 &lt;strong&gt;TeX&lt;/strong&gt; 处理了你的文件，你所得到的 &lt;strong&gt;DVI&lt;/strong&gt; 文件就可以被送到任何输出设备如打印机，屏幕等并且总会得到相同的结果，而这与这些输出设备的限制没有任何关系。这说明 &lt;strong&gt;DVI&lt;/strong&gt; 文件中所有的元素，从页面设置到文本中字符的位置都被固定，不能更改。&lt;/p&gt;
&lt;p&gt;&lt;img src=&quot;https://githubblog.s3.bitiful.net/blog/202411121722846.webp&quot; alt&gt;&lt;/p&gt;
&lt;p&gt;4 . &lt;strong&gt;TeX&lt;/strong&gt; 现在已经被它的开发者 Knuth 所 “冰封”(frozen)，基本不再开发了。但新的变种版本不断出现，&lt;/p&gt;
&lt;ul&gt;
&lt;li&gt;&lt;strong&gt;LaTeX&lt;/strong&gt;: 1984 年，由 Lamport 开发, 适合论文书籍, 对 TeX 推广贡献巨大，由于其标准的格式控制，latex 逐渐成为主流的 TeX 文档排版命令。LaTeX 时代开启。&lt;/li&gt;
&lt;li&gt;&lt;strong&gt;PDFTeX&lt;/strong&gt; : 1997 年，由 H.T. Thanh 开发，完全兼容标准的 &lt;strong&gt;TeX&lt;/strong&gt; ，但能够给出 PDF 输出。它也可以输出标准的 DVI 。&lt;/li&gt;
&lt;li&gt;&lt;strong&gt;XeTeX&lt;/strong&gt; : 2005年，Jonathan Kew 在 &lt;em&gt;e-TeX&lt;/em&gt; 基础上添加 &lt;strong&gt;Unicode&lt;/strong&gt; 支持，并且连接 Mac OS X 的各种技术。&lt;strong&gt;XeTeX&lt;/strong&gt; 在2005/6年陆续发布了它的 Windows 和 Linux 版本，最终集成在 &lt;strong&gt;TeXLive 2007&lt;/strong&gt; 当中，标志着它被广泛地认可。在 &lt;strong&gt;XeTeX&lt;/strong&gt; 中，使用多国语言，变得非常轻松。&lt;/li&gt;
&lt;li&gt;&lt;strong&gt;LuaTeX&lt;/strong&gt; : 2007年，是 Aleph 与 &lt;strong&gt;PDFTeX&lt;/strong&gt; 项目的继任者，主要由 Taco Hoekwater 开发，是 Lua 脚本语言和 TeX 的结合。&lt;/li&gt;
&lt;/ul&gt;</summary>


    <category term="LaTeX" scheme="https://jiyiren.github.io/categories/LaTeX/"/>
    
    
    <category term="report" scheme="https://jiyiren.github.io/tags/report/"/>
    
    <category term="latex" scheme="https://jiyiren.github.io/tags/latex/"/>
    
  </entry>
  
  <entry>
    <title>QUIC/HTTP3 协议说明与站点构建</title>
    <link href="https://jiyiren.github.io/2020/06/17/quic-explain-build/"/>
    <id>https://jiyiren.github.io/2020/06/17/quic-explain-build/</id>
    <published>2020-06-17T14:16:25.000Z</published>
    <updated>2024-12-03T06:54:09.971Z</updated>
    
    <content type="html"><![CDATA[<p align="center" style="margin: 30px 0 35px;">HTTP 已不再是全基于 TCP 了，QUIC 的发展终将带来 HTTP3</p><p>互联网的世界绝大部分的数据传输都是基于 HTTP 协议。自从 1990 年<strong>伯纳斯·李</strong>发明这 <strong>超文本传输协议(HTTP, HyperText Transfer Protocol)</strong> 后，于 1999 年 IETF 才正式发布 <strong>HTTP1.1</strong>(<a href="https://tools.ietf.org/html/rfc2616" target="_blank" rel="noopener">RFC 2616</a>) 协议版本，而这个版本一用就是 15 年，至 2015 年 IETF 才正式发布 <strong>HTTP2</strong>(<a href="https://tools.ietf.org/html/rfc7540" target="_blank" rel="noopener">RFC 7540</a>) 协议版本。其中 HTTP2 相比 HTTP1.1 的优化，我将会专门写个文章详细说明下。而今天我们会谈未来的 HTTP 协议 – <strong>QUIC/HTTP3</strong>。</p><ul><li>本文将实现支持 QUIC/HTTP3 协议站点: <a href="https://http3.godjiyi.cn:9445/" target="_blank" rel="noopener">https://http3.godjiyi.cn:9445/</a></li><li>个人实现 HTTP1.1/HTTP2/HTTP3 速度对比示例: <a href="https://demo.godjiyi.cn" target="_blank" rel="noopener">https://demo.godjiyi.cn</a></li><li>开源 QUIC 支持项目： <a href="https://github.com/jiyiren/quic-web" target="_blank" rel="noopener">https://github.com/jiyiren/quic-web</a></li></ul><p>视频示例:</p><video src="https://githubblog.s3.bitiful.net/blog/quicvshttp.mp4" controls="controls" style="max-width: 100%; display: block; margin-left: auto; margin-right: auto;"><br>your browser does not support the video tag<br></video><p>协议截图:</p><p><img src="https://githubblog.s3.bitiful.net/blog/202412031447726.webp" alt></p><a id="more"></a><h2 id="QUIC-与-HTTP3"><a href="#QUIC-与-HTTP3" class="headerlink" title="QUIC 与 HTTP3"></a>QUIC 与 HTTP3</h2><p>相信大家很早听说的下一代协议是 <strong>QUIC</strong>, 即 Quick UDP Internet Connections，意为<strong>快速UDP网络连接</strong>。该协议最早是由谷歌于 2013 推出的，项目首页: <a href="https://www.chromium.org/quic" target="_blank" rel="noopener">https://www.chromium.org/quic</a>，并且在谷歌自家的 Youtube 和搜索引擎上试验，有兴趣的可以看下 <a href="https://dl.acm.org/doi/pdf/10.1145/3098822.3098842" target="_blank" rel="noopener">The QUIC Transport Protocol - Design and Internet-Scale Deployment</a> 这篇谷歌发表的论文。下图是谷歌应用 QUIC 于搜索引擎的的搜索延迟降低的百分比。(标1的地方是当时谷歌发现了 Bug，到 标2处修复后重新上线。标3处则是谷歌进行了一次优化，所以性能有了逐步提高) 整体上能降低搜索 6% 的延迟。</p><p><img alt="logo" width="500" height="300" src="https://githubblog.s3.bitiful.net/blog/202412031448918.webp"></p><p>正因为 QUIC 的优势(为什么会有这优势，下面会进行说明)，谷歌已经逐步将 QUIC 推广到自家的各个服务中了。</p><p>而当时 IETF 组织正忙于 HTTP2 协议的标准化，最终于<strong>2015年5月</strong>正式发布 HTTP2 规范(<a href="https://tools.ietf.org/html/rfc7540" target="_blank" rel="noopener">RFC 7540</a>)。在 HTTP2 标准化完后，IETF 终于有时间进行下一代 HTTP 标准化，也就是 HTTP3。 而谷歌也有意将 QUIC 作为普适性协议进行推广。因而，于<strong>同年6月</strong>，谷歌提交 QUIC 草案给 IETF，以期作为下一代 HTTP 协议标准进行普及。</p><p>至 <strong>2018年</strong>，IETF组织中专门制定 HTTP 协议的组织(HTTP WG)正式确定将基于 <strong>QUIC 的 HTTP (HTTP Over QUIC)</strong> 作为下一代 HTTP 协议，并重命名为 <strong>HTTP3</strong>。并且 HTTPWG 认为标准化的 QUIC 协议应该支持 HTTP 以外的应用层协议。因此，IETF 将 QUIC 作为单独的传输层进行标准化，并成立了专门的 QUIC 协议标准化小组。</p><p>这里 QUIC 出现的频次较多，由于历史原因，导致大家会很难理解 QUIC 的具体含义，这里着重讲解下。</p><ul><li>HTTP3 确立标准化之前，QUIC 代表的都是谷歌的 QUIC，表示完整的 HTTP 实现，其又分为两种；<ul><li>HTTP2 协议标准化之前: 传输层 UDP 实现类 TCP 特性协议 + Spedy;</li><li>HTTP2 协议标准化之后: 传输层 UDP 实现类 TCP 特性协议 + HTTP2;</li></ul></li><li>HTTP3 确立标准化之后，QUIC 既指代谷歌的 QUIC 也指代 IETF 的 QUIC, IETF 的 QUIC 仅仅表示传输层 QUIC，不包含应用层的实现;</li></ul><p>为便于更好地区分 HTTP3 标准化前后两种 QUIC，现在，一般我们现在将谷歌的 QUIC 改称为 <strong>gQUIC</strong>，而 QUIC 则仅仅指代 IETF 的传输层 QUIC。文字不好理解，我特意画了张图。</p><p><img src="https://githubblog.s3.bitiful.net/blog/202412031448791.webp" alt></p><p>虽然现在我们知道这 QUIC 应该指 IETF 的基于 UDP 的<strong>上层 “传输层协议”</strong>，但是由于 HTTP3 还没有出正式标准，且了解 IETF 中规范的 QUIC 标准很少，因此互联网上所说的 QUIC 一般都是 gQUIC。下文除非特别说明，QUIC 一律指 gQUIC。</p><h2 id="QUIC-HTTP3-特性"><a href="#QUIC-HTTP3-特性" class="headerlink" title="QUIC/HTTP3 特性"></a>QUIC/HTTP3 特性</h2><p>对于 QUIC 的特性这里简单说下，以后会对每个点进行详细解释。</p><p>我们直接看谷歌 QUIC 官方首页：<a href="https://www.chromium.org/quic" target="_blank" rel="noopener">https://www.chromium.org/quic</a></p><p><img src="https://githubblog.s3.bitiful.net/blog/202412031448082.webp" alt></p><p>一共总结四点：</p><ol><li>大大减少建立连接时间;</li><li>增强的拥塞控制;</li><li>无队头阻塞的多路复用;</li><li>连接迁移;</li></ol><p>通过整理了网上的特性说明，我将转换了下说法：</p><ol><li>1/0 RTT;</li><li>优化拥塞控制;</li><li>无队头阻塞;</li><li>连接迁移;</li></ol><p>对应的图示如下:</p><p><img src="https://githubblog.s3.bitiful.net/blog/202412031448189.webp" alt></p><h3 id="1-0-RTT"><a href="#1-0-RTT" class="headerlink" title="1/0 RTT"></a>1/0 RTT</h3><p><strong>RTT</strong> 是指互联网上两个点建立连接的一次往返时间(round-trip time)。QUIC 建立握手的时间能达到 1 或 0 RTT。这是因为原有的 HTTP 是基于 TCP 的方式中：</p><ul><li>① 裸 HTTP 需要 <strong>1.5 RTT</strong>；</li><li>② HTTPS 方式需要 <strong>3 RTT</strong>；</li></ul><p>而 QUIC 则是基于 UDP 的，UDP 无需建立握手就能传输数据，那 1 RTT 只指 SSL 的建立时间。因此建立连接效率比原有 HTTP 快。这个我会专门写篇文章介绍。</p><p>而裸 HTTP 是不安全的，谷歌表示未来的协议都将默认加入安全传输 SSL 协议，因此 QUIC 本身就是要基于加密的，目前的大多数 QUIC 协议的实现也都默认含有加密的，因此，对于 QUIC 的对比，一般都是以 HTTPS 进行对比的。</p><h3 id="优化拥塞控制"><a href="#优化拥塞控制" class="headerlink" title="优化拥塞控制"></a>优化拥塞控制</h3><p>我们知道 TCP 的拥塞控制是内嵌于操作系统的，Linux 内核从 <strong>2.6.19</strong> 开始就是用 <strong>Cubic</strong> 拥塞控制算法。而谷歌于 2016 年发明了全新的 TCP 拥塞控制算法 – <strong>BBR</strong> (Bottleneck Bandwidth and RTT)，这个已经验证是比 Cubic 性能更好的拥塞控制算法。因此，Linux 内核从 <strong>4.19</strong> 开始加入了 BBR 算法。</p><p>每一次的拥塞控制算法的更新都要更新内核，这使得新算法的迭代和普及极其缓慢。而 QUIC 协议则是基于 UDP 实现的类似 TCP 的协议，诸如有序控制、拥塞避免、拥塞控制都进行了重新实现。从宏观上来看，QUIC 则就是应用层协议，这对于拥塞控制算法的更新极其容易，不用更新操作系统。</p><p>此外 QUIC 中的拥塞控制是可拔插式的，这可更进一步优化和迭代各种新的拥塞控制算法。这也是 QUIC 极具吸引人的地方。</p><h3 id="无队头阻塞"><a href="#无队头阻塞" class="headerlink" title="无队头阻塞"></a>无队头阻塞</h3><p>这里的消除队头阻塞在 QUIC 上是彻底地消除了。我们都知道 HTTP2 协议的规范上也说了消除队头阻塞。但那仅仅是消除了 HTTP 连接的队头阻塞，而根本上的 TCP 队头阻塞是没有消除的。因为只要基于 TCP 就铁定有 TCP 队头阻塞的。而 QUIC 是基于 UDP 的，非面向连接的，从而自动消除 TCP 队头阻塞。</p><p><img src="https://githubblog.s3.bitiful.net/blog/202412031449736.webp" alt></p><ul><li><strong>多路复用</strong>是 HTTP2 的一大特定，也是相比 HTTP1.1 的提升体现。一个 web 站点在使用 HTTP2 协议时，只需要建立一个 TCP 连接，所有的数据通过帧进行发送，多个 HTTP 连接里的帧可以并行通过一个 TCP 连接发送。而原有的 HTTP1.1 则是一个 HTTP 连接就只能在一个 TCP 连接里发送，多个 HTTP 连接不能并行发送。一般 Chrome 浏览器对于 HTTP1.1 协议允许一个网站建立最多 6 个 TCP 连接。</li><li>虽然 HTTP2 的多路复用可解决 HTTP 连接并行问题，但解决不了 TCP 的队头阻塞问题。我们知道 TCP 需要包有序到达，当无序的时候，接收方会等待缺少的包，直至包到达。这是 TCP 的优点，也是缺点。</li><li>谷歌为了解决 TCP 握手和这种天生的缺陷，就基于 UDP 实现了类 TCP 各种特性的新协议，并将此协议<strong>融入 QUIC</strong>，这也就是 QUIC 天生就无队头阻塞的原因。</li></ul><h3 id="连接迁移"><a href="#连接迁移" class="headerlink" title="连接迁移"></a>连接迁移</h3><p><strong>连接迁移</strong>这个就是指手机在 4G/5G 流量网络与 WIFI 网络之间可以无缝切换，而无需重建连接。</p><p>我们知道原有的基于 TCP 的 HTTP 协议，在切换网络时，都需要我们的手机与服务器进行重新建立 TCP 连接，然后才能重新发送 HTTP 数据包。</p><p>而 QUIC 协议是基于 UDP 的，天生无面向连接之说，但是我们还是需要维持客户端与服务的<strong>逻辑连接的</strong>。QUIC 中在数据包的头部加了 <strong>ConnectionID</strong>，这样每个 UDP 包里都有同一个连接的 ID，即使手机从 4G 切为 WIFI 了，手机在发送包时，仍然正常发送，而服务器可以根据 <strong>ConnectionID</strong> 进行组装即可，这也就是<strong>无缝连接迁移</strong>。</p><p>废话不多说，看谷歌给的连接迁移 Demo: <a href="https://drive.google.com/file/d/1DlMI_3MOxnWarvEVfzKxFqmD7c-u1cYG/view?usp=sharing" target="_blank" rel="noopener">QUIC Connection Migration demo</a></p><h2 id="构建-QUIC-HTTP3-服务"><a href="#构建-QUIC-HTTP3-服务" class="headerlink" title="构建 QUIC/HTTP3 服务"></a>构建 QUIC/HTTP3 服务</h2><h3 id="QUIC库选择"><a href="#QUIC库选择" class="headerlink" title="QUIC库选择"></a>QUIC库选择</h3><p>由于 HTTP3 协议还在制定中，目前还没有正式的标准出台，只有每年定期举行的会议会给出 Draft 手稿。 <a href="https://quicwg.org/" target="_blank" rel="noopener">IETF 官方 QUIC 工作组</a>有统计在协议设计期间的各种实现库：</p><ul><li><a href="https://github.com/quicwg/base-drafts/wiki/Implementations" target="_blank" rel="noopener">官方工作组给的QUIC实现</a></li><li><a href="https://github.com/quicwg/base-drafts/wiki/Tools" target="_blank" rel="noopener">官方工作给的QUIC调试Tool</a></li></ul><p>大家可以看下，我自己对比了比较常用和著名的库，表格如下，希望对大家选择有帮助。</p><p><img src="https://githubblog.s3.bitiful.net/blog/202412031449724.webp" alt></p><p>今天我们先用 <strong>openlitespeed</strong> 库进行部署支持 QUIC 协议的 WEB 网站。因为该库官网放出性能是 Nginx 的几倍，且支持 gQUIC 和 HTTP3 协议。</p><h3 id="QUIC-部署"><a href="#QUIC-部署" class="headerlink" title="QUIC 部署"></a>QUIC 部署</h3><p><strong>openlitespeed</strong> 安装很简单，可以看官方教程: <a href="https://openlitespeed.org/kb/install-ols-from-litespeed-repositories/" target="_blank" rel="noopener">Install OpenLiteSpeed</a>, 为防止部分人看不到，我记录了下：</p><p>先根据系统安装 repo 源:</p><div class="highlight-wrap"autocomplete="off" autocorrect="off" autocapitalize="off" spellcheck="false" contenteditable="true"data-rel="BASH"><figure class="iseeu highlight /bash"><table><tr><td class="gutter"><pre><span class="line">1</span><br><span class="line">2</span><br><span class="line">3</span><br><span class="line">4</span><br><span class="line">5</span><br><span class="line">6</span><br><span class="line">7</span><br><span class="line">8</span><br><span class="line">9</span><br><span class="line">10</span><br><span class="line">11</span><br><span class="line">12</span><br></pre></td><td class="code"><pre><span class="line"><span class="comment"># CentOS 5</span></span><br><span class="line">rpm -Uvh http://rpms.litespeedtech.com/centos/litespeed-repo-1.1-1.el5.noarch.rpm</span><br><span class="line"><span class="comment"># CentOS 6</span></span><br><span class="line">rpm -Uvh http://rpms.litespeedtech.com/centos/litespeed-repo-1.1-1.el6.noarch.rpm</span><br><span class="line"><span class="comment"># CentOS 7</span></span><br><span class="line">rpm -Uvh http://rpms.litespeedtech.com/centos/litespeed-repo-1.1-1.el7.noarch.rpm</span><br><span class="line"><span class="comment"># CentOS 8</span></span><br><span class="line">rpm -Uvh http://rpms.litespeedtech.com/centos/litespeed-repo-1.1-1.el8.noarch.rpm</span><br><span class="line"><span class="comment"># Debian 7, 8 &amp; Ubuntu 12,14,16,18</span></span><br><span class="line">wget -O - http://rpms.litespeedtech.com/debian/enable_lst_debian_repo.sh | bash</span><br><span class="line"><span class="comment"># Amazon Linux</span></span><br><span class="line">wget http://rpms.litespeedtech.com/centos/litespeed.repo -P /etc/yum.repos.d/</span><br></pre></td></tr></table></figure></div><p>再执行安装命令(根据自己的系统选择安装命令)</p><div class="highlight-wrap"autocomplete="off" autocorrect="off" autocapitalize="off" spellcheck="false" contenteditable="true"data-rel="BASH"><figure class="iseeu highlight /bash"><table><tr><td class="gutter"><pre><span class="line">1</span><br><span class="line">2</span><br><span class="line">3</span><br><span class="line">4</span><br></pre></td><td class="code"><pre><span class="line"><span class="comment"># CentOS</span></span><br><span class="line">yum install openlitespeed</span><br><span class="line"><span class="comment"># Debian &amp; Ubuntu </span></span><br><span class="line">apt-get install openlitespeed</span><br></pre></td></tr></table></figure></div><p>安装完了就进行配置，配置说明请参考官方文档: <a href="https://openlitespeed.org/kb/" target="_blank" rel="noopener">Configuration</a></p><p>说实话，这个库是有后台的，是可视化配置，但是比较难用，需要自己熟悉才行。为避免大家浪费时间，我将整个服务安装好，并配置好了，构建了一个基础镜像：<a href="https://hub.docker.com/r/jiyiren/http-base-quic" target="_blank" rel="noopener">https://hub.docker.com/r/jiyiren/http-base-quic</a>，如何配置自己的服务呢，下面简单讲下。</p><p>部署和配置代码已放 Github 上：<a href="https://github.com/jiyiren/quic-web" target="_blank" rel="noopener">https://github.com/jiyiren/quic-web</a></p><p>效果展示，我部署在我自己的服务器上: <a href="https://http3.godjiyi.cn:9445/" target="_blank" rel="noopener">https://http3.godjiyi.cn:9445/</a> 。</p><p>并且我也写了一个 HTTP1.1 、HTTP2、HTTP3 速度加载对比示例: <a href="https://demo.godjiyi.cn" target="_blank" rel="noopener">https://demo.godjiyi.cn</a></p><p>分别用 Chrome 浏览器和 Firefox 浏览器进行测试。这里说明下：</p><ul><li><p>目前 Chrome 浏览器支持谷歌自家的 QUIC 协议，而谷歌家的 QUIC 原来单叫 QUIC，比如 gQUIC/46。在提交草案给 IETF 后，IETF 也开始了标准化，因此逐渐地谷歌开始将自家的 QUIC 像 IETF 标准靠，因此为 gQUIC-h3-50，相信以后 Chrome 会逐渐替换到 HTTP3 来。</p></li><li><p>而 Firefox 浏览器本身就和 Chrome 是竞争关系，所以虽然 QUIC 好，但没有国际组织的支持 Firefox 也不会支持的。而在谷歌提交草案后，得到了 IETF 的认可，并且 IETF 在进行标准化了，因此 Firefox 直接实现了 IETF 正规的 Draft 版本协议。所以 Firefox 浏览器标识时正规的 HTTP3 协议。</p></li></ul><p>但不论怎样，这些协议思想一致，都是 UDP 进行传输，握手 RTT 很低，大家通过上面的速度加载对比就能看出来 HTTP3 的快速，当然在弱网情况下效果会更好点。</p><p><img src="https://githubblog.s3.bitiful.net/blog/202412031449639.webp" alt></p><p><img src="https://githubblog.s3.bitiful.net/blog/202412031449391.webp" alt></p><p><img src="https://githubblog.s3.bitiful.net/blog/202412031449379.webp" alt></p><p>项目已放入 Github：<a href="https://github.com/jiyiren/quic-web" target="_blank" rel="noopener">https://github.com/jiyiren/quic-web</a> 基于 Docker 构建，可以非常快速的构建自己的站点或 API。</p><h2 id="参考"><a href="#参考" class="headerlink" title="参考"></a>参考</h2><ul><li><a href="https://ictar.xyz/2019/01/31/trans-http-3-from-root-to-tip/" target="_blank" rel="noopener">QUICIETF工作历时</a></li><li><a href="https://www.mf8.biz/use-http-3/" target="_blank" rel="noopener">LiteSpeed 部署</a></li><li><a href="https://www.litespeedtech.com/latest-techs/http-3-is-coming" target="_blank" rel="noopener">LiteSpeedTech官网介绍</a></li><li><a href="https://tools.ietf.org/html/draft-ietf-quic-transport-20" target="_blank" rel="noopener">IETF草稿议案-20版</a></li><li><a href="http://www.ccsa.org.cn/organization/index.php3" target="_blank" rel="noopener">中国通信协会标准化组织介绍</a></li><li><a href="https://www.chromium.org/quic" target="_blank" rel="noopener">Chromium项目对QUIC介绍</a></li><li><a href="https://en.wikipedia.org/wiki/QUIC" target="_blank" rel="noopener">Wikipedia对QUIC介绍</a></li><li><a href="https://zh.wikipedia.org/wiki/%E5%BF%AB%E9%80%9FUDP%E7%BD%91%E7%BB%9C%E8%BF%9E%E6%8E%A5" target="_blank" rel="noopener">Wikipedi对QUIC中文介绍</a></li><li><a href="https://github.com/litespeedtech/lsquic" target="_blank" rel="noopener">https://github.com/litespeedtech/lsquic</a></li><li><a href="https://docs.google.com/document/d/1RNHkx_VvKWyWg6Lr8SZ-saqsQx7rFV-ev2jRFUoVD34/edit" target="_blank" rel="noopener">QUIC设计文档</a></li><li><a href="https://docs.google.com/document/d/1WJvyZflAO2pq77yOLbp9NsGjC1CHetAXV8I0fQe-B_U/edit#" target="_blank" rel="noopener">QUIC传输格式设计文档</a></li><li><a href="http://http2.github.io/http2-spec/" target="_blank" rel="noopener">HTTP2发布</a></li><li><a href="https://blog.csdn.net/hursing/article/details/22785475" target="_blank" rel="noopener">博客-SPDY、HTTP2、QUIC协议介绍</a></li><li><a href="https://blog.csdn.net/liujianfei526/article/details/53289350" target="_blank" rel="noopener">博客-HTTP发展史</a></li><li><a href="https://home.cern/science/computing/birth-web" target="_blank" rel="noopener">The birth of the web</a></li><li><a href="https://developer.mozilla.org/zh-CN/docs/Web/HTTP/Basics_of_HTTP/Evolution_of_HTTP" target="_blank" rel="noopener">Http 演化</a></li><li><a href="https://www.infoq.cn/article/kU4OkqR8vH123a8dLCCJ" target="_blank" rel="noopener">InfoQHttp进化</a></li><li><a href="https://hpbn.co/brief-history-of-http/" target="_blank" rel="noopener">brief-history-of-http</a></li></ul>]]></content>
    
    
    <summary type="html">&lt;p align=&quot;center&quot; style=&quot;margin: 30px 0 35px;&quot;&gt;HTTP 已不再是全基于 TCP 了，QUIC 的发展终将带来 HTTP3&lt;/p&gt;

&lt;p&gt;互联网的世界绝大部分的数据传输都是基于 HTTP 协议。自从 1990 年&lt;strong&gt;伯纳斯·李&lt;/strong&gt;发明这 &lt;strong&gt;超文本传输协议(HTTP, HyperText Transfer Protocol)&lt;/strong&gt; 后，于 1999 年 IETF 才正式发布 &lt;strong&gt;HTTP1.1&lt;/strong&gt;(&lt;a href=&quot;https://tools.ietf.org/html/rfc2616&quot; target=&quot;_blank&quot; rel=&quot;noopener&quot;&gt;RFC 2616&lt;/a&gt;) 协议版本，而这个版本一用就是 15 年，至 2015 年 IETF 才正式发布 &lt;strong&gt;HTTP2&lt;/strong&gt;(&lt;a href=&quot;https://tools.ietf.org/html/rfc7540&quot; target=&quot;_blank&quot; rel=&quot;noopener&quot;&gt;RFC 7540&lt;/a&gt;) 协议版本。其中 HTTP2 相比 HTTP1.1 的优化，我将会专门写个文章详细说明下。而今天我们会谈未来的 HTTP 协议 – &lt;strong&gt;QUIC/HTTP3&lt;/strong&gt;。&lt;/p&gt;
&lt;ul&gt;
&lt;li&gt;本文将实现支持 QUIC/HTTP3 协议站点: &lt;a href=&quot;https://http3.godjiyi.cn:9445/&quot; target=&quot;_blank&quot; rel=&quot;noopener&quot;&gt;https://http3.godjiyi.cn:9445/&lt;/a&gt;&lt;/li&gt;
&lt;li&gt;个人实现 HTTP1.1/HTTP2/HTTP3 速度对比示例: &lt;a href=&quot;https://demo.godjiyi.cn&quot; target=&quot;_blank&quot; rel=&quot;noopener&quot;&gt;https://demo.godjiyi.cn&lt;/a&gt;&lt;/li&gt;
&lt;li&gt;开源 QUIC 支持项目： &lt;a href=&quot;https://github.com/jiyiren/quic-web&quot; target=&quot;_blank&quot; rel=&quot;noopener&quot;&gt;https://github.com/jiyiren/quic-web&lt;/a&gt;&lt;/li&gt;
&lt;/ul&gt;
&lt;p&gt;视频示例:&lt;/p&gt;
&lt;video src=&quot;https://githubblog.s3.bitiful.net/blog/quicvshttp.mp4&quot; controls=&quot;controls&quot; style=&quot;max-width: 100%; display: block; margin-left: auto; margin-right: auto;&quot;&gt;&lt;br&gt;your browser does not support the video tag&lt;br&gt;&lt;/video&gt;

&lt;p&gt;协议截图:&lt;/p&gt;
&lt;p&gt;&lt;img src=&quot;https://githubblog.s3.bitiful.net/blog/202412031447726.webp&quot; alt&gt;&lt;/p&gt;</summary>


    <category term="HTTP" scheme="https://jiyiren.github.io/categories/HTTP/"/>
    
    
    <category term="quic" scheme="https://jiyiren.github.io/tags/quic/"/>
    
    <category term="http3" scheme="https://jiyiren.github.io/tags/http3/"/>
    
    <category term="docker" scheme="https://jiyiren.github.io/tags/docker/"/>
    
  </entry>
  
  <entry>
    <title>随手拍</title>
    <link href="https://jiyiren.github.io/2020/06/13/photo_shot_20200613/"/>
    <id>https://jiyiren.github.io/2020/06/13/photo_shot_20200613/</id>
    <published>2020-06-13T04:00:40.000Z</published>
    <updated>2024-12-03T06:45:16.363Z</updated>
    
    <content type="html"><![CDATA[<p>最近一个月，疫情逐渐缓和了。在公司吃完午饭后走一走是一件很愉悦轻松的事情😊。</p><p>虽然目前还没有经济和时间出去旅游，但自己还是很喜欢美好的景色的。</p><p>随手记录下自己所见，留存在手机和博客中，想来老去后才会有值得回忆之事。</p><p>图1</p><p><img src="https://githubblog.s3.bitiful.net/blog/202412031443130.webp" alt></p><p>图2</p><p><img src="https://githubblog.s3.bitiful.net/blog/202412031444196.webp" alt></p><a id="more"></a><p>图3</p><p><img src="https://githubblog.s3.bitiful.net/blog/202412031444149.webp" alt></p><p>图4: </p><p><img src="https://githubblog.s3.bitiful.net/blog/202412031444233.webp" alt></p><p>图5:</p><p><img src="https://githubblog.s3.bitiful.net/blog/202412031444489.webp" alt></p><p>图6:</p><p><img src="https://githubblog.s3.bitiful.net/blog/202412031444087.webp" alt></p><p>图7:</p><p><img src="https://githubblog.s3.bitiful.net/blog/202412031445269.webp" alt></p>]]></content>
    
    
    <summary type="html">&lt;p&gt;最近一个月，疫情逐渐缓和了。在公司吃完午饭后走一走是一件很愉悦轻松的事情😊。&lt;/p&gt;
&lt;p&gt;虽然目前还没有经济和时间出去旅游，但自己还是很喜欢美好的景色的。&lt;/p&gt;
&lt;p&gt;随手记录下自己所见，留存在手机和博客中，想来老去后才会有值得回忆之事。&lt;/p&gt;
&lt;p&gt;图1&lt;/p&gt;
&lt;p&gt;&lt;img src=&quot;https://githubblog.s3.bitiful.net/blog/202412031443130.webp&quot; alt&gt;&lt;/p&gt;
&lt;p&gt;图2&lt;/p&gt;
&lt;p&gt;&lt;img src=&quot;https://githubblog.s3.bitiful.net/blog/202412031444196.webp&quot; alt&gt;&lt;/p&gt;</summary>


    <category term="拍照" scheme="https://jiyiren.github.io/categories/拍照/"/>
    
    
    <category term="phone" scheme="https://jiyiren.github.io/tags/phone/"/>
    
    <category term="photo" scheme="https://jiyiren.github.io/tags/photo/"/>
    
    <category term="旅游" scheme="https://jiyiren.github.io/tags/旅游/"/>
    
  </entry>
  
  <entry>
    <title>日志 随想</title>
    <link href="https://jiyiren.github.io/2020/06/10/life_think/"/>
    <id>https://jiyiren.github.io/2020/06/10/life_think/</id>
    <published>2020-06-10T07:16:40.000Z</published>
    <updated>2020-06-10T15:31:38.132Z</updated>
    
    <content type="html"><![CDATA[<p>去年(2019年) 7 月入职，到今天也差不多一年了吧。在公司确实学习到了很多技能，但最令我欣慰的应该是公司的整体环境：Leader 随和，同事友好，工作环境舒适开放，双休不常加班(自愿)，另外有大牛带，每两周都有内部大神分享经验。</p><p>从大学、到研究生，再到工作，一路走来，都很<strong>庆幸</strong>自己没有走太多的弯路。</p><p>本科时，同学关系很铁，这也是本科给我的最有价值的东西，到现在最常联系的也是本科的那一波人。而本科的魄力和能力则十分欠缺。虽然最终保研了，但对于我而言，保研靠的是我那书呆子的”读书“能力。我不认为这是值得表扬的事情，因为这种能力对我而言是比较”畏弱“的表现，没有特色、没有想法、没有表达，只会做题。。。</p><p>读研期，与导师关系很铁。看到网上很多导师压榨学生的新闻，我感觉遇到导师则是用尽了毕生的运气了。从大二开始就加入了导师实验室。谈项目，见客户，去企业做技术支持、企业招标导师都带上我，让我见识到了更多的人与事，真的让这个从农村来的我眼界大开。此外，师弟师妹的加入，让研究生的实验室更加活泼、朝气、美好。让原本孤独的自己有了陪伴，很喜欢那种一起”挥霍时间“的感觉。</p><p>到现在，虽然没有成为什么成功人士，但心性和认知我自认为自己了解了他们是什么。</p><p>公司最近裁员了，实习期认识的同事被迫离职了。。。，不知道自己能干多久。我知道命运应该要掌握在自己手里，如何掌握还需进一步探索。希望刚入行或即将入行的同学提早规划下吧！</p>]]></content>


    <summary type="html">&lt;p&gt;去年(2019年) 7 月入职，到今天也差不多一年了吧。在公司确实学习到了很多技能，但最令我欣慰的应该是公司的整体环境：Leader 随和，同事友好，工作环境舒适开放，双休不常加班(自愿)，另外有大牛带，每两周都有内部大神分享经验。&lt;/p&gt;
&lt;p&gt;从大学、到研究生，再到工作</summary>


    <category term="日志" scheme="https://jiyiren.github.io/categories/日志/"/>
    
    
    <category term="Life" scheme="https://jiyiren.github.io/tags/Life/"/>
    
    <category term="日志" scheme="https://jiyiren.github.io/tags/日志/"/>
    
    <category term="Think" scheme="https://jiyiren.github.io/tags/Think/"/>
    
  </entry>
  
  <entry>
    <title>日志 关于职业</title>
    <link href="https://jiyiren.github.io/2019/11/06/work_think/"/>
    <id>https://jiyiren.github.io/2019/11/06/work_think/</id>
    <published>2019-11-06T12:07:25.000Z</published>
    <updated>2019-11-06T13:13:02.790Z</updated>
    
    <content type="html"><![CDATA[<p>最近，<strong>我一直在忧虑程序员这一“职业”的生存状态</strong>。虽然我很不认可很多人说程序员在 35 岁之后必被淘汰的言论，但我还是能隐约感觉到“<strong>心有余而力不足</strong>”的情况势必会来到。我知道也有很多大牛也都讲过，35 岁的传言只是讲给那些没有实力的人听的，<strong>真正有能力的人</strong>是完全不用担心而立之年之后的职业发展的。我相信这些大佬们的经验，但我不相信“一定”这种定数。因为“有能力”也只是 35 岁之后仍然有好的发展的<strong>必要不充分条件</strong>，我们看到的大牛都是已验证的发展的好的大佬，而社会之下应该还有很多默默无闻的<strong>“有能力”却被迫转换职业的人</strong>，他们没有发出任何言论，我们也听不到。</p><p>可能有人会说，他们有能力竟然还没混出头，他们不配称为“有能力”者。这实际上涉及到<strong>“有能力”的定义了</strong>，我想的能力定义就是“<strong>解决问题的能力</strong>”，而“有能”者我姑且将其定义在<strong>具备至少能解决绝大部分专业问题的能力，并且具有较深的经验沉淀者</strong>。如果职业稳定，我想任何一个在 IT 行业岗位上的人都能够逐渐成为这样的人的。但我们只要是被雇者，总是会存在两个隐患因素：</p><ol><li><em>公司经营不善，裁员以减少开支，被迫离职；</em></li><li><em>个人技能失效，没有新的闪光点，被迫转岗；</em></li></ol><p>这两个因素在所有其他的工作岗位中也都存在，比如：会计、销售、人事、土木工程师、电工等，但这些岗位技能失效基本是不可能的事，因为这些工作技能基本都是“普适”型或者是人类生活离不开的工作技能。而公司经营不善确实也是这些岗位的隐患因素。</p><p>然而，这两个因素之于 IT 岗位，则<strong>隐患都会被放大</strong>。IT 行业公司成立快、倒闭也快，基本都是倾夜之间。而技能失效也是 IT 工作者最具挑战性的危险因素了，<strong>旧技术还未熟练运用，新技术却又层出不穷</strong>。因此，在我们就职于一家公司时，前期会担心公司经营不善而被迫离开，后期会担心自身技能失效，无法胜任工作而离开岗位。这也就是大多数就职于 IT 岗位的人，不能持久待下去的原因。</p><p>前面说了 IT 岗位本身的特殊性的两点外部因素。那我们退两步讲，假如我们不考虑这两个外部因素，比如就职于一个“可长久运作”的公司，且完全不用担心技能失效，那我们自身是否一直愿意敲代码到老呢？我们内心真正的需求或理想是什么？</p><p>很多人认为敲代码也没什么不好的。确实，如果仅仅利用成熟的技术进行实现也没什么不好，就像如果我可以用 Java Spring 一直写 WEB，写到老，那也算一种美差了。但身在一个“可长久运作”的公司中，做的“敲代码”的活不是简单的“业务实现”，<em>公司 KPI/OKR 要求的是某某业务性能提升 30%，某某成本降低 40%，或者该业务要实现全球落地，或者要将最近的新技术加入到业务中</em>。这些任务中有的不是能靠加班就能完成，比如：很多新技术(机器学习、深度学习)对于应届生来说可能就是大学所学的，而对于老员工来说可能连一点基础都没有，而未来新技术的更新速度可能会更快。这也就是互联网公司不断<strong>更新换血</strong>的原因。因此，35 岁之后，若成立了家庭，那“<strong>心有余而力不足</strong>”应该是大部分情况了。</p><p>作为曾今被标榜个性主义的 90 后，我们生逢互联网热潮中。有很多 90 后应该都像我一样成为了一名 IT 岗位职员。虽然我们才刚刚步入社会工作，但我想我们不会永远被动地等到那个时候！</p>]]></content>


    <summary type="html">&lt;p&gt;最近，&lt;strong&gt;我一直在忧虑程序员这一“职业”的生存状态&lt;/strong&gt;。虽然我很不认可很多人说程序员在 35 岁之后必被淘汰的言论，但我还是能隐约感觉到“&lt;strong&gt;心有余而力不足&lt;/strong&gt;”的情况势必会来到。我知道也有很多大牛也都讲过，35 岁的传言</summary>


    <category term="日志" scheme="https://jiyiren.github.io/categories/日志/"/>
    
    
    <category term="Life" scheme="https://jiyiren.github.io/tags/Life/"/>
    
    <category term="日志" scheme="https://jiyiren.github.io/tags/日志/"/>
    
    <category term="Work" scheme="https://jiyiren.github.io/tags/Work/"/>
    
  </entry>
  
  <entry>
    <title>基于 gitbook 的项目文档设计</title>
    <link href="https://jiyiren.github.io/2019/09/15/project-doc/"/>
    <id>https://jiyiren.github.io/2019/09/15/project-doc/</id>
    <published>2019-09-15T11:07:25.000Z</published>
    <updated>2024-12-03T06:59:21.766Z</updated>
    
    <content type="html"><![CDATA[<p align="center" style="margin: 30px 0 35px;">基于 Gitbook 的开源生态，更具美观的项目文档设计</p><p><img src="https://githubblog.s3.bitiful.net/blog/202412031458712.webp" alt></p><p><strong>项目源码地址</strong>：<a href="https://github.com/jiyiren/ProjectDoc" target="_blank" rel="noopener">https://github.com/jiyiren/ProjectDoc</a></p><p><strong>有色Demo预览地址</strong>：<a href="https://jiyiren.github.io/project-doc/">https://jiyiren.github.io/project-doc/</a></p><p><strong>无色Demo预览地址</strong>：<a href="https://jiyiren.github.io/project-doc-plain/">https://jiyiren.github.io/project-doc-plain/</a></p><a id="more"></a><p>无色样式：</p><p><img src="https://githubblog.s3.bitiful.net/blog/202412031458787.webp" alt></p><h2 id="基本环境"><a href="#基本环境" class="headerlink" title="基本环境"></a>基本环境</h2><h3 id="安装-Nodejs"><a href="#安装-Nodejs" class="headerlink" title="安装 Nodejs"></a>安装 Nodejs</h3><ul><li>全球官网：<a href="https://nodejs.org/en" target="_blank" rel="noopener">https://nodejs.org/en</a></li><li>中文官网：<a href="http://nodejs.cn/" target="_blank" rel="noopener">http://nodejs.cn/</a></li></ul><p>下载安装后测试下 Node 是否安装成功：</p><div class="highlight-wrap"autocomplete="off" autocorrect="off" autocapitalize="off" spellcheck="false" contenteditable="true"data-rel="BASH"><figure class="iseeu highlight /bash"><table><tr><td class="gutter"><pre><span class="line">1</span><br><span class="line">2</span><br></pre></td><td class="code"><pre><span class="line">$ node -v</span><br><span class="line">v10.15.3</span><br></pre></td></tr></table></figure></div><p>如果提示命令没找到，那么是由于 Node 没有加入环境变量，大家将安装的 Node 环境地址放在环境变量里就可以了。</p><h3 id="安装-gitbook"><a href="#安装-gitbook" class="headerlink" title="安装 gitbook"></a>安装 gitbook</h3><p>直接输入命令进行安装：</p><div class="highlight-wrap"autocomplete="off" autocorrect="off" autocapitalize="off" spellcheck="false" contenteditable="true"data-rel="BASH"><figure class="iseeu highlight /bash"><table><tr><td class="gutter"><pre><span class="line">1</span><br></pre></td><td class="code"><pre><span class="line">$ npm install gitbook-cli -g</span><br></pre></td></tr></table></figure></div><p><code>npm</code> 也是和 <code>node</code> 一起安装的，<code>node</code> 存在 <code>npm</code> 就存在。<code>-g</code> 参数表示全局安装，也就是模块包会安装到全局环境里，这个是推荐做法，因为像这种工具命令全局安装是最好的。而项目依赖模块则项目内安装即可。</p><p>测试 gitbook 命令是否安装成功：</p><div class="highlight-wrap"autocomplete="off" autocorrect="off" autocapitalize="off" spellcheck="false" contenteditable="true"data-rel="BASH"><figure class="iseeu highlight /bash"><table><tr><td class="gutter"><pre><span class="line">1</span><br><span class="line">2</span><br><span class="line">3</span><br></pre></td><td class="code"><pre><span class="line">$ gitbook -V</span><br><span class="line">CLI version: 2.3.2</span><br><span class="line">GitBook version: 3.2.3</span><br></pre></td></tr></table></figure></div><h3 id="使用-gitbook"><a href="#使用-gitbook" class="headerlink" title="使用 gitbook"></a>使用 gitbook</h3><p>任意找一个空目录，执行：</p><div class="highlight-wrap"autocomplete="off" autocorrect="off" autocapitalize="off" spellcheck="false" contenteditable="true"data-rel="BASH"><figure class="iseeu highlight /bash"><table><tr><td class="gutter"><pre><span class="line">1</span><br><span class="line">2</span><br><span class="line">3</span><br><span class="line">4</span><br><span class="line">5</span><br></pre></td><td class="code"><pre><span class="line">$ gitbook init</span><br><span class="line">warn: no summary file <span class="keyword">in</span> this book </span><br><span class="line">info: create README.md </span><br><span class="line">info: create SUMMARY.md </span><br><span class="line">info: initialization is finished</span><br></pre></td></tr></table></figure></div><p>会在当前目录下创建出两个文件，分别是：</p><div class="highlight-wrap"autocomplete="off" autocorrect="off" autocapitalize="off" spellcheck="false" contenteditable="true"data-rel="PLAIN"><figure class="iseeu highlight /plain"><table><tr><td class="gutter"><pre><span class="line">1</span><br><span class="line">2</span><br></pre></td><td class="code"><pre><span class="line">README.md</span><br><span class="line">SUMMARY.md</span><br></pre></td></tr></table></figure></div><p>暂且先不管其他的，我们现在可以直接运行试试，先把流程走通：</p><div class="highlight-wrap"autocomplete="off" autocorrect="off" autocapitalize="off" spellcheck="false" contenteditable="true"data-rel="BASH"><figure class="iseeu highlight /bash"><table><tr><td class="gutter"><pre><span class="line">1</span><br><span class="line">2</span><br></pre></td><td class="code"><pre><span class="line">$ gitbook build</span><br><span class="line">$ gitbook serve</span><br></pre></td></tr></table></figure></div><p>上面的 <code>gitbook build</code> 是编译整个 <code>markdown</code> 文件，然后在当前目录生成 <code>_book</code> 目录，里面是 html 页面。这个主要在部署的时候用到。</p><p>而 <code>gitbook serve</code> 是本地调试开启服务命令，项目最终是要成网站的，因此, 该命令可以开启本地 <code>http://127.0.0.1:4000</code> 地址作为网站浏览地址。</p><p>假如大家执行 <code>gitbook serve</code> 出错，建议大家先 <code>gitbook build</code> 在 <code>gitbook serve</code>.</p><h2 id="项目结构"><a href="#项目结构" class="headerlink" title="项目结构"></a>项目结构</h2><h3 id="基本结构"><a href="#基本结构" class="headerlink" title="基本结构"></a>基本结构</h3><p>我们上面通过 <code>gitbook init</code> 生成的只有下面两个文件：</p><div class="highlight-wrap"autocomplete="off" autocorrect="off" autocapitalize="off" spellcheck="false" contenteditable="true"data-rel="PLAIN"><figure class="iseeu highlight /plain"><table><tr><td class="gutter"><pre><span class="line">1</span><br><span class="line">2</span><br></pre></td><td class="code"><pre><span class="line">README.md</span><br><span class="line">SUMMARY.md</span><br></pre></td></tr></table></figure></div><p>但实际上我们要定制我们的 gitbook 项目，项目还有一个配置文件的: <strong>book.json</strong>，只不过 <code>gitbook init</code> 没有自动创建出来。我们一看这文件名就应该知道这个配置文件就是 <code>json</code> 格式的。最基本的 <strong>book.json</strong> 长什么样子呢？如下所示：</p><div class="highlight-wrap"autocomplete="off" autocorrect="off" autocapitalize="off" spellcheck="false" contenteditable="true"data-rel="JSON"><figure class="iseeu highlight /json"><table><tr><td class="gutter"><pre><span class="line">1</span><br><span class="line">2</span><br><span class="line">3</span><br><span class="line">4</span><br><span class="line">5</span><br><span class="line">6</span><br><span class="line">7</span><br><span class="line">8</span><br><span class="line">9</span><br><span class="line">10</span><br><span class="line">11</span><br><span class="line">12</span><br><span class="line">13</span><br><span class="line">14</span><br></pre></td><td class="code"><pre><span class="line">&#123;</span><br><span class="line">  <span class="attr">"title"</span>: <span class="string">"ProjectDoc"</span>,</span><br><span class="line">  <span class="attr">"author"</span>: <span class="string">"jiyiren"</span>,</span><br><span class="line">  <span class="attr">"description"</span>: <span class="string">"ProjectDoc"</span>,</span><br><span class="line">  <span class="attr">"language"</span>: <span class="string">"zh-hans"</span>,</span><br><span class="line">  <span class="attr">"links"</span>: &#123;</span><br><span class="line">  &#125;,</span><br><span class="line">  <span class="attr">"styles"</span>: &#123;</span><br><span class="line">  &#125;,</span><br><span class="line">  <span class="attr">"plugins"</span>: [</span><br><span class="line">  ],</span><br><span class="line">  <span class="attr">"pluginsConfig"</span>: &#123;</span><br><span class="line">  &#125;</span><br><span class="line">&#125;</span><br></pre></td></tr></table></figure></div><p>基本 book.json 内容：</p><ul><li><strong>title</strong>: 网站标题;</li><li><strong>author</strong>: 网站作者;</li><li><strong>description</strong>: 网站描述;</li><li><strong>language</strong>: 网站语言;</li><li><strong>links</strong>: 侧边栏配置项;</li><li><strong>styles</strong>: 全局自定义网站样式;</li><li><strong>plugins</strong>: 插件配置项;</li><li><strong>pluginsConfig</strong>: 配置插件的配置项，为一些插件传入参数的;</li></ul><h3 id="简单示例"><a href="#简单示例" class="headerlink" title="简单示例"></a>简单示例</h3><p>上面最基本的 <strong>book.json</strong>，对默认界面基本无变动，其界面显示为：</p><p><img src="https://githubblog.s3.bitiful.net/blog/202412031459919.webp" alt></p><p>我们来一个简单 gitbook 定制，<strong>book.json</strong> 如下：</p><div class="highlight-wrap"autocomplete="off" autocorrect="off" autocapitalize="off" spellcheck="false" contenteditable="true"data-rel="JSON"><figure class="iseeu highlight /json"><table><tr><td class="gutter"><pre><span class="line">1</span><br><span class="line">2</span><br><span class="line">3</span><br><span class="line">4</span><br><span class="line">5</span><br><span class="line">6</span><br><span class="line">7</span><br><span class="line">8</span><br><span class="line">9</span><br><span class="line">10</span><br><span class="line">11</span><br><span class="line">12</span><br><span class="line">13</span><br><span class="line">14</span><br><span class="line">15</span><br><span class="line">16</span><br><span class="line">17</span><br><span class="line">18</span><br><span class="line">19</span><br><span class="line">20</span><br><span class="line">21</span><br><span class="line">22</span><br><span class="line">23</span><br><span class="line">24</span><br><span class="line">25</span><br></pre></td><td class="code"><pre><span class="line">&#123;</span><br><span class="line"><span class="attr">"title"</span>: <span class="string">"ProjectDoc"</span>,</span><br><span class="line"><span class="attr">"author"</span>: <span class="string">"jiyiren"</span>,</span><br><span class="line"><span class="attr">"description"</span>: <span class="string">"ProjectDoc"</span>,</span><br><span class="line"><span class="attr">"language"</span>: <span class="string">"zh-hans"</span>,</span><br><span class="line"><span class="attr">"links"</span>: &#123;</span><br><span class="line">  <span class="attr">"sidebar"</span>: &#123;</span><br><span class="line">    <span class="attr">"本文托管"</span>: <span class="string">"https://github.com/jiyiren/ProjectDoc"</span></span><br><span class="line">  &#125;</span><br><span class="line">&#125;,</span><br><span class="line"><span class="attr">"styles"</span>: &#123;</span><br><span class="line">&#125;,</span><br><span class="line"><span class="attr">"plugins"</span>: [</span><br><span class="line">    <span class="string">"anchor-navigation-ex@0.1.8"</span></span><br><span class="line">],</span><br><span class="line"><span class="attr">"pluginsConfig"</span>: &#123;</span><br><span class="line">    <span class="attr">"anchor-navigation-ex"</span>: &#123;</span><br><span class="line">        <span class="attr">"isRewritePageTitle"</span>: <span class="literal">true</span>,</span><br><span class="line">        <span class="attr">"isShowTocTitleIcon"</span>: <span class="literal">true</span>,</span><br><span class="line">        <span class="attr">"tocLevel1Icon"</span>: <span class="string">"fa fa-hand-o-right"</span>,</span><br><span class="line">        <span class="attr">"tocLevel2Icon"</span>: <span class="string">"fa fa-hand-o-right"</span>,</span><br><span class="line">        <span class="attr">"tocLevel3Icon"</span>: <span class="string">"fa fa-hand-o-right"</span></span><br><span class="line">    &#125;</span><br><span class="line">&#125;</span><br><span class="line">&#125;</span><br></pre></td></tr></table></figure></div><p>其界面为如下，多出左侧栏 <strong>本文托管</strong>，和文章右侧的 <strong>目录以及回到开头</strong> 按钮。</p><p><img src="https://githubblog.s3.bitiful.net/blog/202412031459222.webp" alt></p><h2 id="必备插件"><a href="#必备插件" class="headerlink" title="必备插件"></a>必备插件</h2><p>插件使用</p><ul><li><p>插件添加：插件的使用就放在 <strong>book.json</strong> 的 <strong>plugins</strong> 和 <strong>pluginsConfig</strong> 键中，形式如：<code>pluginName@versionName</code> 也就是<strong>插件名@版本</strong>，当然没有版本时，采用最新默认版本。</p></li><li><p>插件删除：要删除自带的插件则使用 <code>-pluginName</code> 即 <strong>-插件名</strong></p></li></ul><p>下面介绍本文档使用到的插件。</p><h3 id="splitter"><a href="#splitter" class="headerlink" title="splitter"></a>splitter</h3><p>使侧边栏的宽度可以自由调节</p><figure class="highlight"><table><tr><td class="gutter"><pre><span class="line">1</span><br><span class="line">2</span><br><span class="line">3</span><br></pre></td><td class="code"><pre><span class="line">"plugins": [</span><br><span class="line">    <span class="string">"splitter"</span></span><br><span class="line">]</span><br></pre></td></tr></table></figure><h3 id="simple-page-toc"><a href="#simple-page-toc" class="headerlink" title="simple-page-toc"></a>simple-page-toc</h3><p>文章页面右上角显示目录，这个目前已经被废弃，建议每个页面自己生成 md 目录。</p><div class="highlight-wrap"autocomplete="off" autocorrect="off" autocapitalize="off" spellcheck="false" contenteditable="true"data-rel="JSON"><figure class="iseeu highlight /json"><table><tr><td class="gutter"><pre><span class="line">1</span><br><span class="line">2</span><br><span class="line">3</span><br><span class="line">4</span><br><span class="line">5</span><br><span class="line">6</span><br><span class="line">7</span><br><span class="line">8</span><br><span class="line">9</span><br><span class="line">10</span><br><span class="line">11</span><br></pre></td><td class="code"><pre><span class="line">&#123;</span><br><span class="line">    <span class="attr">"plugins"</span> : [</span><br><span class="line">        <span class="string">"simple-page-toc"</span></span><br><span class="line">    ],</span><br><span class="line">    <span class="attr">"pluginsConfig"</span>: &#123;</span><br><span class="line">        <span class="attr">"simple-page-toc"</span>: &#123;</span><br><span class="line">            <span class="attr">"maxDepth"</span>: <span class="number">3</span>,</span><br><span class="line">            <span class="attr">"skipFirstH1"</span>: <span class="literal">true</span></span><br><span class="line">        &#125;</span><br><span class="line">    &#125;</span><br><span class="line">&#125;</span><br></pre></td></tr></table></figure></div><h3 id="search-plus"><a href="#search-plus" class="headerlink" title="search-plus"></a>search-plus</h3><p>支持中文搜索, 需要将默认的 search 和 lunr 插件去掉</p><div class="highlight-wrap"autocomplete="off" autocorrect="off" autocapitalize="off" spellcheck="false" contenteditable="true"data-rel="JSON"><figure class="iseeu highlight /json"><table><tr><td class="gutter"><pre><span class="line">1</span><br><span class="line">2</span><br><span class="line">3</span><br></pre></td><td class="code"><pre><span class="line">&#123;</span><br><span class="line">    <span class="attr">"plugins"</span>: [<span class="string">"-lunr"</span>, <span class="string">"-search"</span>, <span class="string">"search-plus"</span>]</span><br><span class="line">&#125;</span><br></pre></td></tr></table></figure></div><h3 id="tbfed-pagefooter"><a href="#tbfed-pagefooter" class="headerlink" title="tbfed-pagefooter"></a>tbfed-pagefooter</h3><p>为页面添加页脚</p><figure class="highlight"><table><tr><td class="gutter"><pre><span class="line">1</span><br><span class="line">2</span><br><span class="line">3</span><br><span class="line">4</span><br><span class="line">5</span><br><span class="line">6</span><br><span class="line">7</span><br><span class="line">8</span><br><span class="line">9</span><br><span class="line">10</span><br></pre></td><td class="code"><pre><span class="line">"plugins": [</span><br><span class="line">   <span class="string">"tbfed-pagefooter"</span></span><br><span class="line">],</span><br><span class="line">"pluginsConfig": &#123;</span><br><span class="line">    "tbfed-pagefooter": &#123;</span><br><span class="line">        "copyright":"Copyright &amp;copy zhangjikai.com 2017",</span><br><span class="line">        "modify_label": "该文件修订时间：",</span><br><span class="line">        "modify_format": "YYYY-MM-DD HH:mm:ss"</span><br><span class="line">    &#125;</span><br><span class="line">&#125;</span><br></pre></td></tr></table></figure><h3 id="anchor-navigation-ex"><a href="#anchor-navigation-ex" class="headerlink" title="anchor-navigation-ex"></a>anchor-navigation-ex</h3><p>添加Toc到侧边悬浮导航以及回到顶部按钮，这个自动生成的悬浮目录必须以下面形式书写，也就是一定要有一个是 <strong>h1</strong> 开头的，否则不能识别。</p><div class="highlight-wrap"autocomplete="off" autocorrect="off" autocapitalize="off" spellcheck="false" contenteditable="true"data-rel="PLAIN"><figure class="iseeu highlight /plain"><table><tr><td class="gutter"><pre><span class="line">1</span><br><span class="line">2</span><br><span class="line">3</span><br></pre></td><td class="code"><pre><span class="line"># h1</span><br><span class="line">## h2</span><br><span class="line">### h3</span><br></pre></td></tr></table></figure></div><p>配置代码：</p><div class="highlight-wrap"autocomplete="off" autocorrect="off" autocapitalize="off" spellcheck="false" contenteditable="true"data-rel="JSON"><figure class="iseeu highlight /json"><table><tr><td class="gutter"><pre><span class="line">1</span><br><span class="line">2</span><br><span class="line">3</span><br><span class="line">4</span><br><span class="line">5</span><br><span class="line">6</span><br><span class="line">7</span><br><span class="line">8</span><br><span class="line">9</span><br><span class="line">10</span><br><span class="line">11</span><br><span class="line">12</span><br><span class="line">13</span><br><span class="line">14</span><br></pre></td><td class="code"><pre><span class="line">&#123;</span><br><span class="line">    <span class="attr">"plugins"</span>: [</span><br><span class="line">        <span class="string">"anchor-navigation-ex"</span></span><br><span class="line">    ],</span><br><span class="line">    <span class="attr">"pluginsConfig"</span>: &#123;</span><br><span class="line">        <span class="attr">"anchor-navigation-ex"</span>: &#123;</span><br><span class="line">            <span class="attr">"isRewritePageTitle"</span>: <span class="literal">true</span>,</span><br><span class="line">            <span class="attr">"isShowTocTitleIcon"</span>: <span class="literal">true</span>,</span><br><span class="line">            <span class="attr">"tocLevel1Icon"</span>: <span class="string">"fa fa-hand-o-right"</span>,</span><br><span class="line">            <span class="attr">"tocLevel2Icon"</span>: <span class="string">"fa fa-hand-o-right"</span>,</span><br><span class="line">            <span class="attr">"tocLevel3Icon"</span>: <span class="string">"fa fa-hand-o-right"</span></span><br><span class="line">        &#125;</span><br><span class="line">    &#125;</span><br><span class="line">&#125;</span><br></pre></td></tr></table></figure></div><h3 id="prism"><a href="#prism" class="headerlink" title="prism"></a>prism</h3><p>使用 <code>Prism.js</code> 为语法添加高亮显示，需要将 <code>highlight</code> 插件去掉。该插件自带的主题样式较少，可以再安装 <code>prism-themes</code> 插件，里面多提供了几种样式，具体的样式可以参考 <a href="https://github.com/PrismJS/prism-themes" target="_blank" rel="noopener">这里</a>，在设置样式时要注意设置 css 文件名，而不是样式名。</p><div class="highlight-wrap"autocomplete="off" autocorrect="off" autocapitalize="off" spellcheck="false" contenteditable="true"data-rel="JSON"><figure class="iseeu highlight /json"><table><tr><td class="gutter"><pre><span class="line">1</span><br><span class="line">2</span><br><span class="line">3</span><br><span class="line">4</span><br><span class="line">5</span><br><span class="line">6</span><br><span class="line">7</span><br><span class="line">8</span><br><span class="line">9</span><br><span class="line">10</span><br><span class="line">11</span><br><span class="line">12</span><br><span class="line">13</span><br><span class="line">14</span><br></pre></td><td class="code"><pre><span class="line">&#123;</span><br><span class="line"><span class="attr">"plugins"</span>: [</span><br><span class="line">    <span class="string">"-highlight"</span>,</span><br><span class="line">    <span class="string">"prism@^2.1.0"</span>,</span><br><span class="line">    <span class="string">"prism-themes@^0.0.2"</span></span><br><span class="line">  ],</span><br><span class="line"><span class="attr">"pluginsConfig"</span>: &#123;</span><br><span class="line"><span class="attr">"prism"</span>: &#123;</span><br><span class="line">      <span class="attr">"css"</span>: [</span><br><span class="line">        <span class="string">"prism-themes/themes/prism-a11y-dark.css"</span></span><br><span class="line">      ]</span><br><span class="line">    &#125;</span><br><span class="line">  &#125;</span><br><span class="line">&#125;</span><br></pre></td></tr></table></figure></div><p>其他插件大家可以参考这个博主的：<a href="http://gitbook.zhangjikai.com/plugins.html" target="_blank" rel="noopener">http://gitbook.zhangjikai.com/plugins.html</a></p><p>最终的页面示例</p><p>有配色见：<a href="https://jiyiren.github.io/project-doc/">https://jiyiren.github.io/project-doc/</a></p><p>无配色见：<a href="https://jiyiren.github.io/project-doc-plain/">https://jiyiren.github.io/project-doc-plain/</a></p><h2 id="参考"><a href="#参考" class="headerlink" title="参考"></a>参考</h2><ol><li><a href="https://redis.io/" target="_blank" rel="noopener">https://redis.io/</a></li><li><a href="https://jiyiren.github.io/2018/08/04/kafka/">https://jiyiren.github.io/2018/08/04/kafka/</a></li><li><a href="http://gitbook.zhangjikai.com/themes.html" target="_blank" rel="noopener">http://gitbook.zhangjikai.com/themes.html</a></li><li><a href="http://www.chengweiyang.cn/gitbook/" target="_blank" rel="noopener">http://www.chengweiyang.cn/gitbook/</a></li><li><a href="https://www.cnblogs.com/YangJieCheng/p/7991660.html" target="_blank" rel="noopener">https://www.cnblogs.com/YangJieCheng/p/7991660.html</a></li></ol>]]></content>
    
    
    <summary type="html">&lt;p align=&quot;center&quot; style=&quot;margin: 30px 0 35px;&quot;&gt;基于 Gitbook 的开源生态，更具美观的项目文档设计&lt;/p&gt;

&lt;p&gt;&lt;img src=&quot;https://githubblog.s3.bitiful.net/blog/202412031458712.webp&quot; alt&gt;&lt;/p&gt;
&lt;p&gt;&lt;strong&gt;项目源码地址&lt;/strong&gt;：&lt;a href=&quot;https://github.com/jiyiren/ProjectDoc&quot; target=&quot;_blank&quot; rel=&quot;noopener&quot;&gt;https://github.com/jiyiren/ProjectDoc&lt;/a&gt;&lt;/p&gt;
&lt;p&gt;&lt;strong&gt;有色Demo预览地址&lt;/strong&gt;：&lt;a href=&quot;https://jiyiren.github.io/project-doc/&quot;&gt;https://jiyiren.github.io/project-doc/&lt;/a&gt;&lt;/p&gt;
&lt;p&gt;&lt;strong&gt;无色Demo预览地址&lt;/strong&gt;：&lt;a href=&quot;https://jiyiren.github.io/project-doc-plain/&quot;&gt;https://jiyiren.github.io/project-doc-plain/&lt;/a&gt;&lt;/p&gt;</summary>


    <category term="Gitbook" scheme="https://jiyiren.github.io/categories/Gitbook/"/>
    
    
    <category term="project" scheme="https://jiyiren.github.io/tags/project/"/>
    
    <category term="report" scheme="https://jiyiren.github.io/tags/report/"/>
    
  </entry>
  
  <entry>
    <title>无版权图库资源收集</title>
    <link href="https://jiyiren.github.io/2019/09/15/openimage/"/>
    <id>https://jiyiren.github.io/2019/09/15/openimage/</id>
    <published>2019-09-15T10:55:25.000Z</published>
    <updated>2019-09-15T10:50:07.162Z</updated>
    
    <content type="html"><![CDATA[<p>我平常自己在写文档时，常常会搭配一些图片来展示。一般我都会去 <strong>无版权图片库</strong> 找一张搭配，毕竟程序员老是敲代码和文字打交道，已经苦不堪言了，来一点 <em>色彩图像</em> 刺激真的会让人耳目一新。很多时候程序员不仅仅应该是实现功能方，我们也应该要把自己当做甲方或者用户，去体验什么样的设计才能让自己感觉舒适。<strong>我喜欢有自己的个性，有自己的配色配图</strong>。</p><h1 id="pixabay"><a href="#pixabay" class="headerlink" title="pixabay"></a>pixabay</h1><ul><li><strong>推荐</strong>：★★★★★</li><li>地址：<a href="https://pixabay.com/" target="_blank" rel="noopener">https://pixabay.com/</a></li><li>主页：<img src="http://img.godjiyi.cn/jy_open-pixabay.jpg" alt></li></ul><h1 id="pexels"><a href="#pexels" class="headerlink" title="pexels"></a>pexels</h1><ul><li><strong>推荐</strong>：★★★★★</li><li>地址：<a href="https://www.pexels.com" target="_blank" rel="noopener">https://www.pexels.com/</a></li><li>主页：<img src="http://img.godjiyi.cn/jy_open-pexels.jpg" alt></li></ul><a id="more"></a><h1 id="isorepublic"><a href="#isorepublic" class="headerlink" title="isorepublic"></a>isorepublic</h1><ul><li><strong>推荐</strong>：★★★★★</li><li>地址：<a href="https://isorepublic.com/" target="_blank" rel="noopener">https://isorepublic.com/</a></li><li>主页：<img src="http://img.godjiyi.cn/jy_open-isorepublic.jpg" alt></li></ul><h1 id="gratisography"><a href="#gratisography" class="headerlink" title="gratisography"></a>gratisography</h1><ul><li><strong>推荐</strong>：★★★★</li><li>地址：<a href="https://gratisography.com/" target="_blank" rel="noopener">https://gratisography.com/</a></li><li>主页：<img src="http://img.godjiyi.cn/jy_open-gratisography.jpg" alt></li></ul><h1 id="rawpixel"><a href="#rawpixel" class="headerlink" title="rawpixel"></a>rawpixel</h1><ul><li><strong>推荐</strong>：★★★★</li><li>地址：<a href="https://www.rawpixel.com/" target="_blank" rel="noopener">https://www.rawpixel.com/</a></li><li>主页：<img src="http://img.godjiyi.cn/jy_open-rawpixel.jpg" alt></li></ul><h1 id="polayoutu"><a href="#polayoutu" class="headerlink" title="polayoutu"></a>polayoutu</h1><ul><li><strong>推荐</strong>：★★★★</li><li>地址：<a href="http://www.polayoutu.com/collections" target="_blank" rel="noopener">http://www.polayoutu.com/collections</a></li><li>主页：<img src="http://img.godjiyi.cn/jy_open-polayoutu.jpg" alt></li></ul><h1 id="pxhere"><a href="#pxhere" class="headerlink" title="pxhere"></a>pxhere</h1><ul><li><strong>推荐</strong>：★★★★</li><li>地址：<a href="https://pxhere.com/" target="_blank" rel="noopener">https://pxhere.com/</a></li><li>主页：<img src="http://img.godjiyi.cn/jy_open-pxhere.jpg" alt></li></ul><h1 id="picjumbo"><a href="#picjumbo" class="headerlink" title="picjumbo"></a>picjumbo</h1><ul><li><strong>推荐</strong>：★★★</li><li>地址：<a href="https://picjumbo.com/" target="_blank" rel="noopener">https://picjumbo.com/</a></li><li>主页：<img src="http://img.godjiyi.cn/jy_open-picjumbo.jpg" alt></li></ul><h1 id="参考"><a href="#参考" class="headerlink" title="参考"></a>参考</h1><ol><li><a href="https://pixabay.com/" target="_blank" rel="noopener">https://pixabay.com/</a></li><li><a href="https://www.pexels.com" target="_blank" rel="noopener">https://www.pexels.com/</a></li><li><a href="https://isorepublic.com/" target="_blank" rel="noopener">https://isorepublic.com/</a></li><li><a href="https://gratisography.com/" target="_blank" rel="noopener">https://gratisography.com/</a></li><li><a href="https://www.rawpixel.com/" target="_blank" rel="noopener">https://www.rawpixel.com/</a></li><li><a href="http://www.polayoutu.com/collections" target="_blank" rel="noopener">http://www.polayoutu.com/collections</a></li><li><a href="https://pxhere.com/" target="_blank" rel="noopener">https://pxhere.com/</a></li><li><a href="https://picjumbo.com/" target="_blank" rel="noopener">https://picjumbo.com/</a></li><li><a href="https://www.yuque.com/ruanyf/weekly/free-photos" target="_blank" rel="noopener">https://www.yuque.com/ruanyf/weekly/free-photos</a></li></ol>]]></content>
    
    
    <summary type="html">&lt;p&gt;我平常自己在写文档时，常常会搭配一些图片来展示。一般我都会去 &lt;strong&gt;无版权图片库&lt;/strong&gt; 找一张搭配，毕竟程序员老是敲代码和文字打交道，已经苦不堪言了，来一点 &lt;em&gt;色彩图像&lt;/em&gt; 刺激真的会让人耳目一新。很多时候程序员不仅仅应该是实现功能方，我们也应该要把自己当做甲方或者用户，去体验什么样的设计才能让自己感觉舒适。&lt;strong&gt;我喜欢有自己的个性，有自己的配色配图&lt;/strong&gt;。&lt;/p&gt;
&lt;h1 id=&quot;pixabay&quot;&gt;&lt;a href=&quot;#pixabay&quot; class=&quot;headerlink&quot; title=&quot;pixabay&quot;&gt;&lt;/a&gt;pixabay&lt;/h1&gt;&lt;ul&gt;
&lt;li&gt;&lt;strong&gt;推荐&lt;/strong&gt;：★★★★★&lt;/li&gt;
&lt;li&gt;地址：&lt;a href=&quot;https://pixabay.com/&quot; target=&quot;_blank&quot; rel=&quot;noopener&quot;&gt;https://pixabay.com/&lt;/a&gt;&lt;/li&gt;
&lt;li&gt;主页：&lt;img src=&quot;http://img.godjiyi.cn/jy_open-pixabay.jpg&quot; alt&gt;&lt;/li&gt;
&lt;/ul&gt;
&lt;h1 id=&quot;pexels&quot;&gt;&lt;a href=&quot;#pexels&quot; class=&quot;headerlink&quot; title=&quot;pexels&quot;&gt;&lt;/a&gt;pexels&lt;/h1&gt;&lt;ul&gt;
&lt;li&gt;&lt;strong&gt;推荐&lt;/strong&gt;：★★★★★&lt;/li&gt;
&lt;li&gt;地址：&lt;a href=&quot;https://www.pexels.com&quot; target=&quot;_blank&quot; rel=&quot;noopener&quot;&gt;https://www.pexels.com/&lt;/a&gt;&lt;/li&gt;
&lt;li&gt;主页：&lt;img src=&quot;http://img.godjiyi.cn/jy_open-pexels.jpg&quot; alt&gt;&lt;/li&gt;
&lt;/ul&gt;</summary>


    <category term="资源" scheme="https://jiyiren.github.io/categories/资源/"/>
    
    
    <category term="无版权" scheme="https://jiyiren.github.io/tags/无版权/"/>
    
    <category term="图片" scheme="https://jiyiren.github.io/tags/图片/"/>
    
  </entry>
  
  <entry>
    <title>2019-07-28 日志</title>
    <link href="https://jiyiren.github.io/2019/07/28/life_work/"/>
    <id>https://jiyiren.github.io/2019/07/28/life_work/</id>
    <published>2019-07-28T07:16:40.000Z</published>
    <updated>2019-11-06T13:08:51.348Z</updated>
    
    <content type="html"><![CDATA[<p>最近，我也毕业入职了，用了一个月时间熟悉了身边新环境，虽说还可以，但仍旧心有不安。</p><p>今年都说工作形式不好，多家互联网企业被爆裁员。互联网，曾今是多么充满活力的名词，基本上是”万众创业”的根本，而现在给人的则是”赢者通吃”的感觉，再无敢与巨头相争，百花齐放的景象了。</p><p>虽说现在巨头当道，创业热情没有以前的高，但互联网仍然是最大的创业领域。目前，移动互联的创业确实少了，但是 5G、IoT、人工智能的创业项目却有很多。</p><p>很多时候我们都在以我们自己能看到的信息进行评判和决策的，由于我们都处于历史长河中的一部分，在那一部分中我们的绝大部分技能、信息都聚焦于某一种东西上，如果时代改变了这种东西的价值，那我们自身的价值也会相应变化，最坏的情况就是贬值，而这正是互联网的特性。</p><p>心有不安，不安在时代正在极速地改变着最吃香的技能，而自己的技能却在逐步被淘汰！很多人怕的不是被裁，而是怕自己已经适应不了社会的需求了！</p>]]></content>


    <summary type="html">&lt;p&gt;最近，我也毕业入职了，用了一个月时间熟悉了身边新环境，虽说还可以，但仍旧心有不安。&lt;/p&gt;
&lt;p&gt;今年都说工作形式不好，多家互联网企业被爆裁员。互联网，曾今是多么充满活力的名词，基本上是”万众创业”的根本，而现在给人的则是”赢者通吃”的感觉，再无敢与巨头相争，百花齐放的景象</summary>


    <category term="日志" scheme="https://jiyiren.github.io/categories/日志/"/>
    
    
    <category term="Life" scheme="https://jiyiren.github.io/tags/Life/"/>
    
    <category term="日志" scheme="https://jiyiren.github.io/tags/日志/"/>
    
    <category term="Work" scheme="https://jiyiren.github.io/tags/Work/"/>
    
  </entry>
  
  <entry>
    <title>新翻墙代理服务器</title>
    <link href="https://jiyiren.github.io/2019/06/16/justmysocks/"/>
    <id>https://jiyiren.github.io/2019/06/16/justmysocks/</id>
    <published>2019-06-16T14:16:40.000Z</published>
    <updated>2025-01-09T08:41:38.769Z</updated>
    
    <content type="html"><![CDATA[<p align="center" style="margin: 30px 0 35px;">本文不提供翻墙服务，只作为技术交流教程！</p><p><strong>2025.1.09号更新</strong>: <a href="/2025/01/09/fanqianghx/">最新稳定翻墙服务：高速代理翻墙，支持全球28多个国家，4K流媒体秒播，支持奈飞GPT等流媒体</a>。</p><p><strong>2024.6.16号更新</strong>: <a href="/2024/06/16/cloudflare_vless/">不用买服务器，利用 Cloudflare 搭建免费翻墙服务，流畅访问 Youtube、ChatGPT、Netflix</a>。</p><p><strong>2019.10.7号更新</strong>：最近国庆期间，有很多 Justmysocks 不能使用，相应的修复方法见博客最后面：<strong>Just My Socks 服务更新使用说明</strong> 部分，只要修改加密方式，基本就可解决不可用问题，对安卓的代理应用进行了区别说明。</p><p>下面是原始正文：</p><hr><p>大约在 2019年 6月初的时候，<strong>搬瓦工</strong> 的服务大面积被 <strong>GFW</strong> 拦截了，GFW 就是 <em>The Great Fire Wall of China(中国长城防火墙)</em> 简称，因此现在想用谷歌或想访问其他国外服务时受到很大的限制。</p><p>在这之后，我尝试了各种可用的国际相对便宜的 VPS，下面记录了一些我体验的几个服务供应商，最后也给出 <strong>翻墙效果和价格对比</strong> 说明，希望能帮到想用谷歌服务的各位。</p><a id="more"></a><h2 id="搬瓦工"><a href="#搬瓦工" class="headerlink" title="搬瓦工"></a>搬瓦工</h2><p><strong>官网地址</strong>：</p><ul><li>地址1(国外官网，国内要代理)：<a href="https://bandwagonhost.com" target="_blank" rel="noopener">https://bandwagonhost.com</a> </li><li>地址2(国内)：<a href="https://www.bwh8.net/" target="_blank" rel="noopener">https://www.bwh8.net/</a></li><li>地址3(国内)：<a href="https://www.bwh1.net/" target="_blank" rel="noopener">https://www.bwh1.net/</a></li><li>地址4(国内)：<a href="https://bwh88.net" target="_blank" rel="noopener">https://bwh88.net</a></li><li>上面 2，3，4 个地址基本上会有一个可访问，不是所有都能访问的。</li></ul><p><strong>说明</strong>：支持 <strong>支付宝</strong>，某些服务器稳定，我之前帮别人申请的服务没有挂掉，但某些服务器直接就不能用，现在也不能更换 IP 了，因此万一购买后不能用做翻墙了，那就只能作为自己的计算服务器用了或者用作 WEB 服务。</p><p><strong>官网服务截图</strong>：</p><p><img src="https://githubblog.s3.bitiful.net/blog/202411121724323.webp" alt></p><h2 id="Ysscloud"><a href="#Ysscloud" class="headerlink" title="Ysscloud"></a>Ysscloud</h2><p><strong>旧地址</strong>：<a href="https://www.ysscloud.co.uk/" target="_blank" rel="noopener">https://www.ysscloud.co.uk/</a> </p><p><strong>新地址(2019.10.19)</strong>：<a href="https://www.ysscloud.me.uk" target="_blank" rel="noopener">https://www.ysscloud.me.uk</a>  感谢评论区用户的提供</p><p>如果地址还是失效了，大家百度 ysscloud 新地址，我搜到地址 <a href="https://www.ysscloud.org/" target="_blank" rel="noopener">https://www.ysscloud.org/</a> 这个然后自动跳转到登录界面，登录成功后就跳转到主页了。</p><p><strong>说明</strong>：支持 <strong>支付宝</strong>。<strong>总体上是能用</strong>，这个服务直接是后台给你 <strong>Shadowsocks 账号和密码</strong> 了，直接用 <a href="https://jiyiren.github.io/2016/10/06/fanqiang/">Shadowsocks 软件代理</a> 就可以了，不像搬瓦工那样给你服务器地址，通过后台点击安装 Shadowsocks 服务或者自己用命令安装服务。其访问 <a href="https://www.google.com/" target="_blank" rel="noopener">谷歌</a> 还可以，看 <a href="https://www.youtube.com/" target="_blank" rel="noopener">Youtube</a> 则会稍慢（<em>上面感受都是我买了一个最便宜的服务使用的，只是我个人感受，而有的人使用可能也会有速度特别好的情况</em>）。</p><p><strong>官网服务截图</strong>：</p><p><img src="https://githubblog.s3.bitiful.net/blog/202411121724836.webp" alt></p><h2 id="Vultr"><a href="#Vultr" class="headerlink" title="Vultr"></a>Vultr</h2><p><strong>地址</strong>：<a href="https://www.vultr.com/" target="_blank" rel="noopener">https://www.vultr.com/</a></p><p><strong>说明</strong>：支持 <strong>支付宝、微信</strong>。我使用了下，<strong>服务很不稳定</strong>，基本是挂了的状态。这个不是按服务器购买的，而是先充值金额，然后可以选择服务器进行使用，如果感觉此服务器不好用，可以立即删掉，费用只会扣掉你使用的那些时间的钱。因此，这个服务器相当于可以换 IP，但是我前后创建了两个服务，一个在法国、一个在日本，两个服务器需要 <strong>通过命令行安装 Shadowsocks 服务</strong> (这个在我 <a href="https://jiyiren.github.io/2016/10/06/fanqiang/">原来文章</a> 里也有记录)。但两个服务均不能使用。(我消费的是最便宜的两款)</p><p><strong>官网服务截图</strong>:</p><p><img src="https://githubblog.s3.bitiful.net/blog/202411121724922.webp" alt></p><h2 id="Virmach"><a href="#Virmach" class="headerlink" title="Virmach"></a>Virmach</h2><p><strong>地址</strong>：<a href="https://virmach.com/" target="_blank" rel="noopener">https://virmach.com/</a> </p><p><strong>说明</strong>：支持 <strong>支付宝</strong>。这个整体上是可用的，我够买了三个服务器，<strong>1.25$</strong> 和 <strong>2.25$</strong> 的两个服务我都可以使用，访问 <a href="https://www.google.com/" target="_blank" rel="noopener">谷歌</a> 没问题，访问 <a href="https://www.youtube.com/" target="_blank" rel="noopener">Youtube</a> 则较慢，没有 Ysscloud 好。但毕竟这个便宜，每月只需要 10 几块，而 Ysscloud 则是 30 多块。<strong>3$</strong> 的那个服务，我装 Shadowsocks 服务没装上就没弄了。</p><p><strong>官网服务截图</strong>：</p><p><img src="https://githubblog.s3.bitiful.net/blog/202411121724416.webp" alt></p><p><strong>个人购买记录</strong>：</p><p><img src="https://githubblog.s3.bitiful.net/blog/202411121724984.webp" alt></p><h2 id="Just-My-Socks"><a href="#Just-My-Socks" class="headerlink" title="Just My Socks"></a>Just My Socks</h2><p><strong>地址</strong>：</p><ul><li>地址1：<a href="https://justmysocks.net" target="_blank" rel="noopener">https://justmysocks.net</a></li><li>地址2：<a href="https://justmysocks1.net" target="_blank" rel="noopener">https://justmysocks1.net</a></li><li>上面两个地址应该有一个可访问，都不能则百度搜 Just My Socks 地址。</li></ul><p><strong>说明</strong>：支持 <strong>支付宝</strong>。这个是用到的最好的服务，购买直接给账号密码，且速度绝对快，看 <a href="https://www.youtube.com/" target="_blank" rel="noopener">Youtube</a> 1080P 无压力。(<em>个人购买使用体验</em>)</p><p><strong>官网服务截图</strong>：</p><p><img src="https://githubblog.s3.bitiful.net/blog/202411121724763.webp" alt></p><p><strong>个人体验截图</strong>：</p><p><img src="https://githubblog.s3.bitiful.net/blog/202411121724788.webp" alt></p><h2 id="服务对比"><a href="#服务对比" class="headerlink" title="服务对比"></a>服务对比</h2><p>上面服务都是我个人使用记录和体验，每个人购买因为网络位置不一样，因此可能体验有差别，我这里只以自己体验来对比下，希望能给大家一个参考。</p><table><thead><tr><th style="text-align:center">服务商</th><th style="text-align:center">价格</th><th style="text-align:center">流量(每月)</th><th style="text-align:center">手动/自动</th><th style="text-align:center">稳定与速度</th></tr></thead><tbody><tr><td style="text-align:center"><strong>搬瓦工</strong></td><td style="text-align:center">30元/月(年付)</td><td style="text-align:center">1TB</td><td style="text-align:center">手动安装</td><td style="text-align:center">不稳定，被封严重</td></tr><tr><td style="text-align:center"><strong>Ysscloud</strong></td><td style="text-align:center">年为30元/月,季为37元/月,月为41元/月</td><td style="text-align:center">无限流量</td><td style="text-align:center"><strong>自动给多账号</strong></td><td style="text-align:center">稳定，速度较慢👍👍</td></tr><tr><td style="text-align:center"><strong>Vultr</strong></td><td style="text-align:center">17元/月,24元/月,34元/月</td><td style="text-align:center">500GB,500GB,1TB</td><td style="text-align:center">手动安装</td><td style="text-align:center">不稳定，速度无</td></tr><tr><td style="text-align:center"><strong>Virmach</strong></td><td style="text-align:center">7元/月,16元/月,28元/月</td><td style="text-align:center">250GB,500GB,1TB</td><td style="text-align:center">手动安装</td><td style="text-align:center">较稳定，速度慢👍✊</td></tr><tr><td style="text-align:center"><strong>Just My Socks</strong></td><td style="text-align:center">20元/月,41元/月,69元/月</td><td style="text-align:center"><strong>100GB</strong>,500GB,1TB</td><td style="text-align:center"><strong>自动给多账号</strong></td><td style="text-align:center">稳定，速度快👍👍👍</td></tr></tbody></table><p>目前，我还是推荐 <strong>Just My Socks</strong> 的，我是以速度优先的，流量一个月虽然少了点，但是 100GB 感觉也够用了，这个服务大家去网站注册账号，点击。大家可以根据自己的情况选择，或者自己购买价格较低的服务对比试试，选择自己认可的就行了。</p><p>这种服务没有确定的哪个好的，说不定哪天就都被封了，希望大家能利用好自己的资源，赋予自己更好的创造力！</p><h2 id="Just-My-Socks-使用"><a href="#Just-My-Socks-使用" class="headerlink" title="Just My Socks 使用"></a>Just My Socks 使用</h2><p><strong>注册</strong>：自己到官网，注册一个账号。</p><p><strong>购买服务</strong>：注册成功后，点击 <strong>Home</strong> 标签进入到个人主界面。然后选择 <strong>Services -&gt; Order New Services</strong> 出现购买页面，点击 <strong>Order</strong> 即可购买完服务。然后再点击 <strong>Home</strong> 页面再次进入到个人主界面。</p><p><img src="https://githubblog.s3.bitiful.net/blog/202411121725701.webp" alt></p><p><strong>查看账号</strong>：点击上图中 <strong>Your Active Products/Services</strong> 里就是自己购买的服务账号和密码了。 </p><p><img src="https://githubblog.s3.bitiful.net/blog/202411121725949.webp" alt></p><h2 id="Just-My-Socks-服务更新使用说明"><a href="#Just-My-Socks-服务更新使用说明" class="headerlink" title="Just My Socks 服务更新使用说明"></a>Just My Socks 服务更新使用说明</h2><blockquote><p>2019.10.7日更新</p></blockquote><p>最近，由于国庆来临，导致很多 SR 不能使用了，Justmysocks 官网已经给出了解决办法。如下图大红色框中的红背景字。主要意思是说 <strong>aes-256-cfb</strong> 这种加密方式容易被 GFW 识破，并被封掉服务，因此 Justmysocks 使用了另一种加密方法即：<strong>aes-256-gcm</strong>，因此大家购买了 Justmysocks 服务后不能使用的，只要修改下加密方式就行了。</p><p><img src="https://githubblog.s3.bitiful.net/blog/202411121725405.webp" alt></p><p>这里说明下这个 <strong>aes-256-gcm</strong> 加密方法在 <em><a href="https://github.com/shadowsocksr-backup/shadowsocksr-android/releases" target="_blank" rel="noopener">Android shadowsocksR 客户端</a></em> 是没有的，就是那红色的安卓客户端，因此，如果大家用的是 Justmysocks 服务的，需要改用 <em><a href="https://github.com/shadowsocks/shadowsocks-android/releases" target="_blank" rel="noopener">Android shadowsocks 客户端</a></em>，也就是没有 R 的客户端。像 MacOS，Windows 客户端则下载参考链接中最新的版本即可都支持的。</p><ul><li>安卓红色的 shadowsocksR(版本:3.4.0.8) 暂时不支持 <strong>aes-256-gcm</strong>，地址：<a href="https://github.com/shadowsocksr-backup/shadowsocksr-android/releases" target="_blank" rel="noopener">Android shadowsocksR 客户端</a></li><li><p>安卓灰色的 shadowsocks 最新版本已经支持 <strong>aes-256-gcm</strong>，地址：<a href="https://github.com/shadowsocks/shadowsocks-android/releases" target="_blank" rel="noopener">Android shadowsocks 客户端</a> 下载 <strong>shadowsocks–universal-xxx.apk</strong> 这个就行了。</p></li><li><p>如图：<br>  <img src="https://githubblog.s3.bitiful.net/blog/202411121725817.webp" alt></p></li></ul><h2 id="参考"><a href="#参考" class="headerlink" title="参考"></a>参考</h2><ul><li><a href="https://jiyiren.github.io/2016/10/06/fanqiang/">https://jiyiren.github.io/2016/10/06/fanqiang/</a> : 我之前写的教程，里面有工具和命令执行流程；</li><li><a href="https://github.com/shadowsocks/shadowsocks-windows/releases" target="_blank" rel="noopener">windows shadowsocks 客户端</a></li><li><a href="https://github.com/shadowsocks/shadowsocks-android/releases" target="_blank" rel="noopener">Android shadowsocks 客户端</a>：功能最完善，界面有点搓</li><li><a href="https://github.com/shadowsocksr-backup/shadowsocksr-android/releases" target="_blank" rel="noopener">Android shadowsocksR 客户端</a>：<del>我推荐这个，这个图标是粉红色的，并且无广告</del>，由于不支持 aes-256-gcm 暂时不推荐了。</li><li><a href="https://github.com/shadowsocks/ShadowsocksX-NG/releases" target="_blank" rel="noopener">Mac下客户端</a></li><li><em>Ubuntu</em> 客户端 <a href="https://github.com/shadowsocks/shadowsocks-qt5/wiki" target="_blank" rel="noopener">安装指南</a></li></ul>]]></content>
    
    
    <summary type="html">&lt;p align=&quot;center&quot; style=&quot;margin: 30px 0 35px;&quot;&gt;本文不提供翻墙服务，只作为技术交流教程！&lt;/p&gt;

&lt;p&gt;&lt;strong&gt;2025.1.09号更新&lt;/strong&gt;: &lt;a href=&quot;/2025/01/09/fanqianghx/&quot;&gt;最新稳定翻墙服务：高速代理翻墙，支持全球28多个国家，4K流媒体秒播，支持奈飞GPT等流媒体&lt;/a&gt;。&lt;/p&gt;
&lt;p&gt;&lt;strong&gt;2024.6.16号更新&lt;/strong&gt;: &lt;a href=&quot;/2024/06/16/cloudflare_vless/&quot;&gt;不用买服务器，利用 Cloudflare 搭建免费翻墙服务，流畅访问 Youtube、ChatGPT、Netflix&lt;/a&gt;。&lt;/p&gt;
&lt;p&gt;&lt;strong&gt;2019.10.7号更新&lt;/strong&gt;：最近国庆期间，有很多 Justmysocks 不能使用，相应的修复方法见博客最后面：&lt;strong&gt;Just My Socks 服务更新使用说明&lt;/strong&gt; 部分，只要修改加密方式，基本就可解决不可用问题，对安卓的代理应用进行了区别说明。&lt;/p&gt;
&lt;p&gt;下面是原始正文：&lt;/p&gt;
&lt;hr&gt;
&lt;p&gt;大约在 2019年 6月初的时候，&lt;strong&gt;搬瓦工&lt;/strong&gt; 的服务大面积被 &lt;strong&gt;GFW&lt;/strong&gt; 拦截了，GFW 就是 &lt;em&gt;The Great Fire Wall of China(中国长城防火墙)&lt;/em&gt; 简称，因此现在想用谷歌或想访问其他国外服务时受到很大的限制。&lt;/p&gt;
&lt;p&gt;在这之后，我尝试了各种可用的国际相对便宜的 VPS，下面记录了一些我体验的几个服务供应商，最后也给出 &lt;strong&gt;翻墙效果和价格对比&lt;/strong&gt; 说明，希望能帮到想用谷歌服务的各位。&lt;/p&gt;</summary>


    <category term="翻墙" scheme="https://jiyiren.github.io/categories/翻墙/"/>
    
    
    <category term="翻墙" scheme="https://jiyiren.github.io/tags/翻墙/"/>
    
    <category term="Shadowsocks" scheme="https://jiyiren.github.io/tags/Shadowsocks/"/>
    
    <category term="Justmysocks" scheme="https://jiyiren.github.io/tags/Justmysocks/"/>
    
  </entry>
  
  <entry>
    <title>一份 LaTeX 报告形式模板</title>
    <link href="https://jiyiren.github.io/2018/12/13/report_paper/"/>
    <id>https://jiyiren.github.io/2018/12/13/report_paper/</id>
    <published>2018-12-13T02:07:25.000Z</published>
    <updated>2018-12-13T03:10:48.370Z</updated>
    
    <content type="html"><![CDATA[<p align="center" style="margin: 30px 0 35px;">A LaTeX Template for Report, With Supporting Chinese Language</p><p><img src="http://img.godjiyi.cn/jy_hothit.jpg" alt></p><p><strong>项目源码地址</strong>：<a href="https://github.com/jiyiren/ReportPaper" target="_blank" rel="noopener">https://github.com/jiyiren/ReportPaper</a></p><p><strong>文档预览地址</strong>：<a href="http://img.godjiyi.cn/report_paper.pdf" target="_blank" rel="noopener">http://img.godjiyi.cn/report_paper.pdf</a></p><a id="more"></a><h2 id="环境"><a href="#环境" class="headerlink" title="环境"></a>环境</h2><p>需要先安装 LaTeX 环境，而支持中文的 LaTeX 为 <a href="http://www.ctex.org/HomePage" target="_blank" rel="noopener">CTeX</a>，CTeX 也只是一种标准定义，其通常分为两个发行版：</p><ul><li>TeXLive: <a href="http://tug.org/texlive/" target="_blank" rel="noopener">http://tug.org/texlive/</a> </li><li>MiKTeX: <a href="https://miktex.org/" target="_blank" rel="noopener">https://miktex.org/</a></li></ul><p>两个发行版都是全平台支持的，很多人会将 <a href="http://tug.org/mactex/" target="_blank" rel="noopener">MacTex</a> 也作为一种发行版，但我喜欢将其归类于 TeXLive 发行版中，这看自己的意愿。</p><p>因此，环境的话大家可以自行选择，这里为使用 TeXLive，下面为安装包地址，大概有 3 GB 左右：</p><ul><li>MacOS: <a href="http://tug.org/mactex/" target="_blank" rel="noopener">MacTex</a></li><li>Windows: <a href="http://mirrors.hust.edu.cn/CTAN/systems/texlive/Images/" target="_blank" rel="noopener">TeXLive.iso</a></li></ul><p>安装后将命令加入环境变量，并使之生效，通过 <code>which latex</code> 可查看是否设置成功：</p><div class="highlight-wrap"autocomplete="off" autocorrect="off" autocapitalize="off" spellcheck="false" contenteditable="true"data-rel="BASH"><figure class="iseeu highlight /bash"><table><tr><td class="gutter"><pre><span class="line">1</span><br><span class="line">2</span><br></pre></td><td class="code"><pre><span class="line">$ <span class="built_in">which</span> latex</span><br><span class="line">/usr/<span class="built_in">local</span>/texlive/2018/bin/x86_64-darwin/latex</span><br></pre></td></tr></table></figure></div><h2 id="IDE"><a href="#IDE" class="headerlink" title="IDE"></a>IDE</h2><p>LaTeX 实际上如果 Java 语言一样，都需要先配置环境，然后选择一款自己喜欢的 IDE 进行编写“代码”。</p><p>当然所有文本编辑器都可以编写 LaTeX 或者 Java 等其他语言“代码”。这里的 IDE 指集成了一些语言本地化的功能，比如编译、特殊符号等等。</p><p>LaTeX 的发行版中会自带一款编辑器，用 TexLive 的话，MacOS 上会有个叫 <strong>TexShop</strong> 的编辑器，而 Windows 上则会是一个叫 <strong>TexWorker</strong> 的编辑器，这些是都可以胜任编写工作的。</p><p>另外，对于第三的 LaTeX 编辑器，笔者也用的不多，这里我推荐两个：</p><ul><li>TeXMaker: <a href="http://www.xm1math.net/texmaker/" target="_blank" rel="noopener">http://www.xm1math.net/texmaker/</a>, 全平台，免费，强烈推荐；</li><li>TeXStudio: <a href="http://texstudio.sourceforge.net/" target="_blank" rel="noopener">http://texstudio.sourceforge.net/</a> , 全平台，免费，推荐；</li><li>WinEdt: <a href="http://www.winedt.com/index.html" target="_blank" rel="noopener">http://www.winedt.com/index.html</a> , 只支持 Windows，收费，自己选；</li></ul><p>我个人推荐前两个，因为第三个收费且不跨平台，之所以写上第三个，主要是因为网络上很多博客或用户都推荐用第三个，这个我使用时也感觉不错，但每次我使用都得到 Windows 上使用，比较麻烦。当然，如果你使用 Windows 且有钱，WinEdt 确实使用体验和功能都是比较好的。</p><h2 id="使用"><a href="#使用" class="headerlink" title="使用"></a>使用</h2><p>上面两点都讲了没实际作用的环境配置，对于使用本项目实际上很简单：</p><ul><li><p>使用 XeLaTeX 编译：</p>  <div class="highlight-wrap"autocomplete="off" autocorrect="off" autocapitalize="off" spellcheck="false" contenteditable="true"data-rel="BASH"><figure class="iseeu highlight /bash"><table><tr><td class="gutter"><pre><span class="line">1</span><br></pre></td><td class="code"><pre><span class="line">xelatex report_paper.tex</span><br></pre></td></tr></table></figure></div></li><li><p>用 BiBTeX 再次编译生成的 <code>report_paper.aux</code> 文件：</p>  <div class="highlight-wrap"autocomplete="off" autocorrect="off" autocapitalize="off" spellcheck="false" contenteditable="true"data-rel="BASH"><figure class="iseeu highlight /bash"><table><tr><td class="gutter"><pre><span class="line">1</span><br></pre></td><td class="code"><pre><span class="line">bibtex report_paper.aux</span><br></pre></td></tr></table></figure></div></li><li><p>之后再次用 XeLaTeX 编译：</p>  <div class="highlight-wrap"autocomplete="off" autocorrect="off" autocapitalize="off" spellcheck="false" contenteditable="true"data-rel="BASH"><figure class="iseeu highlight /bash"><table><tr><td class="gutter"><pre><span class="line">1</span><br></pre></td><td class="code"><pre><span class="line">xelatex report_paper.tex</span><br></pre></td></tr></table></figure></div></li></ul><p>这时候生成的 <code>pdf</code> 文件是最全和完整的文档。</p><p>上面是命令行编译的，大家若使用 IDE 则是比较简单的操作：</p><ul><li>编译选择 XeLaTeX 编译一次；</li><li>再选择 BiBTeX 编译一次；</li><li>再选择 XeLaTeX 编译一次；</li></ul><p>这时产生的 <code>pdf</code> 和上面一致；通过编辑器形式不用自己指定文件名，因此更简单方便。</p><p>最终生成的 pdf 文档示例：</p><ul><li>github: <a href="https://github.com/jiyiren/ReportPaper/blob/master/report_paper.pdf" target="_blank" rel="noopener">report_paper.pdf</a></li><li>七牛：<a href="http://img.godjiyi.cn/report_paper.pdf" target="_blank" rel="noopener">report_paper.pdf</a></li></ul><h2 id="参考"><a href="#参考" class="headerlink" title="参考"></a>参考</h2><ul><li><a href="http://www.ctex.org/HomePage" target="_blank" rel="noopener">CTeX</a></li><li><a href="http://tug.org/texlive/" target="_blank" rel="noopener">TexLive</a></li><li><a href="https://miktex.org/" target="_blank" rel="noopener">MiKTeX</a></li><li><a href="http://www.tug.org/mactex/index.html" target="_blank" rel="noopener">MacTeX</a></li><li><a href="http://www.xm1math.net/texmaker/index.html" target="_blank" rel="noopener">TexMaker(全平台支持编辑器)</a></li><li><a href="http://texstudio.sourceforge.net/" target="_blank" rel="noopener">TeXstudio(全平台支持编辑器)</a></li></ul>]]></content>
    
    
    <summary type="html">&lt;p align=&quot;center&quot; style=&quot;margin: 30px 0 35px;&quot;&gt;A LaTeX Template for Report, With Supporting Chinese Language&lt;/p&gt;


&lt;p&gt;&lt;img src=&quot;http://img.godjiyi.cn/jy_hothit.jpg&quot; alt&gt;&lt;/p&gt;
&lt;p&gt;&lt;strong&gt;项目源码地址&lt;/strong&gt;：&lt;a href=&quot;https://github.com/jiyiren/ReportPaper&quot; target=&quot;_blank&quot; rel=&quot;noopener&quot;&gt;https://github.com/jiyiren/ReportPaper&lt;/a&gt;&lt;/p&gt;
&lt;p&gt;&lt;strong&gt;文档预览地址&lt;/strong&gt;：&lt;a href=&quot;http://img.godjiyi.cn/report_paper.pdf&quot; target=&quot;_blank&quot; rel=&quot;noopener&quot;&gt;http://img.godjiyi.cn/report_paper.pdf&lt;/a&gt;&lt;/p&gt;</summary>


    <category term="LaTeX" scheme="https://jiyiren.github.io/categories/LaTeX/"/>
    
    
    <category term="report" scheme="https://jiyiren.github.io/tags/report/"/>
    
    <category term="latex" scheme="https://jiyiren.github.io/tags/latex/"/>
    
  </entry>
  
  <entry>
    <title>Kafka</title>
    <link href="https://jiyiren.github.io/2018/08/04/kafka/"/>
    <id>https://jiyiren.github.io/2018/08/04/kafka/</id>
    <published>2018-08-04T04:07:25.000Z</published>
    <updated>2018-09-18T12:32:32.190Z</updated>
    
    <content type="html"><![CDATA[<p align="center" style="margin: 30px 0 35px;">分布式消息系统，解耦模块的桥梁</p><p><strong><a href="http://kafka.apache.org/" target="_blank" rel="noopener">Kafka</a></strong> 是一个基于 <strong>发布-订阅</strong> 的分布式消息系统，主要面向于大数据应用场景。它最初由 <em>LinkedIn</em> 公司开发，之后成为 <em>Apache</em> 项目的一部分。<strong>Kafka</strong> 是一种快速、可扩展、本身就专注于分布式的、实时消息流系统。<strong>Kafka</strong> 在2010 年正式向 <em>Apache</em> 社区开源，目前社区活跃。目前在互联网公司使用非常广泛，已经成为大数据分析的基础服务。</p><a id="more"></a><h2 id="应用场景"><a href="#应用场景" class="headerlink" title="应用场景"></a>应用场景</h2><p>Kafka 是众多消息系统中的一种实现方式，那我们为什么需要用到 <strong>消息系统</strong> ？这里我列出以下几种在业务中常常碰到的场景，分别从 <strong>系统架构视角</strong>、<strong>消息传播视角</strong>、<strong>消息处理视角</strong>、<strong>自身系统结构视角</strong> 共四个角度的应用场景来说明：</p><!-- more --><h3 id="模块解耦"><a href="#模块解耦" class="headerlink" title="模块解耦"></a>模块解耦</h3><blockquote><p>从系统架构视角看</p></blockquote><p>这个我想是最明显的一点了，在业务系统上通常会存在一些系统产生数据，一些系统消费数据，这实际上就是 <strong>生产者–消费者</strong> 模式。这里的解耦是什么意思呢？我把消息系统独立出来了，那我的消息系统则会依赖生产者系统，消费系统则会依赖消息系统，不是多出了两个依赖，何为 <strong>解耦</strong> 呢？</p><p>这里的解耦实际上是解耦 <strong>不等速率依赖</strong> (这个名词是我造的，纯属个人观点)。也就是说生产者系统和消费者系统之间会有 <em>生产和消费速度不一致</em> 而导致消息丢失的情况。而消息系统与生产者系统、消息系统与消费者系统之间则没有这种情况，即使有也不会造成消息丢失(只会暂存下来)。因此，破除了生产者系统和消费者系统的依赖关系就叫 <strong>解耦</strong>，而消息系统正是为此而生。</p><h3 id="异步通信-缓冲队列"><a href="#异步通信-缓冲队列" class="headerlink" title="异步通信/缓冲队列"></a>异步通信/缓冲队列</h3><blockquote><p>从消息传播视角看</p></blockquote><p>很多时候，或并发达到一定量级的时候，系统是不能完全提供 <strong>实时消息</strong> 处理的能力的。这时不能立即处理的消息我们必须把这些请求放入 <strong>缓冲队列</strong> 中以等待处理。这种场景在一个公司中可能会有多种业务都会涉及到，因此，领先者们自然想到可以将缓冲队列设计成一个独立的平台，以满足各种业务的接入，从而，<strong>消息系统作为缓冲异步队列轰然降临</strong>。</p><p>这里我使用的是 <strong>缓冲</strong> 队列而非 <strong>缓存</strong> 队列，主要是因为通常我们所说的缓存都是基于内存的，而 <strong>缓冲</strong> 则更普遍一点，你可以让它基于内存，也可以让它基于 <strong>硬盘</strong> 的。通常消息系统基本上都是基于硬盘存储的，包括 Kafka 其也是持久化到硬盘的。</p><p>那 <strong>缓冲队列</strong> 与我们的 <strong>Redis/Memcached 缓存</strong> 或者 <strong>DB 数据库</strong> 有什么区别呢，为什么不用 Redis/Memcached 或者 DB 实现 <strong>缓冲</strong> 功能呢？</p><p>这里我也大概谈下自己的看法：</p><ol><li>先说 <em>基于内存的缓存</em> 吧，缓存的出现都是为了用昂贵的内存代价换来性能上的提升的，缓存通常是暂存那些常被访问的数据以提升较好的用户体验而设计，我们的 <strong>消息系统</strong> 并不是为了 <strong>快</strong>，而是为了 <strong>数据完整性，不丢失</strong> 而作的缓冲设计。因此，我们无需用如此昂贵的内存来作为消息系统的存储介质。另外一点就是缓冲的队列有可能会很大，达到<strong>千万甚至更多级别</strong>，这样如果用内存，那么代价就更昂贵了。</li><li>再说 <em>DB 数据库</em>，上面讲了内存昂贵，那我用数据库总可以了吧！那我们还是先想想数据库的原生作用：数据库是为持久化，通常是恒久的持久化而生的，也就是数据存下去，基本就不用变了，只会少量的修改删除。我们再想想缓冲队列，它是为 <strong>临时存储</strong> 而生的。用持久化的数据库来存临时数据，那会造成频繁的增删操作，势必会给数据库带来极大的性能消耗。</li><li>总结下，缓冲队列目标是：<strong>数据完整性</strong> (而非存读的快速性，不是缓存)，<strong>临时存储能力</strong> (而非恒久持久性，不是数据库)。</li></ol><h3 id="数据一致性保障"><a href="#数据一致性保障" class="headerlink" title="数据一致性保障"></a>数据一致性保障</h3><blockquote><p>从消息处理视角看</p></blockquote><p>有些情况下，我们将数据提交给某个系统处理，有可能那个系统突然崩溃了，那传给它的数据就都覆灭了，这可是企业不能容忍的！因此，我们可以利用消息系统，作为临时备份处，将消息同时发送给消息系统以及那个处理系统，当处理系统处理成功后，发送确认操作让消息系统删除那条消息，也就是采用 “<strong>插入-获取-删除</strong>“ 范式。这样，假如处理系统崩溃，那数据仍然在消息队里中，重启处理系统就可以了。</p><p>这里，我们都是假设消息系统很可靠，比处理系统更可靠！为什么有这个依据呢？这实际上也是消息系统的另一大特性，就是可扩展性强，部分组件失效可容忍。</p><h3 id="可扩展性强，部分组件失效可容忍"><a href="#可扩展性强，部分组件失效可容忍" class="headerlink" title="可扩展性强，部分组件失效可容忍"></a>可扩展性强，部分组件失效可容忍</h3><blockquote><p>从自身结构视角看</p></blockquote><p>这部分的内容我们在后面几节进行说明。</p><h2 id="消息模式"><a href="#消息模式" class="headerlink" title="消息模式"></a>消息模式</h2><p>消息模式就是消息系统实现时需要考虑的业务场景中的不同情况。由于生产者(系统)和消费者(系统)都可能是多个，那么就会产生一些微妙的不同。这里我们只考虑它们都处理相同的消息。对于多个生产者而言，消息系统就是不断接受消息的一个存储域，因此没有什么不同。而对于多个消费者而言就会有两种情况了：</p><ol><li>一个消息只给一个消费者消费：这个是最常见的情况了，一个消息无法被重复消费的，因此这种情况对应到消息模式就是 <strong>点对点模式或者叫队列模式</strong>。</li><li>一个消息可以给多个消费者消费：这个情况类比订阅付费服务，比如我是一家报社，有很多人订阅了我的报纸，只要我这边有新报纸刊登，我就需要把这些新报纸寄送给每一个订阅的人。因此这种情况对应到消息模式就叫 <strong>发布/订阅模式</strong>。</li></ol><p>以上两种模式就是消息模式最常见的两种，所有的消息系统的实现都会考虑这两种模式的，因此大家在学习一个新的消息系统的时候就可以考虑这个消息系统 <strong>如何实现者两种情况的</strong>。对于 Kafka 我们会在下面讲到其对应的两种模式。</p><h2 id="平台对比"><a href="#平台对比" class="headerlink" title="平台对比"></a>平台对比</h2><p>消息系统目前最有名气的大概有四个：<strong>ActiveMQ</strong>、<strong>RabbitMQ</strong>、<strong>Kafka</strong>、<strong>RocketMQ</strong>. 它们的对比网上也应该有很多了，我就不一一列举了。</p><p>这里我将我之前做过的 PPT 拿过来放这里作下对比，我简单说明下：</p><ul><li>下图各个消息系统从左到右，支持的消息量级越来越大，<strong>ActiveMQ</strong> 最小，<strong>RocketMQ</strong> 最大；</li><li><strong>ActiveMQ、RabbitMQ</strong> 稳定性是相对较好的，<strong>RabbitMQ</strong> 稳定性更好同时数据安全性最高，如果对实时性、数据不允许丢失要求高时，可以用 <strong>RabbitMQ</strong>；</li><li><strong>RocketMQ</strong> 是阿里开源的，其处理量是最高的，但是生态比较少，因此若使用过程中出现问题，你只能找原开发者或维护者了；</li><li><strong>Kafka</strong> 是目前生态链最广、社区最活跃的消息系统了。但是其会存在消息丢失情况，通常应用在分布式日志消息处理等这些对消息丢失可容忍性的场景。目前，大数据已成主流的今天，<em>Kafka 也逐渐成为使用的主流消息系统</em>，因为大数据对消息丢失一般都是可容忍的，比如训练集中丢了几条数据等等，都是无相关的。而对于 <strong>支付、会员</strong> 等这些消息则不推荐用 Kafka ，可转用其他 MQ 系统。</li></ul><p><img src="img.godjiyi.cn/csdnblogdistribute_msg.jpg" alt></p><h2 id="宏观结构"><a href="#宏观结构" class="headerlink" title="宏观结构"></a>宏观结构</h2><p>下图是 Kafka 消息系统的 <strong>分布式宏观架构图</strong>，这里分别讲下各个组件的作用及其关系：</p><ol><li><em>Producer</em>: 数据的生产客户端，生产数据发送到 <strong>Kafka Cluster</strong>；</li><li><em>Zookeeper</em>: 负责整体集群的协调工作，保存 <strong>Broker</strong> 与 <strong>Consumer</strong> 交互的元信息，并进行数据变更监控；</li><li><em>Broker</em>: <strong>Broker</strong> 实际上就是单台服务器，其主要接收 <strong>Producer</strong> 和 <strong>Consumer</strong> 请求，持久化<strong>Message</strong>，其中会通过选举产生一个 <strong>Controller</strong>，来主持协调工作；</li><li><em>Kafka Cluster</em>: 由多个 <strong>Borker</strong> 和一套 <strong>Zookeeper</strong> 组成，<strong>Broker</strong> 之间无主从关系，地位平等，可任意增删节点，这主要由 <strong>Zookeeper</strong> 维护；</li><li><em>Consumer</em>: 数据的消费客户端，用于从 <strong>Broker</strong> 中订阅/拉取消息；</li></ol><p><img src="http://img.godjiyi.cn/csdnblog20180805003823.png" alt></p><h2 id="微观设计"><a href="#微观设计" class="headerlink" title="微观设计"></a>微观设计</h2><p>Kafka <strong>内部消息传递流程</strong> 如下图所示：</p><p><img src="http://img.godjiyi.cn/csdnblogkafka-arc.jpg" alt></p><h3 id="Topic"><a href="#Topic" class="headerlink" title="Topic"></a>Topic</h3><p>一个 <strong>消息主题</strong>，也就是一个分布式业务消息队列。不同的生产者将不同的业务消息分发到不同的 <strong>topic</strong> 上，这样，消费者就可以根据 <strong>topic</strong> 进行对应的业务消息消费了。</p><h3 id="Partition"><a href="#Partition" class="headerlink" title="Partition"></a>Partition</h3><p>这个就是 topic 分布式的体现，由于一个 topic 就是一个业务消息，这些消息可能会源源不断来，并且有可能会同时并发很大地进入队列，将这些消息合理地分布在分布式机器中则可以保证机器的负载均衡性，同时也可以使得不同的消费者可以同时拉取不同 partition 中的消息，可提升消费者并发性能，这里总结下 <strong>partition</strong> 特性：</p><ul><li>一个 <strong>topic</strong> 分成多个 <strong>partion</strong>；</li><li>多个 <strong>producer</strong> 生产消息可以并行入队，多个 <strong>Consumer</strong> 可并行消费；</li><li>同一个 <strong>partition</strong> 里保证消息有序, 不同 <strong>partition</strong> 则不能完全保证有序；</li></ul><h3 id="Consumer-Group"><a href="#Consumer-Group" class="headerlink" title="Consumer Group"></a>Consumer Group</h3><p>消费者组应该是 Kafka 最大的特色了，消费者组就是消费者组成的一个组，消费者在向 Kafka 拉取数据的时候需要提供一个组名，这个名称就是消费者组名，上面的两种消息模式都可以在消费者组中得到实现：</p><ol><li><em>点对点/队列模式</em>：一个消息只能被一个消费者消费，我们只需要将这些消费者放在同一个消费者组里就可以了，这样消费者在同一个组中，那么 topic 中的一条消息只会向一个消费者组发送一次；</li><li><em>发布-订阅模式</em>：一个消息可被多个消费者消费，这种情况，我们只需要将各个消费者放在各自单独的组中，各个组均订阅了此消息 topic 就可以了。</li></ol><p>这里还有如下注意点：</p><ul><li>一个消费组消费一个 <strong>topic</strong> 的全量数据；</li><li>组内消费者消费一个或多个 <strong>partition</strong> 数据，如果一个组里的消费者数量少于订阅的 topic 的 partition 数量，那么组中必有一个消费者要消费多个 partion 数据；</li><li>一个组里的消费者应小于等于 <strong>topic</strong> 的 <strong>partition</strong> 数量，这是因为一个 partition 最多只能与一个 consumer 连接，那么如果 partition 数量大于 consumer 数量，则必定有 consumer 是空闲的，因此尽量避免这种情况；</li></ul><h2 id="相关链接"><a href="#相关链接" class="headerlink" title="相关链接"></a>相关链接</h2><ul><li><a href="http://opentsdb.net/docs/build/html/index.html" target="_blank" rel="noopener">http://opentsdb.net/docs/build/html/index.html</a></li><li><a href="http://liubin.org/blog/2016/03/05/tsdb-opentsdb/" target="_blank" rel="noopener">http://liubin.org/blog/2016/03/05/tsdb-opentsdb/</a></li><li><a href="https://www.jianshu.com/p/0bafd0168647" target="_blank" rel="noopener">https://www.jianshu.com/p/0bafd0168647</a></li><li><a href="http://www.nosqlnotes.com/technotes/opentsdb-tabledesign/" target="_blank" rel="noopener">http://www.nosqlnotes.com/technotes/opentsdb-tabledesign/</a></li></ul>]]></content>
    
    
    <summary type="html">&lt;p align=&quot;center&quot; style=&quot;margin: 30px 0 35px;&quot;&gt;分布式消息系统，解耦模块的桥梁&lt;/p&gt;

&lt;p&gt;&lt;strong&gt;&lt;a href=&quot;http://kafka.apache.org/&quot; target=&quot;_blank&quot; rel=&quot;noopener&quot;&gt;Kafka&lt;/a&gt;&lt;/strong&gt; 是一个基于 &lt;strong&gt;发布-订阅&lt;/strong&gt; 的分布式消息系统，主要面向于大数据应用场景。它最初由 &lt;em&gt;LinkedIn&lt;/em&gt; 公司开发，之后成为 &lt;em&gt;Apache&lt;/em&gt; 项目的一部分。&lt;strong&gt;Kafka&lt;/strong&gt; 是一种快速、可扩展、本身就专注于分布式的、实时消息流系统。&lt;strong&gt;Kafka&lt;/strong&gt; 在2010 年正式向 &lt;em&gt;Apache&lt;/em&gt; 社区开源，目前社区活跃。目前在互联网公司使用非常广泛，已经成为大数据分析的基础服务。&lt;/p&gt;</summary>


    <category term="Kafka" scheme="https://jiyiren.github.io/categories/Kafka/"/>
    
    
    <category term="Kafka" scheme="https://jiyiren.github.io/tags/Kafka/"/>
    
    <category term="Message" scheme="https://jiyiren.github.io/tags/Message/"/>
    
  </entry>
  
  <entry>
    <title>OpenTSDB 存储结构</title>
    <link href="https://jiyiren.github.io/2018/07/03/opentsdb-store/"/>
    <id>https://jiyiren.github.io/2018/07/03/opentsdb-store/</id>
    <published>2018-07-03T04:07:25.000Z</published>
    <updated>2018-09-18T12:32:49.400Z</updated>
    
    <content type="html"><![CDATA[<p align="center" style="margin: 30px 0 35px;">时序处理数据库，更快的存储和聚合</p><p><strong>OpenTSDB</strong> 是为存储时序数据而设计的，它基于 <strong>HBase</strong> 存储数据，充分发挥了 <strong>HBase</strong> 的分布式列存储特性，支持数百万每秒的读写，支持千万数目的 <strong>Metric</strong>，它的特点就是容易扩展，具有灵活的 <em>Tag</em> 机制。其主要用途，就是做监控系统，譬如收集大规模集群（ 包括网络设备、操作系统、应用程序 ）的 <strong>监控数据</strong> 并进行存储和聚合查询，在目前的 <strong>IoT</strong> 方面具有很大的应用价值。</p><a id="more"></a><h2 id="Hbase-Schema"><a href="#Hbase-Schema" class="headerlink" title="Hbase Schema"></a>Hbase Schema</h2><p><strong>OpenTSDB</strong> 是基于 <strong>Hbase</strong> 存储系统的，主要利用了 Hbase <strong>数据自动排序</strong> 以及 <strong>可靠的分布式特性</strong>。 <strong>OpenTSDB</strong> 在安装启动时，默认在 <strong>Hbase</strong> 里面创建 <strong>四张</strong> 表。分别为：</p><ol><li><em>tsdb</em>: 存储数据点表，也就是存储实际的时序数据，绝大部分的数据是存在这个表中；</li><li><em>tsdb-uid</em>: 存储 <strong>name</strong> 和 <strong>uid</strong> 的映射关系，也就是给字符串的键、值映射成数值，通常包括 <strong>metric</strong>、<strong>tagk</strong>、<strong>tagv</strong> 等字符串映射。</li><li><em>tsdb-meta</em>: 元数据表，这个只有通过配置文件开启才会存储数据的，默认不开启。如果开启了存储的就是你传过来的<strong>完整的 json 格式数据</strong>，没有经过解析的，这就是元数据。</li><li><em>tsdb-tree</em>: 树形表，这个也是只有开启配置文件选项才能使用，开启后可以由自己创建和管理自己的树形 <strong>metric</strong> 结构，需要自己设计管理的。</li></ol><p>下面主要说明下 <em>tsdb</em> 和 <em>tsdb-uid</em> 的表结构。</p><h2 id="UID-Table-Schema"><a href="#UID-Table-Schema" class="headerlink" title="UID Table Schema"></a>UID Table Schema</h2><p>这里我们主要分析下 OpenTSDB 存储 <strong>UID</strong> 的表 – <strong>tsdb-uid</strong>。</p><p>首先，看下 <em>tsdb-uid</em> 的表结构。其存储的是字符串到 <strong>UID</strong> 的映射关系。</p><p>我们可以通过 <code>hbase shell</code> 通过 <strong>Hbase</strong> 访问数据库入口查看小 <em>tsdb-uid</em> 的表结构：</p><div class="highlight-wrap"autocomplete="off" autocorrect="off" autocapitalize="off" spellcheck="false" contenteditable="true"data-rel="BASH"><figure class="iseeu highlight /bash"><table><tr><td class="gutter"><pre><span class="line">1</span><br><span class="line">2</span><br><span class="line">3</span><br><span class="line">4</span><br><span class="line">5</span><br><span class="line">6</span><br><span class="line">7</span><br><span class="line">8</span><br></pre></td><td class="code"><pre><span class="line">list <span class="string">'tsdb-uid'</span></span><br><span class="line"><span class="comment"># == 结果如下 ==</span></span><br><span class="line">Table tsdb-uid is ENABLED                                                                                                                                     </span><br><span class="line">tsdb-uid                                                                                                                                                      </span><br><span class="line">COLUMN FAMILIES DESCRIPTION                                                                                                                                   </span><br><span class="line">&#123;NAME =&gt; <span class="string">'id'</span>, BLOOMFILTER =&gt; <span class="string">'ROW'</span>, VERSIONS =&gt; <span class="string">'1'</span>,... &#125;                                               </span><br><span class="line">&#123;NAME =&gt; <span class="string">'name'</span>, BLOOMFILTER =&gt; <span class="string">'ROW'</span>, VERSIONS =&gt; <span class="string">'1'</span>,... &#125;                                             </span><br><span class="line">2 row(s) <span class="keyword">in</span> 0.0360 seconds</span><br></pre></td></tr></table></figure></div><p>上面结果我只列出了少量信息，主要看 <em>NAME</em> 就可以了，表示该表的 <strong>Column Family</strong>, 分别为 <em>name</em> 列族和 <em>id</em> 列族。那具体怎么将字符串映射为 <strong>UID</strong> ? 这里就需要通过实际的例子来说明。</p><p>我们先上传一个数据，格式内容如下，可以通过 <strong>Postman</strong> 进行上传测试，<strong>OpenTSDB</strong> 默认上传地址为 <code>http://ip:4242/api/put?details</code>，后缀 <em>details</em> 是为了查看上传反馈。</p><div class="highlight-wrap"autocomplete="off" autocorrect="off" autocapitalize="off" spellcheck="false" contenteditable="true"data-rel="JSON"><figure class="iseeu highlight /json"><table><tr><td class="gutter"><pre><span class="line">1</span><br><span class="line">2</span><br><span class="line">3</span><br><span class="line">4</span><br><span class="line">5</span><br><span class="line">6</span><br><span class="line">7</span><br><span class="line">8</span><br><span class="line">9</span><br><span class="line">10</span><br><span class="line">11</span><br></pre></td><td class="code"><pre><span class="line">[</span><br><span class="line">    &#123;</span><br><span class="line">        <span class="attr">"metric"</span>: <span class="string">"sys.test.metric"</span>,</span><br><span class="line">        <span class="attr">"timestamp"</span>: <span class="number">1528784369</span>,</span><br><span class="line">        <span class="attr">"value"</span>: <span class="number">10</span>,</span><br><span class="line">        <span class="attr">"tags"</span>: &#123;</span><br><span class="line">           <span class="attr">"hostname"</span>: <span class="string">"jiyiren"</span>,</span><br><span class="line">           <span class="attr">"area"</span>: <span class="string">"shanghai"</span></span><br><span class="line">        &#125;</span><br><span class="line">    &#125;</span><br><span class="line">]</span><br></pre></td></tr></table></figure></div><p>上传成功后返回：</p><div class="highlight-wrap"autocomplete="off" autocorrect="off" autocapitalize="off" spellcheck="false" contenteditable="true"data-rel="JSON"><figure class="iseeu highlight /json"><table><tr><td class="gutter"><pre><span class="line">1</span><br><span class="line">2</span><br><span class="line">3</span><br><span class="line">4</span><br><span class="line">5</span><br></pre></td><td class="code"><pre><span class="line">&#123;</span><br><span class="line">    <span class="attr">"success"</span>: <span class="number">1</span>,</span><br><span class="line">    <span class="attr">"failed"</span>: <span class="number">0</span>,</span><br><span class="line">    <span class="attr">"errors"</span>: []</span><br><span class="line">&#125;</span><br></pre></td></tr></table></figure></div><p>我们先看下我们上传的数据格式，需要进行映射的字符串是对应 <code>metric</code>, <code>tagkey</code>, <code>tagvalue</code> 的，这里 <code>tag</code> 有两组，所以要映射的有 5 个字符串，分别为： <em>sys.test.metric</em>, <em>hostname</em>, <em>jiyiren</em>, <em>area</em>, <em>shanghai</em>.</p><p>那我们就再用 <strong>Hbase Shell</strong> 查看表内容：</p><div class="highlight-wrap"autocomplete="off" autocorrect="off" autocapitalize="off" spellcheck="false" contenteditable="true"data-rel="BASH"><figure class="iseeu highlight /bash"><table><tr><td class="gutter"><pre><span class="line">1</span><br><span class="line">2</span><br><span class="line">3</span><br><span class="line">4</span><br><span class="line">5</span><br><span class="line">6</span><br><span class="line">7</span><br><span class="line">8</span><br><span class="line">9</span><br><span class="line">10</span><br><span class="line">11</span><br><span class="line">12</span><br><span class="line">13</span><br></pre></td><td class="code"><pre><span class="line">scan <span class="string">'tsdb-uid'</span></span><br><span class="line"><span class="comment"># === 结果如下 ===</span></span><br><span class="line">ROW                                      COLUMN+CELL </span><br><span class="line">\x00\x00\x01  column=name:metrics, timestamp=1528517476774, value=sys.test.metric</span><br><span class="line">\x00\x00\x01  column=name:tagk, timestamp=1528517476790, value=area </span><br><span class="line">\x00\x00\x01  column=name:tagv, timestamp=1528517476803, value=shanghai</span><br><span class="line">\x00\x00\x02  column=name:tagk, timestamp=1528517476816, value=hostname                                              </span><br><span class="line">\x00\x00\x02  column=name:tagv, timestamp=1528517476830, value=jiyiren </span><br><span class="line">area      column=id:tagk, timestamp=1528517476793, value=\x00\x00\x01</span><br><span class="line">hostname  column=id:tagk, timestamp=1528517476819, value=\x00\x00\x02</span><br><span class="line">jiyiren   column=id:tagv, timestamp=1528517476832, value=\x00\x00\x02</span><br><span class="line">shanghai  column=id:tagv, timestamp=1528517476806, value=\x00\x00\x01</span><br><span class="line">sys.test.metric column=id:metrics, timestamp=1528517476778, value=\x00\x00\x01</span><br></pre></td></tr></table></figure></div><p>从中我们可以看到，数据总是成对出现的，包括 <strong>UID 映射字符串</strong> 和 <strong>字符串映射 UID</strong>。上面 5 组是 <strong>UID</strong> 映射成字符串，下面 5 组是字符串映射为 <strong>UID</strong>. 前面已经看过 <strong>tsdb-uid</strong> 表有两个列族，而其中的 <code>name</code> 列族对应的就是 <strong>UID</strong> 映射成字符串，而 <code>id</code> 列族对应字符串映射为 <strong>UID</strong>, 这正是这两个列族的作用，这样对于正反查找速度都是极快的。</p><p>此外，对于 <strong>UID 映射字符串</strong>的，每行数据，也就是 <code>rowkey</code> 相同的，至少包含三个列，分别是 <code>metrics</code>, <code>tagk</code>, <code>tagv</code>. 我们可以通过前三行结果看出。</p><p>到这里我们知道了 <strong>UID</strong> 与字符串间是怎么映射以便于查询的，但是 <strong>UID</strong> 到底是怎么生成的呢？</p><p>实际上大家在前面操作 <code>scan &#39;tsdb-uid&#39;</code> 的时候，结果会列出额外三行以 <code>\x00</code> 开头的数据：</p><div class="highlight-wrap"autocomplete="off" autocorrect="off" autocapitalize="off" spellcheck="false" contenteditable="true"data-rel="BASH"><figure class="iseeu highlight /bash"><table><tr><td class="gutter"><pre><span class="line">1</span><br><span class="line">2</span><br><span class="line">3</span><br><span class="line">4</span><br></pre></td><td class="code"><pre><span class="line">ROW                                      COLUMN+CELL </span><br><span class="line">\x00    column=id:metrics, timestamp=1528517476737, value=\x00\x00\x00\x00\x00\x00\x00\x01                                  </span><br><span class="line">\x00    column=id:tagk, timestamp=1528517476811, value=\x00\x00\x00\x00\x00\x00\x00\x02                                      </span><br><span class="line">\x00    column=id:tagv, timestamp=1528517476825, value=\x00\x00\x00\x00\x00\x00\x00\x02</span><br></pre></td></tr></table></figure></div><p>实际上 <strong>UID</strong> 是用 <strong>3 bytes</strong> 表示的非负整型数，并且是自增的，而自增的就要依赖于上一次插入的最新 <code>ID</code> 值，这三行就是分别保存 <em>metrics</em>, <em>tagk</em>, <em>tagv</em> 插入的最新数据的 <strong>UID</strong>，这样下次插入新的数据只要在对应的值上加 1 就能得到其对应的 <strong>UID</strong> 了。</p><h2 id="Data-Table-Schema"><a href="#Data-Table-Schema" class="headerlink" title="Data Table Schema"></a>Data Table Schema</h2><p>我们再看看 OpenTSDB 的实际存储时序数据的表 – <strong>tsdb</strong>。</p><p>既然 <strong>UID</strong> 与字符串的映射关系搞定了，那么真实的时序数据存储就好理解了。<em>tsdb</em> 保存了所有的时序数据，其 <code>rowkey</code> 就是由各个字段对应的 <strong>UID</strong> 组成的。</p><p>先查看下 <em>tsdb</em> 数据库结果：</p><div class="highlight-wrap"autocomplete="off" autocorrect="off" autocapitalize="off" spellcheck="false" contenteditable="true"data-rel="BASH"><figure class="iseeu highlight /bash"><table><tr><td class="gutter"><pre><span class="line">1</span><br><span class="line">2</span><br><span class="line">3</span><br><span class="line">4</span><br></pre></td><td class="code"><pre><span class="line">scan <span class="string">'tsdb'</span></span><br><span class="line"><span class="comment"># == 结果如下 ==</span></span><br><span class="line">ROW                COLUMN+CELL </span><br><span class="line">\x00\x00\x01[\x1Fa`\x00\x00\x01\x00\x00\x01\x00\x00\x02\x00\x00\x02 column=t:I\x00, timestamp=1528521000278, value=\x0A</span><br></pre></td></tr></table></figure></div><p>结果值太长了，可以分开看，先看列族里的数据【18.7.10 更正为】:</p><div class="highlight-wrap"autocomplete="off" autocorrect="off" autocapitalize="off" spellcheck="false" contenteditable="true"data-rel="PLAIN"><figure class="iseeu highlight /plain"><table><tr><td class="gutter"><pre><span class="line">1</span><br></pre></td><td class="code"><pre><span class="line">column=t:I\x00, timestamp=1528521000278, value=\x0A</span><br></pre></td></tr></table></figure></div><p>其中 <code>value=\x0A</code> 而 <code>0X0A</code> 化为十进制就是 <strong>10</strong>, 正好是我们前面上传的 <code>metric</code> 的值。</p><p>再看看 <strong>rowkey</strong>：</p><div class="highlight-wrap"autocomplete="off" autocorrect="off" autocapitalize="off" spellcheck="false" contenteditable="true"data-rel="PLAIN"><figure class="iseeu highlight /plain"><table><tr><td class="gutter"><pre><span class="line">1</span><br></pre></td><td class="code"><pre><span class="line">\x00\x00\x01[\x1Fa`\x00\x00\x01\x00\x00\x01\x00\x00\x02\x00\x00\x02</span><br></pre></td></tr></table></figure></div><p><code>rowkey</code> 是 <code>OpenTSDB</code> 设计的独特之处，其构成规则为：</p><div class="highlight-wrap"autocomplete="off" autocorrect="off" autocapitalize="off" spellcheck="false" contenteditable="true"data-rel="PLAIN"><figure class="iseeu highlight /plain"><table><tr><td class="gutter"><pre><span class="line">1</span><br></pre></td><td class="code"><pre><span class="line">[salt]&lt;metric_uid&gt;&lt;timestamp&gt;&lt;tagk1&gt;&lt;tagv1&gt;[...&lt;tagkN&gt;&lt;tagvN&gt;]</span><br></pre></td></tr></table></figure></div><p><code>salt</code> 是为了更好的分布式，</p><p>我们的上面添加的 <code>metric</code> 为，其中 <code>tagk</code> 会自动按字母排序，所以 <em>area</em> 排在前面：</p><div class="highlight-wrap"autocomplete="off" autocorrect="off" autocapitalize="off" spellcheck="false" contenteditable="true"data-rel="PLAIN"><figure class="iseeu highlight /plain"><table><tr><td class="gutter"><pre><span class="line">1</span><br><span class="line">2</span><br><span class="line">3</span><br><span class="line">4</span><br></pre></td><td class="code"><pre><span class="line"># 字符串对应</span><br><span class="line">sys.test.metric 1528784369 area shanghai hostname jiyiren</span><br><span class="line"># UID 对应 ( timestamp 先不变 )</span><br><span class="line">000001 1528784369 000001 000001 000002 000002</span><br></pre></td></tr></table></figure></div><p>除了 <em>timestamp</em> 和上面结果完全对应，而 <em>timestamp</em> 则是按小时存储的，也就是取 <strong>3600</strong> 的整数倍的 <em>timestamp</em> 作为当前时间戳。计算方法 <em>timestamp - timestamp % 3600</em>.</p><p>这样，我们应该对 <strong>OpenTSDB</strong> 的 <strong>UID</strong> 以及 <strong>Rowkey</strong> 的生成和存储结构都基本了解了。</p><h2 id="相关链接"><a href="#相关链接" class="headerlink" title="相关链接"></a>相关链接</h2><ul><li><a href="http://opentsdb.net/docs/build/html/index.html" target="_blank" rel="noopener">http://opentsdb.net/docs/build/html/index.html</a></li><li><a href="http://liubin.org/blog/2016/03/05/tsdb-opentsdb/" target="_blank" rel="noopener">http://liubin.org/blog/2016/03/05/tsdb-opentsdb/</a></li><li><a href="https://www.jianshu.com/p/0bafd0168647" target="_blank" rel="noopener">https://www.jianshu.com/p/0bafd0168647</a></li><li><a href="http://www.nosqlnotes.com/technotes/opentsdb-tabledesign/" target="_blank" rel="noopener">http://www.nosqlnotes.com/technotes/opentsdb-tabledesign/</a></li></ul><p>img.godjiyi.cn</p>]]></content>
    
    
    <summary type="html">&lt;p align=&quot;center&quot; style=&quot;margin: 30px 0 35px;&quot;&gt;时序处理数据库，更快的存储和聚合&lt;/p&gt;

&lt;p&gt;&lt;strong&gt;OpenTSDB&lt;/strong&gt; 是为存储时序数据而设计的，它基于 &lt;strong&gt;HBase&lt;/strong&gt; 存储数据，充分发挥了 &lt;strong&gt;HBase&lt;/strong&gt; 的分布式列存储特性，支持数百万每秒的读写，支持千万数目的 &lt;strong&gt;Metric&lt;/strong&gt;，它的特点就是容易扩展，具有灵活的 &lt;em&gt;Tag&lt;/em&gt; 机制。其主要用途，就是做监控系统，譬如收集大规模集群（ 包括网络设备、操作系统、应用程序 ）的 &lt;strong&gt;监控数据&lt;/strong&gt; 并进行存储和聚合查询，在目前的 &lt;strong&gt;IoT&lt;/strong&gt; 方面具有很大的应用价值。&lt;/p&gt;</summary>


    <category term="NoSQL" scheme="https://jiyiren.github.io/categories/NoSQL/"/>
    
    
    <category term="Metric" scheme="https://jiyiren.github.io/tags/Metric/"/>
    
    <category term="OpenTSDB" scheme="https://jiyiren.github.io/tags/OpenTSDB/"/>
    
  </entry>
  
</feed>