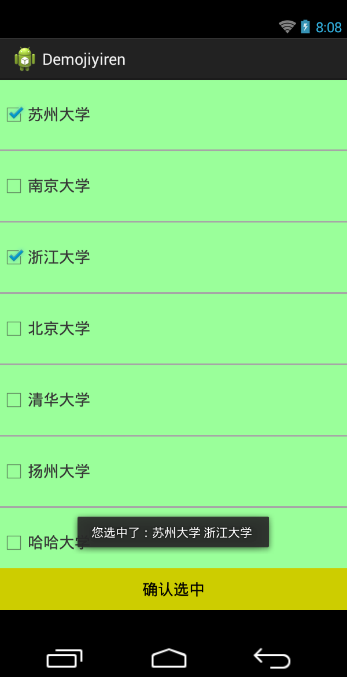
Android 中多选 ListView 的实现

实现效果

开始效果

多选后点击按钮效果

实现过程

添加ListView

layout布局中添加ListView,将 android:choiceMode="multipleChoice"属性设置成这样

自定义item布局

自定义ListView的item布局,这个布局和非多选的ListView的item布局设置一样。效果如下:

自定义itemview

为ListView的item布局写一个自定义View。正常的ListView实现时,item的布局是在自定义adapter里实现的,但是因为本ListView 是多选,如果只在adapter里调用item的Layout布局则不能实现多选。因为多选的ListView要求单个item的最外层布局要实现Checkable接口,这样多选ListView就能自己调用实现好的接口提供多选结果给我们。
自己写的View如下:

1
2
3
4
5
6
7
8
9
10
11
12
13
14
15
16
17
18
19
20
21
22
23
24
25
26
27
28
29
30
31
32
33
34
35
36
37
38
39
40
41
42
43
44
45
46
47
48
49
50
51
52
53
/**
* @author JIYI
*/
public class MultipleChoiceListItem extends LinearLayout implements Checkable{

private CheckBox mCheckBox;
private TextView mTextView;
public MultipleChoiceListItem(Context context) {
super(context);
initview(context);
// TODO Auto-generated constructor stub
}

public MultipleChoiceListItem(Context context, AttributeSet attrs) {
super(context, attrs);
initview(context);
// TODO Auto-generated constructor stub
}

public MultipleChoiceListItem(Context context, AttributeSet attrs, int defStyle) {
super(context, attrs, defStyle);
initview(context);
// TODO Auto-generated constructor stub
}
private void initview(Context context){
LayoutInflater inflater=LayoutInflater.from(context);
View v=inflater.inflate(R.layout.choicelistitem, this,true);
mCheckBox=(CheckBox) v.findViewById(R.id.syminfo_item_cb);
mTextView=(TextView) v.findViewById(R.id.syminfo_item_tv);
}

public void setText(String text){
mTextView.setText(text);
}
@Override
public void setChecked(boolean checked) {
// TODO Auto-generated method stub
mCheckBox.setChecked(checked);
}

@Override
public boolean isChecked() {
// TODO Auto-generated method stub
return mCheckBox.isChecked();
}

@Override
public void toggle() {
// TODO Auto-generated method stub
mCheckBox.toggle();
}

}

自定义 Adapter

主要是 getView() 方法里要用到刚刚自定义的 View. 为什么直接new 一个对象,就是让 item 的最外层布局是实现了 Checkable 接口的控件。

1
2
3
4
5
6
7
8
9
10
11
12
13
14
15
16
17
18
19
20
21
22
23
24
25
26
27
28
29
30
31
32
33
34
35
36
37
38
39
40
41
public class MultipleLvAdapter extends BaseAdapter {

private List<String> mlistdata;
private Context context;
public MultipleLvAdapter(List<String> mlistdata,Context context) {
// TODO Auto-generated constructor stub
this.mlistdata=mlistdata;
this.context=context;
}
@Override
public int getCount() {
// TODO Auto-generated method stub
return mlistdata.size();
}

@Override
public Object getItem(int position) {
// TODO Auto-generated method stub
return mlistdata.get(position);
}

@Override
public long getItemId(int position) {
// TODO Auto-generated method stub
return position;
}

@Override
public boolean hasStableIds() {
// TODO Auto-generated method stub
return true;
}
@Override
public View getView(int position, View convertView, ViewGroup parent) {
// TODO Auto-generated method stub
MultipleChoiceListItem choicelistitem=new MultipleChoiceListItem(context);
choicelistitem.setText(mlistdata.get(position));
return choicelistitem;
}

}

调用

Activity 中调用即可。

1
2
3
4
5
6
7
8
9
10
11
12
13
14
15
16
17
18
19
20
21
22
23
24
25
26
27
28
29
30
31
32
33
34
35
36
37
38
39
40
41
42
43
44
45
46
47
48
49
50
51
52
53
54
55
56
57
58
59
60
/**
*
* @author JIYI
*
*/
public class AtyMultipleListView extends Activity implements OnClickListener{

private ListView mlistview;
private MultipleLvAdapter madapter;
private List<String> mlistdata=new ArrayList<String>();


@Override
protected void onCreate(Bundle savedInstanceState) {
// TODO Auto-generated method stub
super.onCreate(savedInstanceState);
setContentView(R.layout.atymultiplelistview);
mlistview=(ListView) findViewById(R.id.multiplelv);
getData();
madapter=new MultipleLvAdapter(mlistdata, this);
/*ArrayAdapter<String> arrayAdapter=new ArrayAdapter<>(this,
android.R.layout.simple_list_item_multiple_choice, objects);*/
mlistview.setAdapter(madapter);

findViewById(R.id.multiplebt).setOnClickListener(this);
}

private void getData(){
mlistdata.add("苏州大学");
mlistdata.add("南京大学");
mlistdata.add("浙江大学");
mlistdata.add("北京大学");
mlistdata.add("清华大学");
mlistdata.add("扬州大学");
mlistdata.add("哈哈大学");
mlistdata.add("呵呵大学");
mlistdata.add("咯咯大学");
}

@Override
public void onClick(View v) {
switch (v.getId()) {
case R.id.multiplebt:
okClick();
break;
}
}

private void okClick(){
//保证自定义的MultipleLvAdapter里面的hasStableIds()方法返回true
long selected[]=mlistview.getCheckedItemIds();
//int count=mlistview.getCheckedItemCount();这是获取选中的总数
String str="您选中了:";
for (int i = 0; i < selected.length; i++) {
str=str+mlistdata.get(((int)selected[i]))+" ";
}
Toast.makeText(AtyMultipleListView.this, str, Toast.LENGTH_SHORT).show();
}
}

注意点

  • 如果要在 Adapter 里直接用 item 的布局,可以将 item 布局的最外层的 Layout 控件改为自己实现 Checkable 接口的控件即可。

  • item 中的图标更换,是在 item 布局中 CheckBox 控件的 background 更改的。你只需在 drawable 文件夹下新建一个 checkboxbutton_bac.xml 的文件,在里面写一个 selector 即可,如下:

1
2
3
4
5
<?xml version="1.0" encoding="utf-8"?>
<selector xmlns:android="http://schemas.android.com/apk/res/android">
<item android:drawable="@drawable/btn_check_on_holo_light" android:state_checked="true"></item>
<item android:drawable="@drawable/btn_check_off_holo_light" android:state_checked="false"></item>
</selector>

注意其中的 state_checked=“false”或者"true"

为什么要用多选 ListView 呢?这个主要是为不定选项而设计的,并且多选 ListView 可以提供一个很好的方法获取所点击的item的id,即:
long selected[]=mlistview.getCheckedItemIds(); 还有获取选中的个数的方法: int count=mlistview.getCheckedItemCount(); 等等,大家可以自己测试。

苟且一下